Showing posts with label Heartfelt Creations-Calla Lily Collection. Show all posts

Saturday, 4 January 2020

A Regal Celebration

Dear Friends,

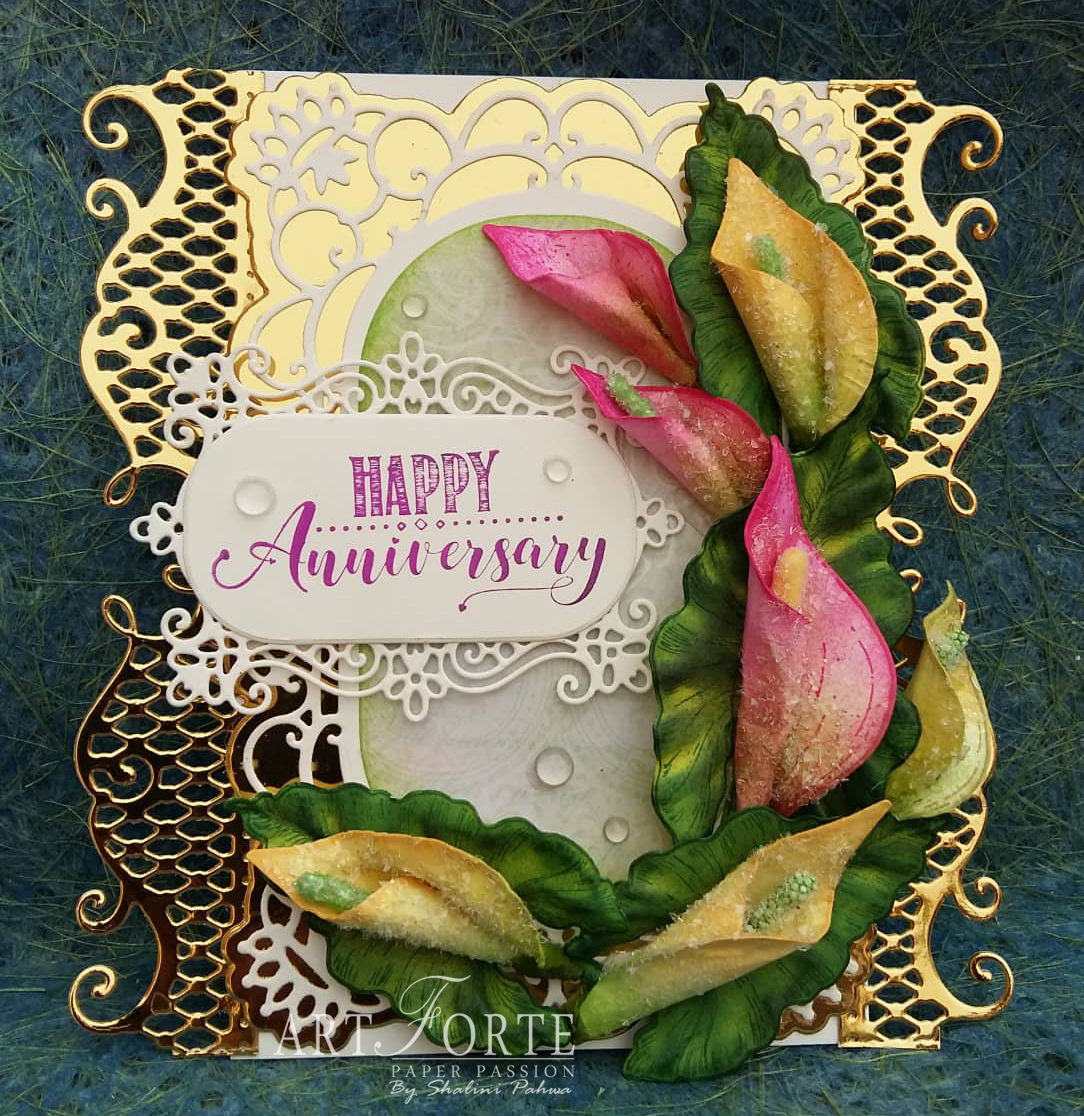
Another inspiration for Heartfelt Creations-Calla Lily Collection...
Here's the picture


Products Used:
Designer Dries Clear Adhesive, 159723
Double Dots 100pc. -3D Foam Circles, DDOTS
Decorative Pocket Accents Die, HCD1-7211
Regal Frame & Accents Die, HCD1-7248
Calla Lily Die, HCD1-7275
Eyelet Lace Frames Die, HCD2-7192
Stack and Store Daubers-Pack of 30, HCDA2-450
Calla Lily Paper Collection, HCDP1-2110
3D Calla Lily Shaping Mold, HCFB1-484
Luxe Gold Cardstock, HCGP1-488
Celebrate Love Sentiments Cling Stamp Set, HCPC-3847
Calla Lily Cling Stamp Set, HCPC-3897
Pastel Pollen Stamens - Medium, HCS1-485
Rajni Chawla's Crystal Clear, PGM15015
Ranger Archival Ink Pad - Leaf Green, RACP436
Ranger Archival Ink Pad - Library Green, RACP475
Ranger Archival Ink Pad - Vibrant Fuchsia, RACP524
Ranger Archival Ink Pad - Vivid Chartreuse, RACP531

Other Products: White cardstock, Big Shot Machine, Diamond Dust, Clear Drops.

For more tips on creating with the Calla Lily Collection watch the tutorial at https://youtu.be/VWKPoXjpiug.

Instructions: Card Base size is 4” x 6” and it’s a tent fold card.

Cut one die from Regal Frame & Accents Die from white cardstock and cutting a layer from gold cardstock. Cut two dies from Decorative Pocket Accents Die from gold cardstock and adhere it on the left side edge and right side edge using Designer Dries Clear Adhesive. Cut one oval die from Regal Frame & Accents Die using pattern paper and adhere it as shown. Cut one die from Eyelet Lace Frames Die on white cardstock and layer it with another oval die cut from Regal Frame & Accents Die on white cardstock. Add sentiment from Celebrate Love Sentiments Cling Stamp Set using archival ink-Vibrant Fuchsia.

Now stamp a few Calla Lily flowers and leaves using archival ink Vibrant Fuchsia and Library green, cut them with coordinating dies and color them with Vibrant Fuchsia and Vivid Chartreuse on both the sides, and for leaves color them with leaf green on both sides and shape them using Calla Lily 3D Shaping Mold. For flowers, twirl them, then add stamen and diamond dust. For Leaves color them with archival ink-library green on the edges of leaves.

Stamp few Calla Lily flowers using archival ink- leaf green for flowers and cut them with coordinating die and color them with Vivid Chartreuse and sunflower on both the sides, and shape them using Calla Lily 3D Shaping Mold, twirl them, add stamen and diamond dust.

Now assemble all flowers and leaves as pictured and add a few clear drops.

Tuesday, 24 December 2019

My Life, My Love, My World

Dear Friends,
Merry Christmas to all of you. Today i have another inspiration from Heartfelt Creations-Calla Lily Collection. Here's the picture...


Products Used:
Designer Dries Clear Adhesive, 159723
Color In Watercolor Brush - Fine, 409311
Zig Clean Color Real Brush Markers - 36 Pack, 478455
Double Dots 100pc. -3D Foam Circles, DDOTS
Fanci-Fold Pocket & Accents Die, HCD1-7246
Regal Pocket Accents Die, HCD1-7247
Swirly Border Accents Die, HCD1-7262
Rounded Window Frame Die, HCD1-7271
Calla Lily Die, HCD1-7275
Swan Lake Die, HCD1-7277
Stack and Store Daubers-Pack of 30, HCDA2-450
Calla Lily Paper Collection, HCDP1-2110
3D Calla Lily Shaping Mold, HCFB1-484
Calla Lily Cling Stamp Set, HCPC-3897
Swan Lake Cling Stamp Set, HCPC-3899
Deluxe Flower Shaping Paper Pack of 50 - White, HCPP1-475
Pastel Pollen Stamens - Medium, HCS1-485
Rajni Chawla's Crystal Clear, PGM15015

Other Products: White cardstock, Big Shot Machine, Diamond Dust.

For more tips on creating with the Calla Lily Collection watch the tutorial at https://youtu.be/VWKPoXjpiug.

Instructions: Card Base is 6”x 6”. Adhere pattern paper from the Collection with torn edges.

Cut two corner dies from Fanci-Fold Pocket & Accents Die from white cardstock and adhere them on top left edge and bottom right edge of card. Cut one Rounded Window Frame Die from white cardstock and adhere it on the center of card. Cut both Swirly Border Accents Die from gold cardstock and adhere them on left and right side using Designer Dries Clear Adhesive. Cut two Regal Pocket Accents Die from gold cardstock and adhere them on the right top edges and left bottom edges with foam tape. Add sentiment from paper collection.

Now Stamp one Swan with flowers and leaves image from Swan Lake Cling Stamp Set on white cardstock using archival ink-Jet Black and cut it with coordinating Die. Color with Zig Clean Color Real Brush Markers using Color In Watercolor Brush-Fine and adhere it with foam tape. Add crystal clear glitter.

Now stamp a few Calla Lily flowers and leaves using archival ink- leaf green for flowers and Library green for leaves, cut them with coordinating die and color them with Vivid Chartreuse and sunflower on both sides. For the leaves, color them with leaf green on both sides and shape them using Calla Lily 3D Shaping Mold and for flowers twirl them as pictured and then add stamen and diamond dust. For Leaves color them with archival ink-library green on the edges of leaves.

Now assemble all flowers and leaves as pictured.

Wednesday, 18 December 2019

Beautiful Birthday Blooms

Dear Friends,

Come alongside us as we celebrate the grandest occasions in life with the most elegant of flowers…the NEW Calla Lily Collection! by Heartfelt Creations. Here's my inspiration for today...


Products Used:
Designer Dries Clear Adhesive, 159723
Color In Watercolor Brush - Fine, 409311
Zig Clean Color Real Brush Markers - 36 Pack, 478455
Double Dots 100pc. -3D Foam Circles, DDOTS
Album Tags and Accents Die, HCD1-7202
Ornamental Tags Die, HCD1-7203
Swirly Accent Spray Die, HCD1-7263
Calla Lily Die, HCD1-7275
Feathery Swan Die, HCD1-7276
Stack and Store Daubers-Pack of 30, HCDA2-450
Calla Lily Paper Collection, HCDP1-2110
3D Calla Lily Shaping Mold, HCFB1-484
Special Birthday Sentiments Cling Stamp Set, HCPC-3843
Calla Lily Cling Stamp Set, HCPC-3897
Feathery Swan Cling Stamp Set, HCPC-3898
Deluxe Flower Shaping Paper Pack of 50 - White, HCPP1-475
Pastel Pollen Stamens - Medium, HCS1-485
Rajni Chawla's Crystal Clear, PGM15015

Other Products: White cardstock, Big Shot Machine, Diamond Dust.

For more tips on creating with the Calla Lily Collection watch the tutorial at https://youtu.be/VWKPoXjpiug.

Instructions: Card Base 6”x 6”. Cut pattern paper from the Calla Lily Collection, tear edges and adhere to the card base.

Cut two Swirly Accent Spray Die on white cardstock and add crystal clear glitter. Cut two borders of the same die from pink pattern paper from the collection and distress the edges. Now assemble these two layers as pictured.

Cut one die from Album Tags and Accents Die from white cardstock and adhere it with foam tape.

Cut one die from Ornamental Tags Die on white cardstock and add sentiment from Special Birthday Sentiments using archival ink- Vibrant Fuchsia and adhere.

Now Stamp one Swan image from Feathery Swan Cling Stamp Set on white cardstock using archival ink-Jet Black, cut with coordinating die and color it with Zig Clean Color Real Brush Markers using Color In Watercolor Brush-Fine. Adhere it with foam tape on the right bottom edge of the Album Tags Die and add crystal clear glitter.

Now stamp a few Calla Lily flowers and leaves using archival ink Vibrant Fuchsia and Library green, cut them with coordinating dies and color them with Vibrant Fuchsia and Vivid Chartreuse on both the sides for the flowers and with leaf green for the leaves on both sides. Shape them using Calla Lily 3D Shaping Mold and for flowers, twirl them as shown, add stamen and then add diamond dust. For Leaves color them with archival ink-library green on the edges of leaves.

Now adhere all flowers and leaves.

Wednesday, 11 December 2019

Golden Anniversary Easel-Debuting the Calla Lily Collection

Dear Friends,

So, come alongside us as we celebrate the grandest occasions in life with the most elegant of flowers…introducing the NEW Calla Lily Collection! by Heartfelt Creations. Here's my inspiration for today...


Products Used:
Designer Dries Clear Adhesive, 159723
Color In Watercolor Brush - Fine, 409311
Zig Clean Color Real Brush Markers - 36 Pack, 478455
Double Dots 100pc. -3D Foam Circles, DDOTS
Eyelet Circle & Basics Small Die, HCD1-7154
Ornamental Tags Die, HCD1-7203
Decorative Pocket Accents Die, HCD1-7211
Swirly Border Accents Die, HCD1-7262
Rounded Window Frame Die, HCD1-7271
Rounded Lattice Window Die, HCD1-7274
Calla Lily Die, HCD1-7275
Feathery Swan Die, HCD1-7276
Swan Lake Die, HCD1-7277
Stack and Store Daubers-Pack of 30, HCDA2-450
Calla Lily Paper Collection, HCDP1-2110
3D Calla Lily Shaping Mold, HCFB1-484
Luxe Gold Cardstock, HCGP1-488
Celebrate Love Sentiments Cling Stamp Set, HCPC-3847

Other Products: White cardstock, Big Shot Machine, Diamond Dust, distress oxides-peeled paint.

For more tips on creating with the Calla Lily Collection watch the tutorial at https://youtu.be/VWKPoXjpiug.

Instructions: Card Base 6” x 6” and create Easel Fold card. Take top flap and fold it into half and take another cardstock measuring 6” x 6” and paste it on the top half fold and the easel card it ready. Adhere the pattern paper from the Collection with torn edges on top flap and inside of card as pictured.

Cut three Decorative Pocket Accents Die on gold cardstock and adhere on the top edges and the bottom edges. Cut one Rounded Lattice Window Die on gold cardstock and adhere it using Designer Dries Clear Adhesive. Cut one Rounded Window Frame Die on white cardstock and adhere it with foam tape as seen on picture.

Cut one small circle on white cardstock and add sentiment from Celebrate Love Sentiments using archival ink-Vibrant Fuchsia and then stamp small a portion of feathery swam wings using distress oxides-peeled paint and sprinkle crystal clear glitter. Now adhere this embellishment using foam tape.

Now Stamp one Swan image from Swan Lake Cling Stamp Set on white cardstock using archival ink-Jet Black and cut it with coordinating Die and color it with Zig Clean Color Real Brush Markers using Color In Watercolor Brush-Fine and adhere it with foam tape on the left bottom edge and add crystal clear glitter.

Now stamp Calla Lily flowers and leaves using archival ink-Vibrant Fuchsia and Library green, cut them with coordinating die and color them with Vibrant Fuchsia and Vivid Chartreuse on both the sides. For leaves color them with leaf green on both sides and shape them using Calla Lily 3D Shaping Mold. For flowers, twirl them pictured and then add stamen and diamond dust. For Leaves color them with archival ink-library green on the edges of leaves.

Stamp few Calla Lily using archival ink- leaf green for flowers and cut them with coordinating die and color them with Vivid Chartreuse and sunflower on both the sides, and shape them using Calla Lily 3D Shaping Mold and twirl them as seen on picture and add stamen and then add diamond dust, as seen on picture.

Now assemble all flowers and leaves. Cut two Swirly Border Accents Die on gold cardstock and tear it and randomly add them between flowers.

Cut two Ornamental Tags Die on white cardstock and color it with Vibrant Fuchsia and create a label as seen on picture. Another layer of white cardstock and add sentiment.