Wednesday 28 December 2022

Beauteous Background

Dear Friends,
Another inspiration for today with Heartfelt Creations-Floral Basket Collection. As we come to the close of 2022, so excited to bring you the last set of creative inspiration that will get you a jumpstart in creating your 2023 cards. Here's the picture...


Products Used:

Instructions:
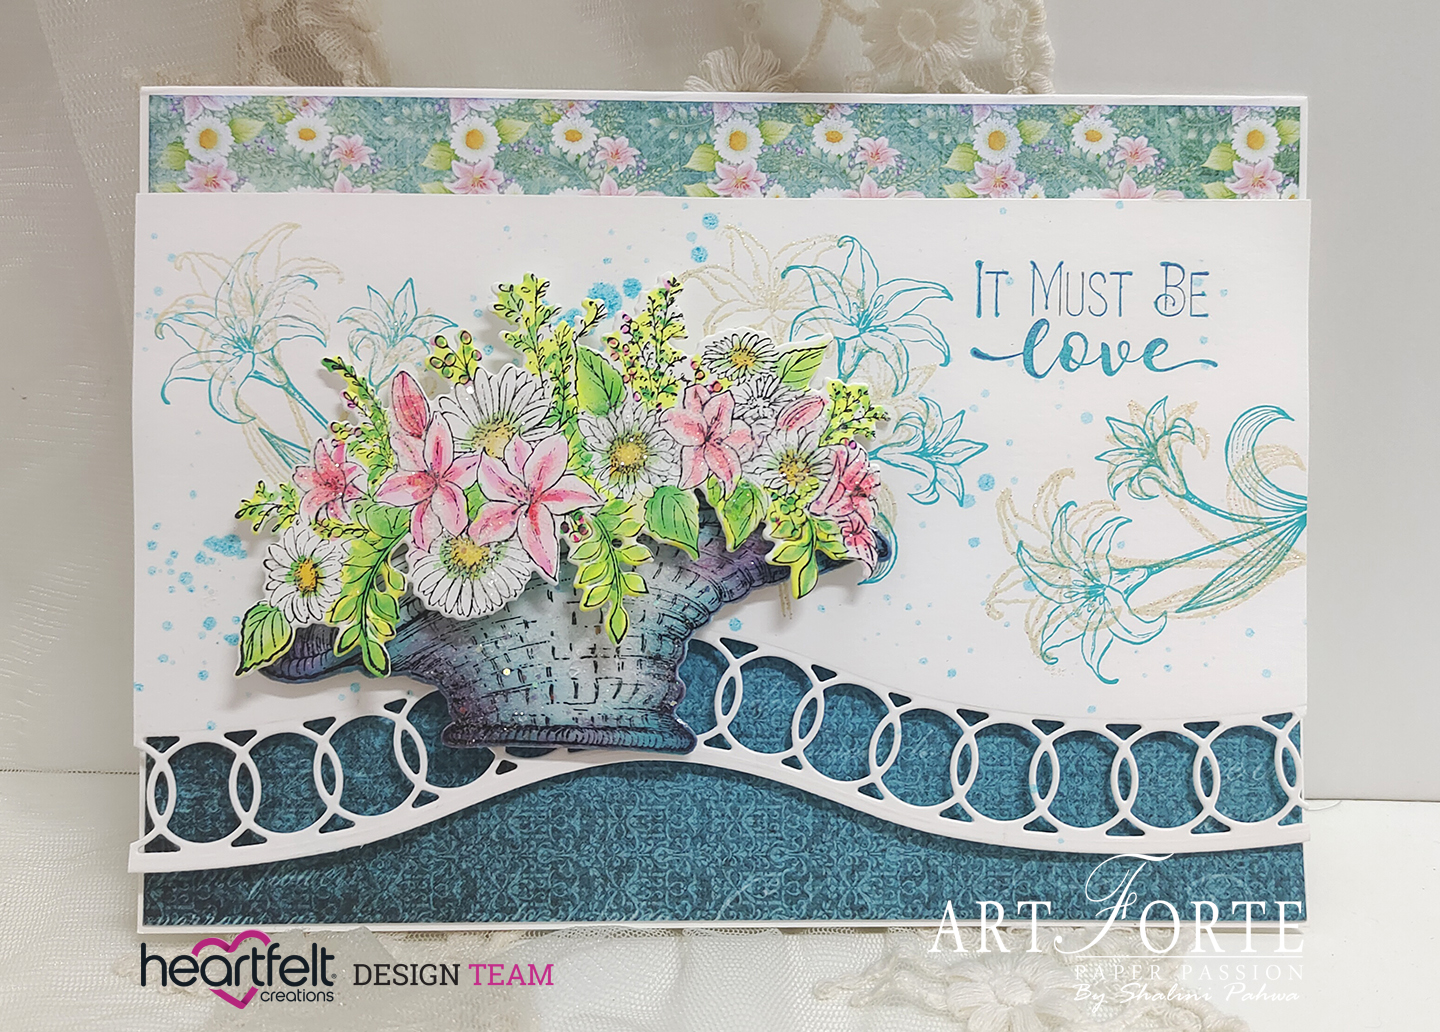
Card size 5” x 7” (final size). Take two different pattern papers from HCDP1-2146 Floral Basket Paper Collection, size 2.5”x6.875”, adhere them on card base. Take another white cardstock size 4” x 6.875” and cut die cut on the bottom side using HCD3-7442 Curvy Decorative Border Die.
Now stamp flower image from HCPC-31010 Basket Blooms Cling Stamp Set using archival ink-garden patina. Using same stamp use versamark ink pad and sprinkle embossing powder-enchanted gold and heat set. Add sentiment on the right from HCPC-3847 Celebrate Love Sentiments Cling Stamp Set using archival ink-Garden Patina.
Sprinkle some drops of splatter of water adding archival ink-forget me not re inker drops in water on the background.
Stamp one basket image from HCPC-31008 Wicker Basket Cling Stamp on white cardstock using Stazon ink-jet black, cut it with coordinating HCD1-7436 Wicker Basket Die. Color them using archival ink-garden patina and night sky, add 3d crystal lacquer and add crystal clear glitter.
Stamp one bloom image from HCPC-31010 Basket Blooms Cling Stamp Set on white cardstock, cut it with coordinating HCD1-7438 Basket Blooms Die. Color using Zig markers.
Arrange images as pictured.
Other Products: Big Shot Plus Machine, Versamark Ink Pad, Ranger Embossing Powder-Enchanted Gold.

Wednesday 21 December 2022

Lattice Oval Blooms

Dear Friends,

If you’ve been looking for a new way to create an elegant floral bouquet, look no further than the Heartfelt Creations-Floral Basket Collection! Regardless of your skill level, your cards will be bursting with florals and beauty, demanding the attention they deserve! Here's my inspiration for today...


Products Used:

Instructions:
Card size 9” x 4” (final size). Take pattern paper from HCDP1-2146 Floral Basket Paper Collection, size 8.875” x 3.875”.  Cut another die from HCD3-7431 Slim Eyelet Rectangle Die ( 2nd largest die) on white cardstock. Take another layer of die and cut it on pattern paper from die HCD3-7432 Slim Basic Rectangle Die (2rd largest die) on pattern paper and adhere it on white cardstock using designer dries clear adhesive. Now adhere this layer using foam tape. Cut one die from HCD3-7433 Slim Lattice Oval Die on white cardstock and adhere it using foam tape. Next cut one eyelet circle die from HCD1-7154 Eyelet Circle & Basics Small Die on white cardstock, adhere it using foam tape, sprinkle some drop of splatter of water adding archival ink-forget me not re-inker drops in water.
Stamp one basket, handle and ribbon image from HCPC-31008 Wicker Basket Cling Stamp on white cardstock using Stazon ink-jet black, cut it with coordinating die HCD1-7436 Wicker Basket Die. Color them using archival ink-garden patina and night sky, add 3d crystal lacquer and add crystal clear glitter.
Stamp one bloom image from HCPC-31010 Basket Blooms Cling Stamp Set on white cardstock, cut it with coordinating die HCD1-7438 Basket Blooms Die. Color using Zig markers andarrange them as pictured.
Cut one tag die from HCD1-7202 Albums Tags and Accents Die, on white cardstock. Stamp sentiment from HCPC-3843 Special Birthday Sentiments Cling Stamp using archival ink-garden patina and night sky. Adhere using foam tape.
Other Products: Big Shot Plus Machine.

Tuesday 13 December 2022

Beauty in Bloom

 Dear Friends

Today's the day Heartfelt Creations -Floral Basket Collection becomes available to everyone!
Have you been feeling bored with “basic” card making? Looking for a fresh new take on your floral cards? Go from basic to Wow with the Floral Basket Collection! Create stunning cards with the large floral basket and fill it with a beautiful floral display that will leave your friends awestruck!


Instructions:

Card size 6” x 6” (final size). Take pattern paper from HCDP1-2146 Floral Basket Paper Collection, adhere it on card base, using designer dries clear adhesive. Cut white cardstock size 5” x 5”, stamp HCPC-31009 Basket Florals Cling Stamp using archival ink-garden patina, adhere it using foam tape.
Cut one die from HCD2-7426 Oval Filigree Frame die on white cardstock, sprinkle some drops of splatter of water adding archival ink-forget me not re-inker drops in water. Adhere this die cut using foam tape.

Stamp one basket, handle and ribbon image from HCPC-31008 Wicker Basket Cling Stamp on white cardstock using Stazon ink-jet black, cut it with coordinating die HCD1-7436 Wicker Basket Die. Color them using archival ink-garden patina and night sky, add 3d crystal lacquer and add crystal clear glitter.

Stamp one bloom image from HCPC-31010 Basket Blooms Cling Stamp Set on white cardstock, cut it with coordinating die HCD1-7438 Basket Blooms Die. Color them using Zig markers. Arrange everything as pictured.

Add sentiment using HCD1-7203 Ornamental Tags die. Cut base die on white cardstock and the upper layer on pattern paper. Adhere it using foam tape.

Other Products: Big shot plus machine.

Friday 25 November 2022

Slimline Clematis Wishes

Dear Friends,

Happy Black Friday....we hope your day is off to a great start and that you had a wonderful Thanksgiving Day with your family & friends. We are so EXCITED to debut Heartfelt Creations Black Friday New Product Releases along with the once a year Black Friday Savings!

Black Friday Savings

You can see all the details here: https://www.heartfeltcreations.us/black-friday

Save up to 20% on new products.

Doorbuster Special: Place a $100 order and choose a FREE paper pad of your choice!

If you are an Insider member, your 20% discount will also apply + Free Shipping. Not an Insider member, click here for details: https://www.heartfeltcreations.us/insider

These savings will only be valid on Black Friday, November 25th, 2022. 

Here's my inspiration for today...


Products Used:

Slim Eyelet Rectangle Die, HCD3-7431

Slim Basic Rectangle Die, HCD3-7432

Slim Lattice Oval Die, HCD3-7433

Climbing Clematis Paper Collection, HCDP1-2128

Clematis Cling Stamp Set, HCPC-3954

Clematis Die, HCD1-7355

3D Clematis Shaping Mold, HCFB1-5006

Leafy Accents Cling Stamp Set, HCPC-3835

Leafy Accents Die, HCD1-7193

3D Leafy Accents Shaping Mold, HCFB1-467

Deluxe Flower Shaping Paper Pack of 50 - White, HCPP1-475

Luxe Gold Cardstock, HCGP1-488

Stack and Store Daubers-Pack of 30, HCDA2-450

Double Dots 100pc. -3D Foam Circles, DDOTS

Designer Dries Clear Adhesive, 159723

Rajni Chawla's Crystal Clear, PGM15015

Ranger Archival Ink Pad - Leaf Green, RACP436

Ranger Archival Ink Pad - English Ivy, RACP970

Ranger Archival Ink Pad - Vibrant Fuchsia, RACP524

Ranger Archival Ink Pad - Majestic Violet, RACP494

Instructions:

Slim line card size is 9.5” x 4.25”. Cut one large HCD3-7431 Slim Eyelet Rectangle die on white cardstock and adhere it using foam tape. Cut one HCD3-7432 Slim Basic Rectangle Die on pattern paper and adhere it using designer dries clear adhesive. Cut another layer on luxe gold cardstock from HCD3-7431 Slim Eyelet Rectangle die, adhere it using foam tape. Cut another layer of die HCD3-7432 Slim Basic Rectangle Die on pattern paper and adhere it using designer dries clear adhesive.

Cut HCD3-7433 Slim Lattice Oval Die on white cardstock and luxe gold cardstock, adhere them together a little offset and adhere it on card using designer dries clear adhesive. Stamp the sentiment in the center.

Stamp some clematis flower images using HCPC-3954 Clematis Cling Stamp Set on Deluxe Flower Shaping Paper using archival ink- Majestic Violet. Cut them with coordinating die HCD1-7355. Color them using archival ink-majestic violet and violet. Shape them using HCFB1-5006 3D Clematis Shaping Mold and use groove tool also to give some more dimension. Then add gold beads, then sprinkle crystal clear glitter using Designer Dries Clear Adhesive.

Stamp some leaves from HCPC-3835 Leafy Accents Cling Stamp on deluxe flower shaping paper using archival ink- English ivy and cut them with coordinating die. Color them using archival ink-leaf green and English ivy. Shape them using HCFB1-467 3D Leafy Accents Shaping Mold.

Arrange these flowers and leaves as pictured.

Other Products: Big Shot Plus Machine, Gold Beads.

Wednesday 9 November 2022

Special Place in My Heart-Debuting Heartfelt Creations-Friendship Rose Collection

 Dear Friends,

Today's the day, Heartfelt Creations - Friendship Rose Collection becomes available to everyone!

Do you love creating elegant roses but you need some elegant background images to pair them with? Maximize your creativity with the versatility of the Friendship Rose Collection and use it as a focal point on your card. Here's my inspiration for today...


Products Used:

Friendship Rose Paper Collection, HCDP1-2145

Friendship Rose Heart Clig Stamp Set, HCPC-31005

Friendship Rose Heart Die, HCD1-7428

Decorative Heart Die, HCD2-7430

Friendship Sentiments Cling Stamp Set, HCPC-31007

Small Wild Rose Cling Stamp Set, HCPC-3906

Small Wild Rose Die, HCD1-7289

Small 3D Wild Rose Shaping Mold, HCFB1-486

Leafy Accents Cling Stamp Set, HCPC-3835

Leafy Accents Die, HCD1-7193

3D Leafy Accents Shaping Mold, HCFB1-467

Deluxe Flower Shaping Paper Pack of 50 - White, HCPP1-475

Luxe Gold Cardstock, HCGP1-488

Stack and Store Daubers-Pack of 30, HCDA2-450

Double Dots 100pc. -3D Foam Circles, DDOTS

Designer Dries Clear Adhesive, 159723

Rajni Chawla's Crystal Clear, PGM15015

Ranger Archival Ink Pad - Leaf Green, RACP436

Ranger Archival Ink Pad - English Ivy, RACP970

Ranger Archival Ink Pad - Vibrant Fuchsia, RACP524

Ranger Archival Ink Pad - Magenta Hue, RACP614

Ranger Archival Ink Pad - Light House, RACP771

StazOn Ink Pad - Jet Black, TSSZ31

Spellbinders Tool N' One, 359848

Instructions:

Card size 5”x7”. Take two different pattern papers from HCDP1-2145 Friendship Rose Paper Collection, tear edges and adhere it on card base.

Cut HCD2-7430 Decorative Heart Die on white cardstock and luxe gold cardstock, adhere them together a little offset and then paste it on card base using foam tape. Cut another layer of heart base die on luxe gold cardstock and intricate heart die on white cardstock, adhere them together using designer dries clear adhesive and then adhere this die using foam tape. Stamp sentiment from  HCPC-31007 Friendship sentiments Cling Stamp using archival ink vibrant fuchsia on heart die cut and adhere it using foam tape.

Stamp rose with stem image on white cardstock using archival ink-light house and jet black ink, cut it with coordinating die HCD1-7428 Friendship Rose Heart Die, add crystal clear glitter and adhere using foam tape, as shown.

Stamp some flower petals from HCPC-3906 Small Wild Rose Cling Stamp on deluxe flower shaping paper using archival ink-magenta hue and cut it with coordinating die HCD1-7289 Small Wild Rose Die and color them using archival ink-magenta hue and leaf green. Shape them using Small 3D Wild Rose Shaping Mold. Create rose flower and some small flowers.  Add gold beads on small flowers.

Stamp some leaves from HCPC-3835 Leafy Accents Cling Stamp on deluxe flower shaping paper using archival ink- English ivy and cut them with coordinating die. Color them using archival ink-leaf green and English ivy. Shape them using HCFB1-467 3D Leafy Accents Shaping Mold.

Arrange all flowers and leaves as pictured.

Other Products: Big Shot Plus Machine


Tuesday 1 November 2022

Subtly Stamped Floral

 Dear Friends,

Do you need to get back into your craft room and create something pretty? Here's another inspiration with Heartfelt Creations- Elegant Rose Frames Collection...


Products Used:

Elegant Rose Frames Paper Collection, HCDP1-2144

Stylish Rose Frame Cling Stamp Set, HCPC-31003

Stylish Rose Frame Die, HCD1-7421

Elegant Rose Sentiments Cling Stamp Set, HCPC-31004

Elegant Rose Sentiments Die, HCD1-7422

Filigree Accents Die, HCD2-7427

Small Wild Rose Cling Stamp Set, HCPC-3906

Small Wild Rose Die, HCD1-7289

Small 3D Wild Rose Shaping Mold, HCFB1-486

Leafy Accents Cling Stamp Set, HCPC-3835

Leafy Accents Die, HCD1-7193

3D Leafy Accents Shaping Mold, HCFB1-467

Deluxe Flower Shaping Kit, HCST1-401

Deluxe Flower Shaping Paper Pack of 50 - White, HCPP1-475

Luxe Gold Cardstock, HCGP1-488

Stack and Store Daubers-Pack of 30, HCDA2-450

Double Dots 100pc. -3D Foam Circles, DDOTS

Lettuce Entertain You Prills, ANC814

Designer Dries Clear Adhesive, 159723

Ranger Archival Ink Pad - Leaf Green, RACP436

Ranger Archival Ink Pad - English Ivy, RACP970

Ranger Archival Ink Pad - Vibrant Fuchsia, RACP524

Ranger Archival Ink Pad - Magenta Hue, RACP614

Rajni Chawla's Crystal Clear, PGM15015

Spellbinders Tool N' One, 359848

Instructions:

Card size 6” x 6” (final size). Take pattern paper from HCDP1-2144 Elegant Rose Paper Collection, tear edges and adhere it using designer dries clear adhesive.

Take white cardstock size 6 ’x 4”, cut die from HCD2-7427 Filigree Accents Die, combining two dies together on white cardstock, from same set cut this die on luxe gold cardstock measuring size 6” x 2”. Adhere them together a little offset using designer dries clear adhesive. Adhere on card using foam tape, as shown. Add stamp image from HCPC-31003 Stylish Rose Frame Cling Stamp randomly using archival ink-magenta hue.

Stamp border image from HCPC-31003 Stylish Rose Frame Cling Stamp using archival ink-Magenta Hue and English Ivy and cut with coordinating die. Add crystal clear glitter randomly. Adhere using glue gun.

Stamp HCPC-31004 Elegant Rose Sentiments Cling Stamp on white cardstock using archival ink-Vibrant Fuchsia and English Ivy, cut it with coordinating HCD1-7422 Elegant Rose Sentiments Die. From same die set cut one base die on white cardstock. Combine sentiment and base die cut using designer dries clear adhesive and then adhere it using foam tape.

Stamp some flower petals from HCPC-3906 Small Wild Rose Cling Stamp on deluxe flower shaping paper using archival ink-magenta hue and cut it with coordinating die HCD1-7289 Small Wild Rose Die and color them using archival ink-magenta hue and leaf green. Shape them using Small 3D Wild Rose Shaping Mold. Create two flowers. Add some Lettuce Entertain You Prills on flower centers.

Stamp some leaves from HCPC-3835 Leafy Accents Cling Stamp on deluxe flower shaping paper using archival ink- English ivy and cut them with coordinating die. Color them using archival ink-leaf green and english ivy. Shape them using HCFB1-467 3D Leafy Accents Shaping Mold.

Arrange all flowers and leaves as pictured.

Other Products: Big Shot Plus machine.

Tuesday 18 October 2022

Luxe Rose Frame

Dear Friends,

Give your projects that extra dose of “wow” you’ve been wanting! Start creating the most impressive framed, stamped and die cut cards with the Heartfelt Creations- Elegant Rose Frames Collection! Here's my inspiration for today..


Products Used:

Instructions:
Card size 5” x 7” (final size). Take pattern paper from HCDP1-2144 Elegant Rose Paper Collection, tear edges and adhere it using designer dries clear adhesive.
Cut one die from HCD2-7424 Rectangle Filigree Frame Die on white cardstock and adhere it using designer dries clear adhesive. From same die set cut another die on white cardstock, and adhere it using foam tape. Cut another die on pattern paper and adhere it using designer dries clear adhesive. Cut another die on white cardstock and luxe gold cardstock,  adhere together little offset, stamp sentiment from HCPC-3845 Just For You Sentiments Cling Stamp using archival ink-Vibrant Fuchsia. and adhere it using foam tape.

Stamp image from HCPC-31003 Stylish Rose Frame Cling Stamp using archival ink-magenta Hue and Library green and cut it with coordinating die, cut flowers images, add crystal clear glitter randomly. Arrange them as shown and adhere using foam tape.

Stamp some flower petals from HCPC-3906 Small Wild Rose Cling Stamp on deluxe flower shaping paper using archival ink-magenta hue and cut with coordinating HCD1-7289 Small Wild Rose Die and color them using archival ink-magenta hue and leaf green. Shape them using Small 3D Wild Rose Shaping Mold. Create two rose flowers and three small flowers. Add some Lettuce Entertain You Prills for small flowers.

Stamp some leaves from HCPC-3835 Leafy Accents Cling Stamp on deluxe flower shaping paper using archival ink- English ivy and cut them with coordinating die. Color them using archival ink-leaf green and english ivy. Shape them using HCFB1-467 3D Leafy Accents Shaping Mold.

Arrange all flowers and leaves as pictured.
Other Products: Big Shot Plus machine

Wednesday 12 October 2022

Celebrating Love

Dear Friends,

Today is the day Heartfelt Creations-the Elegant Rose Frames Collection becomes available to everyone!!!!Recover your joy of crafting with the new Elegant Rose Frame stamps and dies! Here's my inspiration for today...


Products Used:

Elegant Rose Frames Paper Collection, HCDP1-2144

Elegant Rose Frame Cling Stamp Set, HCPC-31002

Elegant Rose Frame Die, HCD1-7420

Oval Filigree Frame Die, HCD2-7426

Small Wild Rose Cling Stamp Set, HCPC-3906

Small Wild Rose Die, HCD1-7289

Small 3D Wild Rose Shaping Mold, HCFB1-486

Celebrate Love Sentiments Cling Stamp Set, HCPC-3847

Leafy Accents Cling Stamp Set, HCPC-3835

Leafy Accents Die, HCD1-7193

3D Leafy Accents Shaping Mold, HCFB1-467

Deluxe Flower Shaping Paper Pack of 50 - White, HCPP1-475

Deluxe Flower Shaping Kit, HCST1-401

Stack and Store Daubers-Pack of 30, HCDA2-450

Double Dots 100pc. -3D Foam Circles, DDOTS

Lettuce Entertain You Prills, ANC814

Designer Dries Clear Adhesive, 159723

Ranger Archival Ink Pad - Leaf Green, RACP436

Ranger Archival Ink Pad - English Ivy, RACP970

Ranger Archival Ink Pad - Vibrant Fuchsia, RACP524

Ranger Archival Ink Pad - Magenta Hue, RACP614

Rajni Chawla's Crystal Clear, PGM15015

Spellbinders Tool N' One, 359848

Instructions:

Card size 5”x7” (final size). Take pattern paper from HCDP1-2144 Elegant Rose Paper Collection, tear edges and adhere it using designer dries clear adhesive.

Cut one die from HCD2-7426 Oval Filigree Frame Die on white cardstock and adhere it using foam tape. From same die set cut another oval die on pattern paper, and adhere it using designer dries clear adhesive.

Stamp one frame image from HCPC-31002 Elegant Rose Frame Cling Stamp using archival ink-magenta Hue and Library green and cut it with coordinating die. From same die cutting set cut one base of this frame, and adhere it using foam tape as shown. Add crystal clear glitter randomly. Add sentiment from HCPC-3847 Celebrate Love Sentiments Cling Stamp using archival ink-Vibrant Fuchsia.

Stamp some flower petals from HCPC-3906 Small Wild Rose Cling Stamp on deluxe flower shaping paper using archival ink-magenta hue and cut it with coordinating HCD1-7289 Small Wild Rose Die and color them using archival ink-magenta hue and leaf green. Shape them using Small 3D Wild Rose Shaping Mold. Create two rose flowers and four small flowers. Add some Lettuce Entertain You Prills for small flowers.

Stamp some leaves from HCPC-3835 Leafy Accents Cling Stamp on deluxe flower shaping paper using archival ink- English ivy and cut them with coordinating die. Color them using archival ink-leaf green and english ivy. Shape them using HCFB1-467 3D Leafy Accents Shaping Mold.

Arrange all flowers and leaves as pictured.

Other Products: Big Shot Plus Machine.

Tuesday 4 October 2022

Sentiments for Your Special Day

 Dear Friends,

Maximize your creativity with the Heartfelt Creations -Hollyhock Garden Collection! Keep it simple, for those quick and easy cards, or create unique blooms on tall spikes, perfect for creating floral gardens with depth and variation in sizes.... Here's my inspiration for today 


Products Used:

Instructions:

Card size 6” x 6” (final size). Take a pattern paper from HCDP1-2143 Hollyhock Garden Paper Collection and adhere it to white card base using designer dries clear adhesive.

Cut three corner dies from HCD2-7382 Simply Classic Oval Frame Die on white cardstock and adhere to the two top corners and the bottom left corner using designer dries clear adhesive. From same die set, cut another Oval die on white cardstock and adhere it using foam tape.

Now Stamp sentiment from HCPC-3843 Special Birthday Sentiments Cling Stamp HCPC-3843 Special Birthday Sentiments Cling Stamp using archival ink-Vibrant Fuchsia. Cut one die from HCD2-7382 Simply Classic Oval Frame Die on white cardstock and adhere using designer dries clear adhesive and giving some dimension by raising die.

Create hollyhock flowers using HCPC-3999 Hollyhock Petals & Leaves Cling Stamp on white cardstock using archival ink-Vibrant Fuchsia for flower petals and English Ivy for leaves and small flower petals. Cut them using coordinating HCD1-7417 Hollyhock Petals & Leaves Die, color them using archival ink-Vivid Chartreuse, Leaf Green, Coastal Coral, Vibrant Fuchsia and Mulberry. Shape them using HCFB1-5012 3D Hollyhock Shaping Mold, giving a touch of Encore Ultimate Metallic Ink Pad-Gold for leaves, add stamens and prills and randomly add crystal clear glitter on edges of flowers.

Stamp some stems from HCPC-31000 Hollyhock Stem & Blooms Cling Stamp on white cardstock using archival ink- English Ivy, cut them using coordinating die HCD1-7418 Hollyhock Stem & Blooms Die, color them using archival ink-leaf green, English Ivy. From same stamp set make base for hollyhock flowers using archival ink-Vibrant Fuchsia and English Ivy, cut them with coordinating die and color them using same ink.

Arrange all flowers, leaves and stems as pictured.

Other Products: Big Shot Plus Machine.

Tuesday 27 September 2022

Holiday Filigree-Debuting the Filigree Frame & Border Dies

 Dear Friends,

Today's the day Heartfelt Creations -Filigree Frame & Border dies become available to everyone! Are you a crafter that loves making shaped cards with unique border elements, but sometimes feel limited or uninspired? Do you feel stuck when trying to add extra beauty and accents to your cards? Don’t waste another minute feeling frustrated with limitations! The Filigree Frame & Border dies are designed to create quick and easy shaped cards plus they give you the ability to add unique borders on any of your favorite paper crafting projects! Here's my inspiration for today...


Instructions:
Take white cardstock size 10” x 7” and take oval die from HCD2-7426 Oval Filigree Frame Die and create a card base. From same die set, cut largest intricate die on white cardstock and pattern paper from HCDP1-2142 Joyous Noel Paper Collection, adhere them together and adhere on card base using designer dries clear adhesive. From same set, cut oval shape on pattern paper and adhere it on the centre. Cut another intricate die on luxe gold cardstock and adhere it using foam tape. Cut another die on white cardstock and adhere it using foam tape. Cut next die on white cardstock and stamp sentiment using archival ink-night sky using HCPC-3993 Holiday Star Cling Stamp Set, adhere it using designer dries clear adhesive.

Stamp some poinsettia flowers from HCPC-3957 Large Festive Poinsettia Cling Stamp Set, using archival ink-goldenrod and HCPC-3958 Small Festive Poinsettia Cling Stamp Set using archival ink-night sky. Cut with coordinating HCD1-7358 Large Festive Poinsettia Die and HCD1-7359 Small Festive Poinsettia Die and shape them using HCFB1-5007 Large 3D Festive Poinsettia Shaping Mold, HCFB1-5008 Small 3D Poinsettia Mold, adhere two petals together, add stamens and crystal clear glitter.

Stamp leaf  from HCPC-3958 Small Festive Poinsettia Cling Stamp Set using archival ink-Periwrinkle, cut it with coordinating die. Arrange poinsettia flowers and leaves as  pictured.

Other Products: Big Shot Plus Machine.

Tuesday 20 September 2022

Vibrant Hues

Dear Friends,

Maximize your creativity with the Heartfelt Creations -Hollyhock Garden Collection! Keep it simple, for those quick and easy cards, or create unique blooms on tall spikes, perfect for creating floral gardens with depth and variation in sizes.... Here's my inspiration for today...


Instructions:

Card size 5” x 7”. Take pattern paper from HCDP1-2143 Hollyhock Garden Paper Collection, tear edges, adhere it on card base using designer dries clear adhesive.

Cut one die base on pattern paper using die HCD2-7349 Palace Gateway Die, adhere it using foam tape, cut one intricate die on white cardstock, adhere it on pattern paper using foam tape.

Stamp one fence image on white cardstock using versamark ink, sprinkle embossing powder-enchanted gold and cut it with coordinating HCD1-7419 Hollyhock Fence Die. Adhere it using designer dries clear adhesive and foam tape.

Create hollyhock flowers using HCPC-3999 Hollyhock Petals & Leaves Cling Stamp on white cardstock using archival ink-vibrant fuchsia for flower petals and english ivy for leaves and small flower petals, cut them using coordinating HCD1-7417 Hollyhock Petals & Leaves Die. Color them using archival ink-vivid chartreuse, leaf green, coastal coral, vibrant fuchsia, mulberry,  shape them using HCFB1-5012 3D Hollyhock Shaping Mold, giving a touch of Encore Ultimate Metallic Ink Pad-Gold for leaves. Add stamens and prills and randomly add crystal clear glitter on edges of flowers.

Stamp some stems from HCPC-31000 Hollyhock Stem & Blooms Cling Stamp on white cardstock using archival ink- English ivy, cut them using coordinating die HCD1-7418 Hollyhock Stem & Blooms Die, color them using archival ink-leaf green, english ivy. From same stamp set make base for hollyhock flowers using archival ink- english ivy, cut them with coordinating die and color them using archival ink-leaf green.

Stamp one stem image from HCPC-31001 Hollyhock Fence Cling Stamp on white cardstock using archival ink-english ivy, cut them with coordinating die HCD1-7419 Hollyhock Fence Die, color them using archival ink-sunflower and leaf green, add randomly add crystal clear glitter. Arrange all flowers, leaves, stems as pictured.

Cut one small oval die from HCD2-7309 Eleborate Oval frames Die Die on white cardstock, add sentiment from HCPC-3847 Celebrate Love Sentiments Cling Stamp using archival ink-vibrant fuchsia, adhere it using foam tape.

Other Products: Big Shot Plus Machine. Embossing Powder-Enchanted gold.

Wednesday 14 September 2022

Hollyhock Terrace-Debuting the Hollyhock Garden Collection

Dear Friends,

Today is the day the  Heartfelt Creations -Hollyhock Garden Collection becomes available to everyone!

We all love the look of the hollyhock blooms, perfect for creating floral gardenscapes with depth and variation in sizes, adding that unique feature to our flower gardens. Here's my inspiration for today...


Products Used:

Hollyhock Garden Paper Collection, HCDP1-2143

Hollyhock Petals & Leaves Cling Stamp Set, HCPC-3999

Hollyhock Petals & Leaves Die, HCD1-7417

3D Hollyhock Shaping Mold, HCFB1-5012

Hollyhock Stem & Blooms Cling Stamp Set, HCPC-31000

Hollyhock Stem & Blooms Die, HCD1-7418

Hollyhock Fence Cling Stamp Set, HCPC-31001

Hollyhock Fence Die, HCD1-7419

Regal Lattice Gateway Die, HCD2-7339

Scalloped Flourish Gateway Die, HCD2-7325

Decorative Circle Frames Die, HCD2-7306

Deluxe Flower Shaping Paper Pack of 50 - White, HCPP1-475

Celebrate Love Sentiments Cling Stamp Set, HCPC-3847

Stack and Store Daubers-Pack of 30, HCDA2-450

Bridal Bouquet Stamens-Small, HCS1-460

Double Dots 100pc. -3D Foam Circles, DDOTS

Designer Dries Clear Adhesive, 159723

Rajni Chawla's Crystal Clear, PGM15015

Ranger Archival Ink Pad - Vibrant Fuchsia, RACP524

Ranger Archival Ink Pad - English Ivy, RACP970

Ranger Archival Ink Pad - Leaf Green, RACP436

Ranger Archival Ink Pad - Coastal Coral, RACP300

Ranger Archival Ink Pad - Mulberry, RACP994

Ranger Archival Ink Pad - Vivid Chartreuse, RACP531

Encore Ultimate Metallic Ink Pad - Gold, TSUM10

Ribbit Prills, ANC825

Go Man Go Prills, ANC818

Spellbinders Tool N' One, 359848

Instructions:

Make a card base using largest outer HCD2-7325 Scalloped Flourish Gateway Die. Using same die, cut another die on white cardstock and pattern paper from HCDP1-2143 Hollyhock Garden Paper Collection and paste it on white cardstock to give extra strength. Cut another die on white cardstock from HCD2-7339 Regal Lattice Gateway Die and adhere it using foam tape, as pictured.

Create hollyhock flowers using stamp HCPC-3999 Hollyhock Petals & Leaves Cling Stamp on white cardstock using archival ink-Vibrant Fuchsia for flower petals and English Ivy for leaves and small flower petals, cut them using coordinating HCD1-7417 Hollyhock Petals & Leaves Die. Color them using archival ink-Vivid Chartreuse, Leaf green, Coastal Coral, Vibrant Fuchsia, Mulberry, shape them using HCFB1-5012 3D Hollyhock Shaping Mold. Give a touch of Encore Ultimate Metallic Ink Pad-Gold for leaves, add stamens and prills and randomly add crystal clear glitter on edges of flowers.

Stamp some stems from HCPC-31000 Hollyhock Stem & Blooms Cling Stamp on white cardstock using archival ink- English Ivy, cut them using coordinating die HCD1-7418 Hollyhock Stem & Blooms Die, color them using archival ink-Leaf Green, English Ivy. From same stamp set make base for hollyhock flowers using archival ink-Vibrant Fuchsia and English Ivy, cut them with coordinating die and color them using same ink.

Stamp some stems from HCPC-31001 Hollyhock Fence Cling Stamp on white cardstock using archival ink-English Ivy, cut them with coordinating HCD1-7419 Hollyhock Fence Die, color them using archival ink-Sunflower and Leaf Green, add randomly crystal clear glitter.

Arrange all flowers, leaves, stems as pictured.

Cut one small circle from HCD2-7306 Decorative Circle Frames Die on white cardstock, add sentiment from HCPC-3847 Celebrate Love Sentiments Cling Stamp using archival ink-Vibrant Fuchsia, adhere it using foam tape.

Other Products: Big Shot Plus Machine