Thursday 30 May 2019

Hope it's Purr-fect

Dear Friends,

Another inspiration with Heartfelt Creations-Purr-fect Posies Collection.


Products Used
Purr-fect Posies Paper Collection, HCDP1-2102
Purring and Playful Cling Stamp Set, HCPC-3876
Purring and Playful Die, HCD1-7240
Playful Miss Kitty Cling Stamp Set, HCPC-3877
Playful Miss Kitty Die, HCD1-7241
Eyelet Diamond Die, HCD1-7227
Ornate Pocket Accents Die, HCD1-7214
Stack and Store Daubers-Pack of 30, HCDA2-450
Designer Dries Clear Adhesive, 159723
Rajni Chawla's Crystal Clear, PGM15015
Double Dots 100pc. -3D Foam Circles, DDOTS
Ranger Archival Ink Pad - Jet Black, RACP468
Zig Clean Color Real Brush Markers - 36 Pack, 478455
Color In Watercolor Brush - Fine, 409311

Other Products: White cardstock, Big-Shot Machine.

For more tips on creating with the Purr-fect Posies collection, watch the tutorial at https://youtu.be/88KR6a5RRmg.

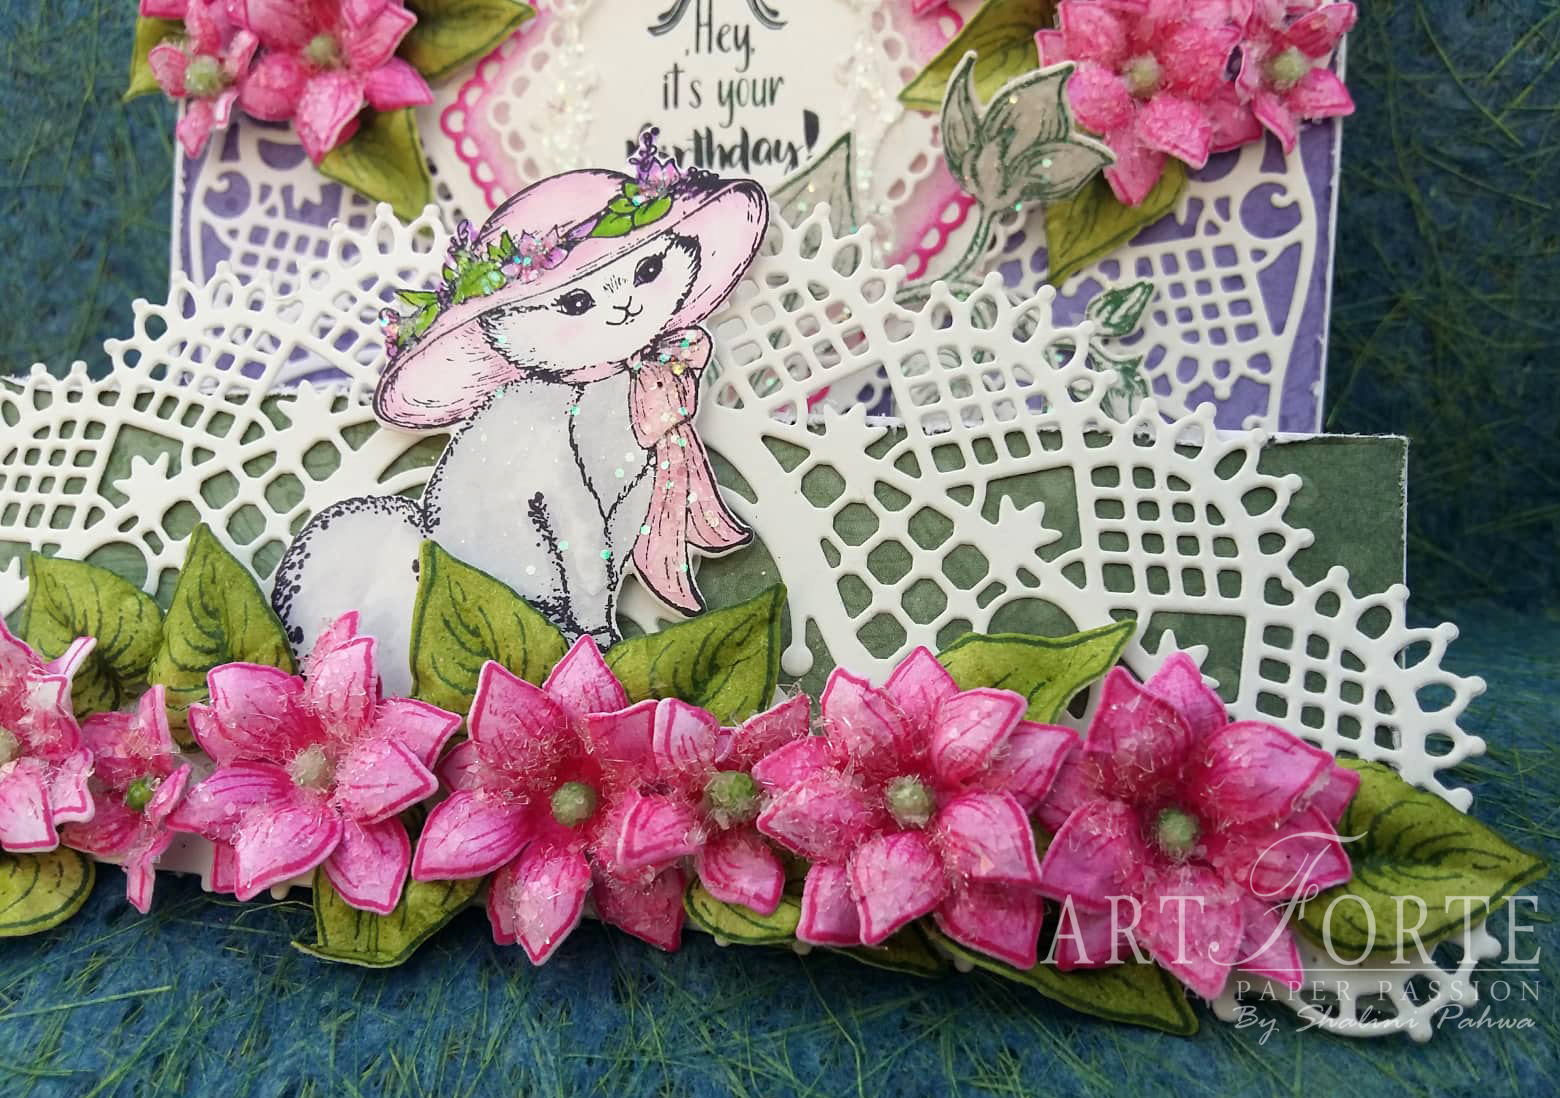
Instructions: Card size 6" x 6 (final size). Take pattern paper from the collection and distress the edges and adhere it on the card base.

Cut one die from Ornate Pocket Accents Die on white cardstock and adhere it at the bottom of the card as shown using Designer Dries Clear Adhesive.

Cut another die from Eyelet Diamond Die on white cardstock, add sentiment from Purring and Playful Cling Stamp Set using archival ink-jet black and adhere this die with foam tape to give some dimension. Add sequins at the edges of the eyelet diamond die.

Stamp one image from Playful Miss Kitty Cling Stamp Set on white cardstock using archival ink-jet black, cut it with coordinating die and color it with Zig Clean Color Real Brush Markers using Color In Watercolor Brush-Fine. Adhere it with foam tape.

Stamp some spray images from Purring and Playful Cling Stamp Set using archival ink-jet black and cut them with coordinating die and color them with Zig Clean Color Real Brush Markers using Color In Watercolor Brush-Fine. Adhere with foam tape and Designer Dries Clear Adhesive as shown. Add crystal clear glitter on the spray images.

Tuesday 21 May 2019

Beautiful Posies

Dear Friends,

Another inspiration for Heartfelt Creations-Purr-fect Posies Collection. Here's my inspiration


Products Used
Purr-fect Posies Paper Collection, HCDP1-2102
Purr-fect Playdate Cling Stamp Set, HCPC-3875
Purr-fect Playdate Die, HCD1-7239
Purr-fect Posies Cling Stamp Set, HCPC-3874
Purr-fect Posies Die, HCD1-7238
3D Purr-fect Posies Shaping Mold, HCFB1-476
Deluxe Flower Shaping Paper Pack of 50 - White, HCPP1-475
Regal Pocket Accents Die, HCD1-7247
Intricate Swirl Frames Die, HCD2-7191
Ornamental Tags Die, HCD1-7203
Stack and Store Daubers-Pack of 30, HCDA2-450
Rock Candy Stamens-Small, HCS1-459-4
Designer Dries Clear Adhesive, 159723
Rajni Chawla's Crystal Clear, PGM15015
Double Dots 100pc. -3D Foam Circles, DDOTS
Ranger Archival Ink Pad - Vibrant Fuchsia, RACP524
Ranger Archival Ink Pad - Leaf Green, RACP436
Ranger Archival Ink Pad - Library Green, RACP475
Ranger Archival Ink Pad - Jet Black, RACP468

Other Products: White cardstock, Big-Shot Machine.

For more tips on creating with the Purr-fect Posies collection, watch the tutorial at https://youtu.be/88KR6a5RRmg.

Instructions: Card size 6" x 6" (final size). Take pattern paper from the collection and tear the edges and adhere on the card base. Take another pattern paper size 4.5" x 5.875" and tear the edges and adhere it to the centre of the card.

Cut two dies from Regal Pocket Accents Die on white cardstock and adhere them as shown. Cut one die from Intricate Swirl Frames Die from white cardstock and adhere it to pattern paper which is slightly larger than the Intricate Swirl Frames Die then adhere it with foam tape to the card front.

Stamp one image from Purr-fect Playdate Cling Stamp Set on white cardstock using archival ink-jet black and color it with Zig Clean Color Real Brush Markers using Color In Watercolor Brush-Fine.

Stamp some flowers and leaves from Purr-fect Posies using archival ink- Vibrant Fuchsia and Library Green for leaves, cut them with coordinating die, color them with archival ink Vibrant Fuchsia and Leaf Green and shape them using 3D Purr-fect Posies Shaping Mold. Use two petals, offset to create flowers and add stamen at the center. Sprinkle crystal clear glitter using Designer Dries Clear Adhesive. Now arrange these flowers and leaves as shown.

Cut one die from Ornamental Tags Die on white cardstock and sentiment from the paper collection and adhere it with foam tape. Adhere the Kitten to the side of the sentiment.

Thursday 16 May 2019

Delicately Adorned

Dear friends,

Another inspiration with this beautiful collection Purr-fect Posies Collection by Heartfelt Creations.
Finely illustrated images of loveable kittens at play, and are "purr-fect" for creating furry, fun filled scenes on all of your paper crafting creations, while a "purr-fectly" charming floral cling stamp set and coordinating die, lend themselves to assembling pretty, whimsical dimensional posies "purr-fect" for accenting your summer themed paper craft creations!


Products Used
Purr-fect Posies Paper Collection, HCDP1-2102
3D Purr-fect Posies Shaping Mold, HCFB1-476
Purr-fect Posies Cling Stamp Set, HCPC-3874
Purring and Playful Cling Stamp Set, HCPC-3876
Playful Miss Kitty Cling Stamp Set, HCPC-3877
Playful Miss Kitty Die, HCD1-7241
Purring and Playful Die, HCD1-7240
Purr-fect Posies Die, HCD1-7238
Deluxe Flower Shaping Paper Pack of 50 - White, HCPP1-475
Special Birthday Sentiments Cling Stamp Set, HCPC-3843
Regal Pocket Accents Die, HCD1-7247
Regal Frame & Accents Die, HCD1-7248
Eyelet Diamond Die, HCD1-7227
Adorn It Pocket Accents Die, HCD1-7245
Petite Pocket Accents Die, HCD1-7212
Stack and Store Daubers-Pack of 30, HCDA2-450
Rock Candy Stamens-Small, HCS1-459-4
Designer Dries Clear Adhesive, 159723
Rajni Chawla's Crystal Clear, PGM15015

Other Products: White cardstock, Big-Shot Machine

For more tips on creating with the Purr-fect Posies collection, watch the tutorial at https://youtu.be/88KR6a5RRmg.

Instructions: Card size is 6" x 14" and score at 4", 8" and 10". It's a step-up card. Cut paper from the collection , tear the edges and adhere to the card base.  

Cut one die from Adorn It Pocket Accents Die from white cardstock and adhere it on the front as shown. Cut another die from Petite Pocket Accents Die on white cardstock, adhere it on the top fold and sprinkle crystal clear glitter using Designer Dries Clear Adhesive.

Cut another two dies from Regal Pocket Accents Die on white cardstock and adhere on the second fold as shown using Designer Dries Clear Adhesive.

Cut three different dies from Eyelet Diamond Die and distress the second layer of eyelet diamond die with archival ink- Vibrant Fuchsia. On the top layer add sentiment from Special Birthday Sentiments Cling Stamp Set using archival ink-Jet Black.

Cut one smallest frame die Regal Frame &Accents Die on white cardstock and cut it into half and sprinkle crystal clear glitter and adhere it on the top layer of eyelet frame die.

Stamp one image from Playful Miss Kitty Cling Stamp Set on white cardstock using archival ink-jet black and cut it with coordinating die and color it with Zig Clean Color Real Brush Markers using Color In Watercolor Brush-Fine and sprinkle crystal clear glitter. Adhere it with foam tape.

Stamp one spray image from Purring and Playful Cling Stamp Set using archival ink-library green, cut it with coordinating die, sprinkle crystal clear glitter and adhere it as ahown.

Stamp some flowers and leaves from Purr-fect Posies using archival ink- Vibrant Fuchsia and Library Green for leaves, cut them with coordinating die and color them with archival ink Vibrant Fuchsia and Leaf Green. Shape them using 3D Purr-fect Posies Shaping Mold, add stamen at the center and sprinkle crystal clear glitter using Designer Dries Clear Adhesive. Now arrange these flowers and leaves as shown.

Tuesday 7 May 2019

Purr-fect Playdate-Debuting the Purr-fect Posies Collection by Heartfelt Creations

Dear Friends,

Today's the day the Purr-fect Posies Collection becomes available to everyone! Irresistibly charming and fun-filled antics of playful kittens bounding through the summer flower beds, or hiding behind large leafy foliage, ready to pounce on whatever comes their way, provide endless hours of entertainment and can quickly turn one's frown upside down! Whether your favorite kitty is timid or filled with sass from the tip of their nose to the tip of their tail, Heartfelt Creations invite you to celebrate your "purr-fect" fur babies with the new Purr-fect Posies Collection!
Here's my inspiration


Products Used
Purr-fect Posies Paper Collection, HCDP1-2102
3D Purr-fect Posies Shaping Mold, HCFB1-476
Purr-fect Posies Cling Stamp Set, HCPC-3874
Purr-fect Posies Die, HCD1-7238
Purr-fect Playdate Cling Stamp Set, HCPC-3875
Purr-fect Playdate Die, HCD1-7239
Deluxe Flower Shaping Paper Pack of 50 - White, HCPP1-475
Regal Pocket Accents Die, HCD1-7247
Regal Frame & Accents Die, HCD1-7248
Arrows and Banner Die, HCD1-7204
Stack and Store Daubers-Pack of 30, HCDA2-450
Rock Candy Stamens-Small, HCS1-459-4
Designer Dries Clear Adhesive, 159723
Rajni Chawla's Crystal Clear, PGM15015
Double Dots 100pc. -3D Foam Circles, DDOTS
Ranger Archival Ink Pad - Vibrant Fuchsia, RACP524
Ranger Archival Ink Pad - Leaf Green, RACP436
Ranger Archival Ink Pad - Library Green, RACP475
Zig Clean Color Real Brush Markers - 36 Pack, 478455

Other Products: White cardstock, Big-Shot Machine.

For more tips on creating with the Purr-fect Posies collection, watch the tutorial at https://youtu.be/88KR6a5RRmg.

Instructions: Base of the card size is 3.375" x 5.5" (3.375" x 11") as final size, it's a tent fold card. Cut one Regal Frame Die on white cardstock and one on pattern paper from the collection and attach this pattern paper on white cardstock. Now attach this regal frame die on the base of the card. Next, cut another regal frame die on white cardstock as shown. Cut two Regal pocket accent die on white cardstock and attach it on the base of the card on left and right side.

Stamp one image from Purr-fect Playmate Cling stamp on white cardstock using archival ink-jet black and cut it with coordinating die and color it with Zig Clean Color Real Brush Markers using Color In Watercolor Brush-Fine. Sprinkle some crystal clear glitter randomly and adhere it with foam tape to give some dimension.

Stamp some flowers and leaves from Purr-fect Posies using archival ink- Vibrant Fuchsia and Library Green for leaves and cut them with coordinating die. Color them with archival ink Vibrant Fuchsia and Leaf Green and shape them using 3D Purr-fect Posies Shaping Mold. Add stamen to the center of the flowers and sprinkle crystal clear glitter using Designer Dries Clear Adhesive. Now arrange these flowers and leaves as shown.

Cut one Arrows and Banner Die on white cardstock and add sentiment from Purr-fect Playmate Cling stamp Set using archival ink- Vibrant Fuchsia and adhere it with foam tape to give some dimension.

Wednesday 1 May 2019

Congratulatory Gift Box

Dear Friends,

Another inspiration for Heartfelt Creations today,


Products Used
Fanci-Fold Pocket & Accents Die, HCD1-7246
Regal Pocket Accents Die, HCD1-7247
Album Tags and Accents Die, HCD1-7202
Ornamental Tags Die, HCD1-7203
Large Sweet Peony Die, HCD1-7174
Large Sweet Peony Cling Stamp Set, HCPC-3820
Oakberry Lane Blossoms Die, HCD1-7200
Oakberry Lane Blossoms Cling Stamp Set, HCPC-3842
Celebrate Love Sentiments Cling Stamp Set, HCPC-3847
3D Floral Basics Shaping Mold, HCFB1-464
3D Blossoms Shaping Mold, HCFB1-469
Deluxe Flower Shaping Kit, HCST1-401
Deluxe Flower Shaping Paper Pack of 50 - White, HCPP1-475
Designer Dries Clear Adhesive, 159723
Metal Tip for Adhesive Bottles, 352854
Rajni Chawla's Crystal Clear, PGM15015
Stack and Store Daubers-Pack of 30, HCDA2-450
Double Dots 100pc. -3D Foam Circles, DDOTS
Assorted Pearl Stamens-Medium, HCS1-459-2

Other Products: White cardstock, Big-Shot Machine, Gold cardstock, Lace-Ribbon, hole punch

For more tips on creating with the Sweet Peony collection, watch the tutorial at https://youtu.be/L9_MLkvpGPQ.

For more tips on creating with the Oakberry Lane collection, watch the tutorial at https://youtu.be/HirfUN8NEYY.

For more tips on creating with the pocket accent dies, watch the tutorial at https://youtu.be/A8sxtkGXWLQ.

Instructions: Create box with white cardstock measuring 10 x 10" and the final box size is 5 x 5". Cut two golden cardstock size 5 x 8" and score at 1" on the top as seen on the picture. Paste this golden cardstock at the base of the box. Cut two gold cardstock measuring 5 x 2.5" adhere it on the sides of the boxes as seen on the picture. Cut six Fanci-Fold Pocket & Accents Die on white cardstock and adhere them as seen on the picture. Cut two Regal Pocket Accents Die and adhere it on the top of the golden cardstock as seen on the picture. Punch a hole and add lace ribbon as seen on the picture.

Cut one Eyelet Decorative Accent Die from Albums tags and Accents Die Set and adhere it at the centre of the gold cardstock using Designer Dries Clear Adhesive, as seen on the picture. Cut two swirling ornamental tag die from Ornamental Tags Die set and add some color on the edges of the die as seen on the picture and add sentiment from Celebrate Love Sentiments Cling Stamp Set using archival ink - Vibrant Fuchsia and Plum. Adhere it with foam tape.

For Peony Flowers - Stamp Large Sweet Peony on Deluxe Flower Shaping paper using archival ink - cactus flower, stamp leaves with leaf green and cut them with coordinating dies. Color peonies with archival ink-cactus flower and for leaves use leaf green. Use shaping stylus to shape leaves. Shape peonies with -3D Floral Basics Shaping Mold and then give some shape by twisting with fingers and add stamens at the center of the flower and sprinkle some crystal clear glitter using Designer Dries Clear Adhesive. For Oakberry flowers- Stamp some Oakberry Lane Blossoms on Deluxe Flower Shaping paper using archival ink-carnation red and cut them with coordinating die. Color them with the same ink and shape them using 3D Blossoms Shaping Mold and add stamens at the center of the flower and then add crystal clear glitter. Arrange the flowers and leaves onto gift box as shown.