Wednesday 30 January 2019

Fintastic Hibiscus Seashells

Dear Friends,

Take a walk along the edge of the deep blue sea, feel the warm sand between your toes and breathe in the salty air. Balmy breezes tousle your hair and toy with the exotic hibiscus flower behind your ear as you stoop to snatch a lustrous seashell that has been swept onto the beach with the incoming tide.
Before you know it you have been submerged into a magical underwater world where you find yourself settling on a jagged reef surrounded with burnished coral, glassy seashells and mystical sea creatures more beautiful than your imagination could ever conjure.

Here's my inspiration with this lovely Under the Sea Collection by Heartfelt Creations!!!


Products Used
Under The Sea Paper Collection, HCDP1-266
Tropical Hibiscus Cling Stamp Set, HCPC-3736
Tropical Hibiscus Die, HCD1-796
Coral Reef Collage Cling Stamp Set, HCPC-3738
Coral Reef Collage Die, HCD1-798
Under the Sea Coral Cling Stamp Set, HCPC-3737
Under The Sea Coral Die, HCD1-797
Eyelet Lace Frames Die, HCD2-7192
Eyelet Circle & Basics Small Die, HCD1-7154
Zig Clean Color Real Brush Markers - 36 Pack, 478455
Color In Watercolor Brush - Fine, 409311
Go Man Go Prills, ANC818
Designer Dries Clear Adhesive, 159723
Rajni Chawla's Frosting Powder, PGM15016
Stack and Store Daubers-Pack of 30, HCDA2-450
Double Dots 100pc. -3D Foam Circles, DDOTS
Ranger Archival Ink Pad - Leaf Green, RACP436
Ranger Archival Ink Pad - Library Green, RACP475
Ranger Archival Ink Pad - Plum, RACP499

Other Products: White cardstock, Big Shot Machine

For more tips on creating with the Under The Sea collection, watch the tutorial at https://youtu.be/84Re1-gaq1o.

Instructions: Card size is 5 x 7" (final size). Take pattern paper from the Under the Sea collection and tear the edges and adhere it on the white card base.

Cut two Eyelet Lace Frames Die on white cardstock and adhere it on the card. Cut one Eyelet Circle Die and adhere it at the centre of the card with foam tape.

Stamp two shell images from Coral Reef Collage Cling Stamp set with archival ink-plum and cut it with coordinating die and color them with Zig Clean Color Real Brush Markers using Color In Watercolor Brush. Arrange them as seen on the picture.

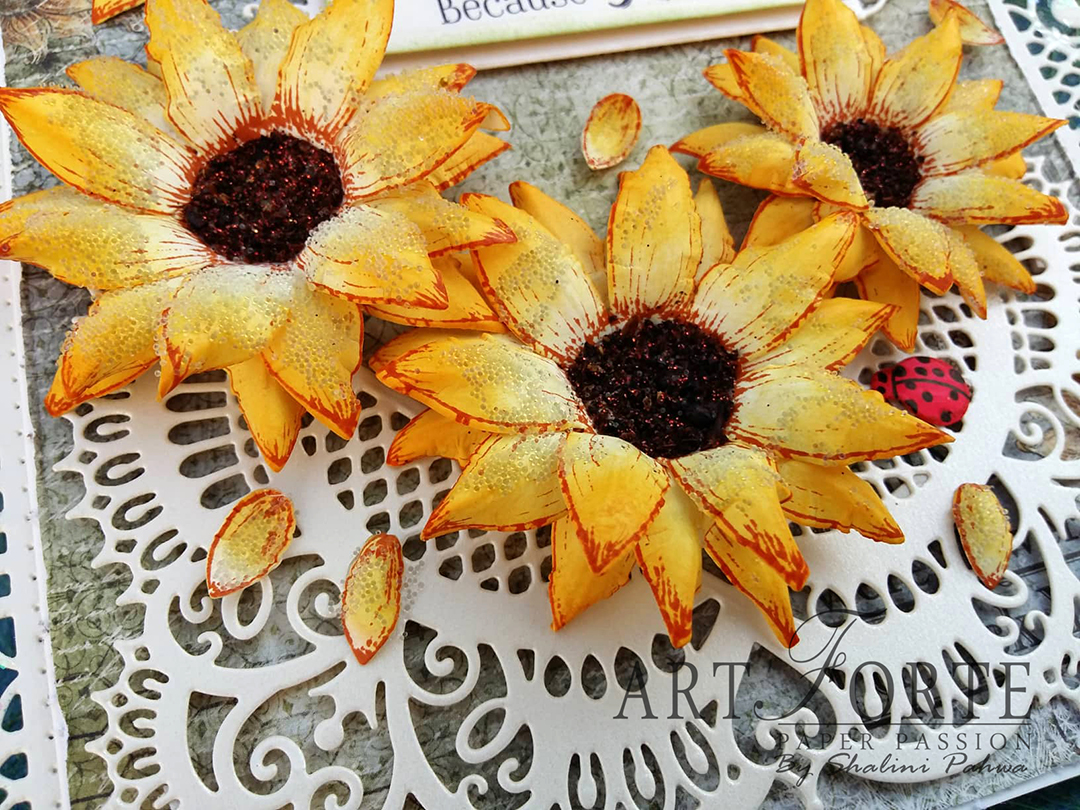
Stamp some flowers, leaves, and small shells from Tropical Hibiscus Cling Stamp Set with archival ink and cut them with coordinating die. Color them with archival ink and shape them using Deluxe flower shaping tool kit. Add prills and crystal glitter as seen on the picture. Arrange them at the centre of the card.

Add sentiment from the paper collection, using foam tape as seen on the picture.

Tuesday 29 January 2019

Special Hibiscus

Dear Friends,

Cares and worries melt away because life really is better at the seaside. The cool, crystal clear water lapping at the shoreline beckons you and you cannot resist the sudden urge to dive right in.
Here's my inspiration with this lovely Under the Sea Collection by Heartfelt Creations!!!


Products Used
Under The Sea Paper Collection, HCDP1-266
Tropical Hibiscus Cling Stamp Set, HCPC-3736
Under the Sea Cling Stamp Set, HCPC-3739
Elegant Pocket Accents Die, HCD1-7213
Tropical Hibiscus Die, HCD1-796
Under The Sea Die, HCD1-799
Designer Dries Clear Adhesive, 159723
Rajni Chawla's Crystal Clear, PGM15015
Stack and Store Daubers-Pack of 30, HCDA2-450
Double Dots 100pc. -3D Foam Circles, DDOTS
Ranger Archival Ink Pad - Leaf Green, RACP436
Ranger Archival Ink Pad - Library Green, RACP475
Ranger Archival Ink Pad - Plum, RACP499
Ranger Archival Ink Pad - Cactus Flower, RACP985
Ranger Archival Ink Pad - Sunflower, RACP005
Zig Clean Color Real Brush Markers - 36 Pack, 478455
Color In Watercolor Brush - Fine, 409311
Go Man Go Prills, ANC818
Assorted Pearl Stamens-Medium, HCS1-459-2


Other Products: White cardstock, Big Shot Machine

To see how to shape the hibiscus, watch the video at https://youtu.be/84Re1-gaq1o.

For more tips on creating with the Under The Sea collection, watch the tutorial at https://youtu.be/84Re1-gaq1o.

Instructions: Card size is 6"x 6"(final size). Take pattern paper from the collection and tear the edges and adhere it on the white card base.

Cut two dies from Elegant Pocket Accents Die on white cardstock and adhere it on the card base as seen on the picture.

Stamp some flowers from Tropical Hibiscus Cling Stamp Set with Archival Plum ink onto white cardstock and diecut them with coordinating die. Color them with Cactus Flower and Sunflower Archival ink and shape them using Deluxe flower shaping tool kit.

Stamp leaves from the same stamp set with Archival Library Green ink onto white cardstock and diecut them with coordinating die. Color the leaves with Leaf Green and Library Green inks. Shape leaves.

Stamp one fish from Under The Sea Cling Stamp set onto white cardstock with Archival Plum ink and diecut it with coordinating die. Color it with Zig Clean Color Real Brush Marker using Watercolor Brush.

Adhere everything onto card as pictured. Add prills, pollens and crystal glitter as shown. Add sentiment from the paper collection, using foam tape.

You Brighten My World-Debuting the Lacy Diamond Dies

Hi Friend,
Good morning, how is your week going? Elegant, decorative and basic dies are one of the most used tools in the craft room, and it's every crafters desire to have a well-rounded collection. Stylish and stately, the Lacey Diamond Dies by Heartfelt Creations are magnificent for adding a touch of class to any paper craft creation! Charming diamond shapes nest together perfectly to create a variety of layered looks, providing an ideal layering base for all of your floral clusters and is perfect for framing that special heartfelt sentiment. A delightful assembling of dies you will certainly reach for over and over again in the years to come! Here's my inspiration...


Products Used
Tulip Time Paper Collection, HCDP1-298
Tulip Time Cling Stamp Set, HCPC-3858
Tulip Vase & Fillers Cling Stamp Set, HCPC-3860
Tulip Vase & Fillers Die, HCD1-7220
Tulip Time Die, HCD1-7218
3D Tulip Shaping Mold, HCFB1-472
Lacy Diamond Die, HCD1-7228
Diamonds & Lace Die, HCD1-7229
Ornamental Tags Die, HCD1-7203
Bright Pearl Stamens-Small, HCS1-458-1
Stack and Store Daubers-Pack of 30, HCDA2-450
Designer Dries White Adhesive , 159951
Rajni Chawla's Crystal Clear, PGM15015
Double Dots 100pc. -3D Foam Circles, DDOTS
Ranger Archival Ink Pad - Leaf Green, RACP436
Ranger Archival Ink Pad - Library Green, RACP475
Ranger Archival Ink Pad - Sunflower, RACP005
Ranger Archival Ink Pad - Carnation Red, RACP399
Ranger Archival Ink Pad - Tiger Lily, RACP670


Other Products: White Cardstock, Big-Shot Machine.

For more tips on creating with the diamond dies, watch the tutorial at https://youtu.be/JwS0Rmysd98.

For more tips on creating with the Tulip Time collection, watch the tutorial at https://youtu.be/rfYMxeNBmJk.

Instructions: Card size is 6" x 6". Take pattern paper from the collection and tear the edges and adhere it on the card base. Take another pattern paper size of 6" x 6" and then tear the paper giving triangle shape and adhere it on the left side as pictured

Cut one Diamond and Lace die on white cardstock and adhere it with foam tape at the centre of the card. Cut one Diamond lace die on white cardstock and distress the edges with archival ink-tiger lily and adhere it with foam tape to give some dimension.

Stamp some Petals from Tulip Time on white cardstock using archival ink-Tiger Lily and cut them with coordinating die and color them with the same ink both inside and outside and shape them using 3D Tulip Shaping Mold. Assemble them as per tutorial and then add stamens and prills at the centre of the flower and add crystal clear glitter. Stamp some tulip leaves with archival ink-library green on white cardstock and cut them with coordinating die and shape them using Flower shaping tool kit

Stamp some fillers from Tulip Vase and fillers with VersaMark ink and sprinkle embossing powder-gold and heat with Heat It Tool and cut these stamps with coordinating die. Arrange these flowers and leaves as shown. Cut one tag from Ornamental Tags Die set and add sentiment from paper collection as shown.

Wednesday 16 January 2019

Thoughtful Tulips

Dear Friends,
Another inspiration for today from Tulip Time Collection from Heartfelt Creations.


Products Used
Tulip Time Cling Stamp Set, HCPC-3858
Tulip Bouquet Cling Stamp Set, HCPC-3859
Tulip Cart & Fence Cling Stamp Set, HCPC-3861
Tulip Time Die, HCD1-7218
Tulip Bouquet Die, HCD1-7219
Tulip Cart & Fence Die, HCD1-7221
3D Tulip Shaping Mold, HCFB1-472
Eyelet Circle & Basics Small Die, HCD1-7154
Festive Holiday Die, HCD1-7146
Stack and Store Daubers-Pack of 30, HCDA2-450
Designer Dries Clear Adhesive, 159723
Rajni Chawla's Crystal Clear, PGM15015
Double Dots 100pc. -3D Foam Circles, DDOTS
Ranger Archival Ink Pad - Vibrant Fuchsia, RACP524
Ranger Archival Ink Pad - Leaf Green, RACP436
Ranger Archival Ink Pad - Library Green, RACP475
Ranger Archival Ink Pad - Jet Black, RACP468
Heat It Craft Tool, RAHT
Zig Clean Color Real Brush Markers - 36 Pack, 478455


Other Products: White Cardstock, Big-Shot Machine.

For more tips on creating with the Tulip Time collection, watch the tutorial at https://youtu.be/rfYMxeNBmJk.

Instructions: Card final size is 6 x 6".

Cut two Festive Holiday Die on white card-stock and adhere on the card base on left top side and bottom right side as shown. Cut one eyelet circle die and adhere it at the centre of the card with foam tape to give some dimension.

Stamp one Tulip Bouquet on white cardstock with archival ink-jet black, cut it with coordinating die and color it with Zig Clean Color Real Brush Markers. Stamp some Petals from Tulip Time on white cardstock using archival ink-vibrant fuchsia and cut them with coordinating die and color them with the same ink both inside and outside and shape them using 3D Tulip Shaping Mold. Stamp some tulip leaves with archival ink-library green on white cardstock and cut them with coordinating die and shape them using Flower shaping tool kit. Arrange these flowers as shown.

Stamp Fence, cart and flowers from Tulip Cart and fence Cling stamp set with archival ink-jet black and cut them with coordinating die and color them with Zig Clean Color Real Brush Markers, as shown and adhere them with foam tape.

Add sentiment from the Tulip paper collection and adhere it with foam tape on the right top side.

Tuesday 8 January 2019

A Springtime Birthday-Debuting the Tulip Time Collection by Heartfelt Creations

Dear Friends,

Shake off the wintertime blues and greet the spring season with the breathtaking Tulip Time Collection, by Heartfelt Creations.

The Tulip Time Collections features it's very own flower! Breezy tulip petals in varying diameters, along with coordinating dies and a customized Tulip Shaping Mold, will allow you to surround yourself with realistic replicas of the first flowers of spring! Graceful illustrations of delicate tulip bouquets, elegant flower pot arrangements, and colorful meadow like scenes garnish delicate backgrounds adorned in beautiful brocades, dainty lace like patterns and soft floral images. This beautiful collection is certain to put a spring in your step and a song in your heart! Here'e my inspiration for today...


Products Used
Tulip Time Cling Stamp Set, HCPC-3858
Tulip Bouquet Cling Stamp Set, HCPC-3859
Tulip Vase & Fillers Cling Stamp Set, HCPC-3860
Tulip Time Die, HCD1-7218
Tulip Bouquet Die, HCD1-7219
Tulip Vase & Fillers Die, HCD1-7220
Tulip Time Paper Collection, HCDP1-298
3D Tulip Shaping Mold, HCFB1-472
Special Birthday Sentiments Cling Stamp Set, HCPC-3843
Petite Pocket Accents Die, HCD1-7212
Elegant Pocket Accents Die, HCD1-7213
Ornamental Tags Die, HCD1-7203
Eyelet Oval & Basics Small Die, HCD1-7156
Stack and Store Daubers-Pack of 30, HCDA2-450
Pastel Pearl Stamens-Small, HCS1-457-1
Designer Dries Clear Adhesive, 159723
Rajni Chawla's Crystal Clear, PGM15015
Double Dots 100pc. -3D Foam Circles, DDOTS
Ranger Archival Ink Pad - Vibrant Fuchsia, RACP524
Ranger Archival Ink Pad - Leaf Green, RACP436

Other Products: White Cardstock, Big-Shot Machine, Ruby Microfine Glitter, Sequins.

For more tips on creating with the Tulip Time collection, watch the tutorial at https://youtu.be/rfYMxeNBmJk.

Instructions: Cardstock size 6"x 12" and fold it into half, final size 6"x 6". Take pattern paper from the collection and tear the edges and adhere it on the card base as shown.

Cut two dies from Petite Pocket Accents on white cardstock and adhere them with foam tape and sprinkle crystal clear glitter. Cut one eyelet oval die and color at the edges of the oval die and then take one stamp from Tulip Bouquet with versamark ink and sprinkle embossing powder-Tinsel-Bridal and heat it as shown and then adhere this oval embellishment with foam tape. Cut one die from Elegant Pocket Accents on white cardstock and add ruby microfine glitter on the base of the die and add this embellishment at the back of the oval die.

Stamp one vase image from Tulip Bouquet on white cardstock with archival ink-jet black and cut it with coordinating die and sprinkle crystal clear glitter using Designer Dries Clear Adhesive and adhere it with foam tape as seen on the picture.

Stamp some Petals from Tulip Time on white cardstock using archival ink-vibrant fuchsia and cut them with coordinating die and color them with the same ink both inside and outside and shape them using 3D Tulip Shaping Mold. Assemble them as per tutorial and then add stamens and prills at the centre of the flower and add crystal clear glitter. Stamp some tulip leaves with archival ink-library green on white cardstock and cut them with coordinating die and shape them using Flower shaping tool kit

Stamp some fillers from Tulip Vase and fillers with versmark ink and sprinkle embossing powder-gold and heat them and cut these stamps with coordinating die. Add these tulip flowers and fillers leaves on the vase as shown.

Cut one tag from Ornamental Tags Die set and add sentiment from Special Birthday Sentiments with archival ink-jet black.

Sunday 6 January 2019

Caring Sunflowers

Dear Friends,
This collection Classic Sunflower is from Heartfelt CreationsThis collection is designed with the warmth of home, Here's my inspiration


Products Used
Ornate Pocket Accents Die, HCD1-7214
Decorative Pocket Accents Die, HCD1-7211
Classic Sunflower Cling Stamp Set, HCPC-3626
Classic Sunflower Die, HCD1-753
Ornamental Tags Die, HCD1-7203
Heartfelt Love Sentiments Cling Stamp Set, HCPC-3804
Stack and Store Daubers-Pack of 30, HCDA2-450
Designer Dries Clear Adhesive, 159723
Rajni Chawla's Crystal Clear, PGM15015
Double Dots 100pc. -3D Foam Circles, DDOTS
Ranger Archival Ink Pad - Monarch Orange, RACP239
Ranger Archival Ink Pad - Sunflower, RACP005
Ranger Archival Ink Pad - Jet Black, RACP468
Groove Golf Tool Set, DMCT4185
Redland Elements, 26redland

Other Products: White cardstock, Big Shot Machine, clear glass micro beads.

For more tips on creating with the pocket dies, watch the tutorial at https://youtu.be/uDhKUj9AAMo.

Instructions: Card size 6"x6" (final Size). Adhere pattern paper from the Collection with distress and torn edges.

Cut one die from Ornate pocket Accents on white cardstock and adhere it with foam tape to give some dimension, as shown. Cut two decorative die on white cardstock and adhere them on the left side and on the right side as shown and then add crystal clear glitter using Designer Dries Clear Adhesive.

Stamp some classic sunflowers from Classic Sunflower Cling Stamp set using archival ink-orange blossom and cut them using the coordinating die and follow this tutorial how to make the sunflowers. Sprinkle some clear glass micro bead to the flower using Designer Dries Clear Adhesive. Add some sunflower seeds around the sunflower with cute little bug.

Cut one Ornate tag die on white cardstock and add sentiment from Heartfelt Love Sentiments Cling Stamp Set using archival ink-jet black. Adhere it with foam tape as shown.

Friday 4 January 2019

Sweet Birthday Love

Dear Friends,


Products Used
Floral Fashionista Paper Collection, HCDP1-297
Floral Corset Cling Stamp Set, HCPC-3856
Floral Corset Die, HCD1-7216
Elements of Fashion Cling Stamp Set, HCPC-3857
Elements of Fashion Die, HCD1-7217
Elegant Pocket Accents Die, HCD1-7213
Ornate Pocket Accents Die, HCD1-7214
Ornamental Tags Die, HCD1-7203
Sweetheart Borders Die, HCD1-7161
Special Birthday Sentiments Cling Stamp Set, HCPC-3843
Stack and Store Daubers-Pack of 30, HCDA2-450
Designer Dries Clear Adhesive, 159723
Rajni Chawla's Crystal Clear, PGM15015
Double Dots 100pc. -3D Foam Circles, DDOTS
Ranger Archival Ink Pad - Plum, RACP499
Ranger Archival Ink Pad - Rose Madder, RACP638
Ranger Archival Ink Pad - Jet Black, RACP468
Funnel Tray, 359503
Zig Clean Color Real Brush Markers - 36 Pack, 478455

Other Products: White cardstock, Big Shot Machine, pink glitter.

For more tips on creating with the Floral Fashionista collection, watch the tutorial at https://youtu.be/9V6JOqdQtC8.

Instructions: Card size 6" x 6" (final Size).

Cut one sweetheart border die on white cardstock and on the pattern paper for the base of the die and distress the edges using archival ink-plum. Adhere it with foam tape as shown and sprinkle crystal clear glitter using Designer Dries Clear Adhesive.

Stamp one floral corset image with archival ink-plum and cut it with coordinating die and color it with Zig Clean Color Real Brush Markers with Color In Watercolor Brush-Fine and stamp one dress image from elements of fashion cut it coordinating die and cut the spiral image from the dress and color it with Zig Clean Color Real Brush Markers with Color In Watercolor Brush-Fine attach them to the corset and adhere this embellishment with foam tape to give some dimension.

Cut one ornate tag die on white cardstock and stamp sentiment from Special Birthday Cling Stamp Set with archival ink-jet black.

Cut One die from Elegant Pocket Accents Die set on white cardstock and cut one base of the die and layer it with pink glitter and attach this die at the back of the card as seen on the picture.