Wednesday, 25 May 2022

Classic Wild Poppy

Dear Friends,

How are you spending the last days of May.....are you taking time to create something beautiful today? How about getting started on some cheery cards that will quickly make you feel like you're in a creative oasis in a floral paradise. Here's my another inspiration for today with beautiful Heartfelt Creations-Wild Poppy Collection...


Products Used:

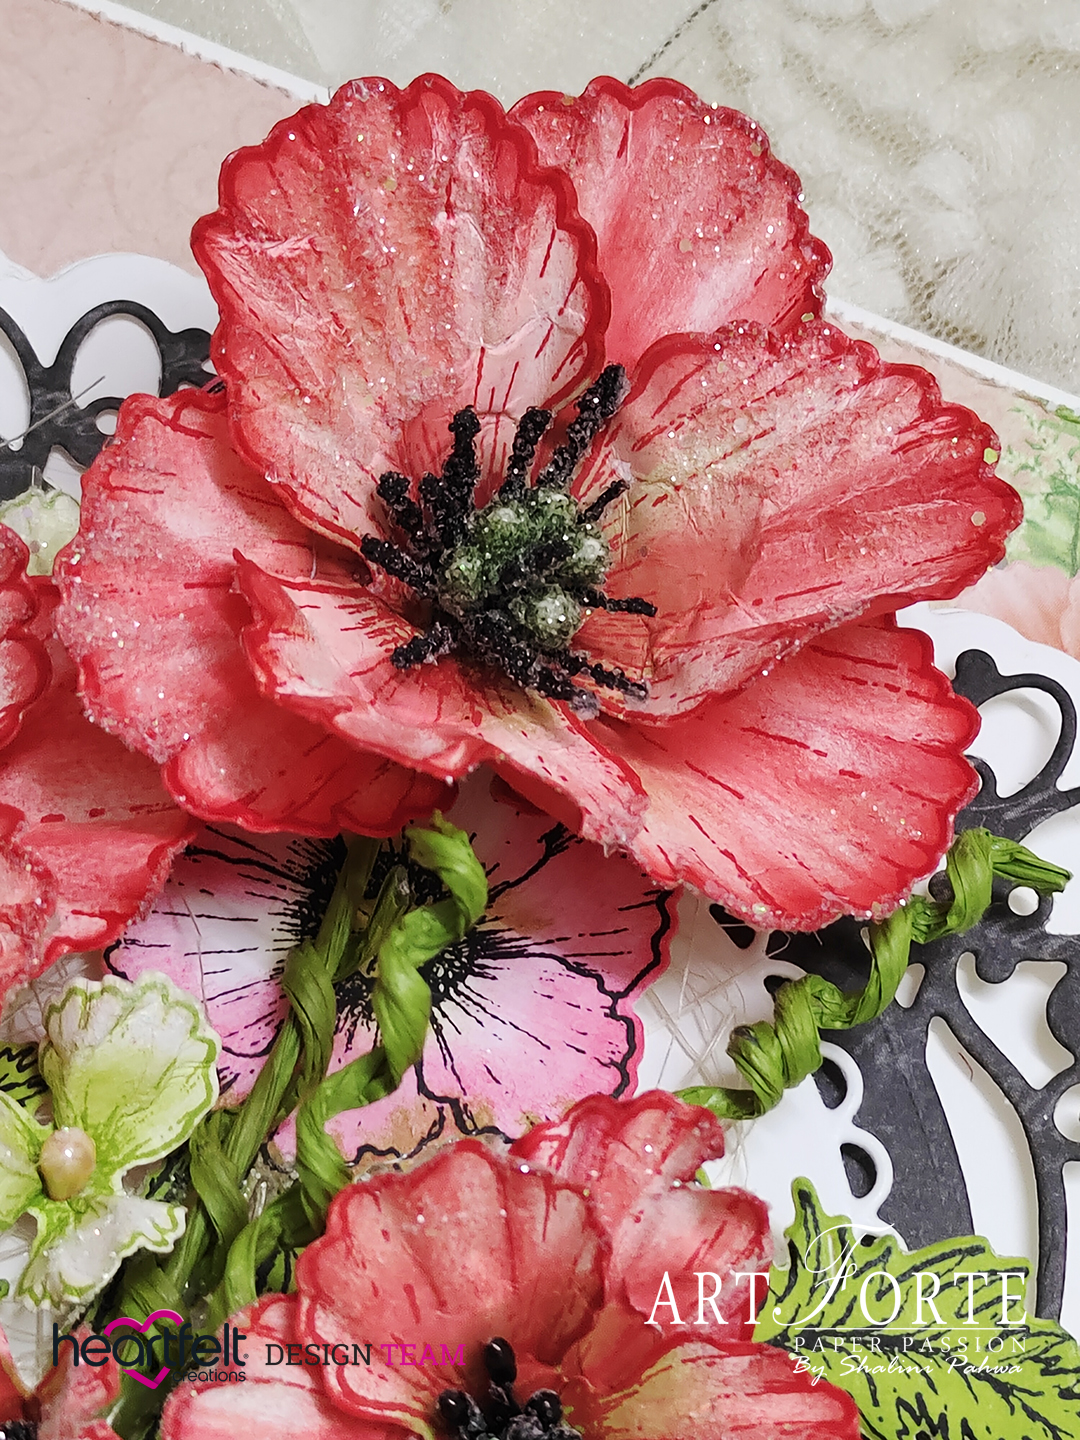
Take white cardstock size 7.25” x 10.5” and create card base using outer die from HCD2-7383 Simply Classic Rectangles Frame Die. Take same die cut on white cardstock and adhere it on card base using designer dries clear adhesive. Now from same die set cut one intricate border die on black pattern paper from HCDP1-2139 wild poppy paper collection. Using same die cut on another pattern paper from the collection, adhere it using foam tape. From the same die set, cut another layer of die on pattern paper, as seen on picture, adhere it using foam tape. Cut another intricate die on black pattern paper and light color pattern paper. Cut another inner intricate die on black pattern paper and adhere it as shown.

Now stamp two corner images from HCPC-3987 Wild Poppy Accents Cling Stamp Set on Deluxe flower Shaping paper using archival ink-jet black and cut them using coordinating die, HCD1-7405 Wild Poppy Accents Die. Color them using archival ink-leaf green, vermillion.

Stamp some flower petals from HCPC-3986 Wild Poppy Cling Stamp on Deluxe flower shaping paper-white using archival ink-vermillion and leaf green (small size). Cut them with coordinating die HCD1-7404 Wild Poppy Die, shape them using HCFB1-5011 Wild Poppy Mold. Add stamens- HCS1-457-2 Pastel Pearl Stamens-Medium, HCS1-459-2 Rock Candy Stamens-Small, HCS1-459-3 Assorted Beads Stamens-Medium.

Arrange all these embellishments as pictured.

Other Products: Big Shot Plus Machine.

Wednesday, 18 May 2022

Courtyard Poppies

Dear Friends,
We  make flower making simple, and add lasting beauty and elegance in our own lives and the lives of our loved ones….Here's another inspiration with the Heartfelt Creations NEW Wild Poppy Collection!


Products Used:
Wild Poppy Die, HCD1-7404

Instructions:

Card size 6”x6”. Take pattern paper from HCDP1-2139 Wild Poppy Paper Collection, tear edges and adhere it on card base using Designers Dries Clear Adhesive.

Next Cut two dies from HCD1-7398 French Courtyard Die on white cardstock, add black pattern paper from collection, adhere it on the back of die cuts as shown and adhere these die cuts using foam tape. Now cut another die which is eyelet circle die from HCD2-7306 Decorative Circle Frames Die on white cardstock and adhere it using foam tape. Cut one small die from HCD1-7398 French Courtyard Die on white cardstock and adhere it using designer dries clear adhesive.

Now stamp some images from HCPC-3987 Wild Poppy Accents Cling Stamp Set, HCPC-3988 Wild Poppy Bouquet Cling Stamp Set on Deluxe flower Shaping paper using archival ink-jet black and cut them using coordinating die, HCD1-7405 Wild Poppy Accents Die, HCD1-7406 Wild Poppy Bouquet Die. Color them using archival ink-leaf green and vermillion.

Stamp some flower petals from HCPC-3986 Wild Poppy Cling Stamp on Deluxe flower shaping paper-white using archival ink-vermillion and leaf green (small size). Cut them with coordinating die HCD1-7404 Wild Poppy Die, shape them using HCFB1-5011 Wild Poppy Mold. Add stamens- HCS1-457-2 Pastel Pearl Stamens-Medium, HCS1-459-2 Rock Candy Stamens-Small. Make some swirls with HCSF1-498 EZ Stem Floral wire, as seen on picture.

Arrange all these embellishments as pictured.

Other Products: Big Shot Plus Machine

Wednesday, 11 May 2022

Wild Poppy Bouquet- Heartfelt Creations-Debuting-the Wild Poppy Collection

 Dear Friends,

Today's the day Heartfelt Creations- Wild Poppy Collection becomes available to everyone! Maximize your creativity with the versatility of the Wild Poppy Collection! From beginner to advanced, it’s an essential set to showcase your flowershaping skills! Layer them up for a full and impressive dimensional flower, or make a stunning bouquet with single layer flowers! The variety of flowers complete with the 3D flower shaping mold create endless possibilities! Here's my inspiration for today...


Products Used:

Wild Poppy Paper Collection, HCDP1-2139

Wild Poppy Cling Stamp Set, HCPC-3986

Wild Poppy Die, HCD1-7404

3D Wild Poppy Shaping Mold, HCFB1-5011

EZ Stem Floral Wire - Pack of 12, HCSF1-498

Wild Poppy Accents Cling Stamp Set, HCPC-3987

Wild Poppy Accents Die, HCD1-7405

Wild Poppy Bouquet Cling Stamp Set, HCPC-3988

Wild Poppy Bouquet Die, HCD1-7406

Decorative Circle Frames Die, HCD2-7306

Deluxe Flower Shaping Paper Pack of 50 - White, HCPP1-475

Deluxe Flower Shaping Kit, HCST1-401

Pastel Pearl Stamens-Medium, HCS1-457-2

Rock Candy Stamens-Small, HCS1-459-4

Assorted Bead Stamens-Medium, HCS1-459-3

Stack and Store Daubers-Pack of 30, HCDA2-450

Double Dots 100pc. -3D Foam Circles, DDOTS

Designer Dries Clear Adhesive, 159723

Rajni Chawla's Crystal Clear, PGM15015

Ranger Archival Ink Pad - Jet Black, RACP468

Ranger Archival Ink Pad - Vermillion, RACP461

Ranger Archival Ink Pad - Coastal Coral, RACP300

Ranger Archival Ink Pad - Leaf Green, RACP436

Spellbinders Tool N' One, 359848

Instructions:

Card size 5” x 7”. Take pattern paper from HCDP1-2139 Wild Poppy Paper Collection, tear edges and adhere it on card base using Designers Dries Clear Adhesive.

Next, cut one outer die from HCD2-7306 Decorative Circle Frames Die on white cardstock and adhere it using foam tape. Now cut intricate die from the same set on pattern paper from HCDP1-2139 Wild Poppy Paper Collection and adhere it using foam tape. Now cut another die which is eyelet circle die from same set on white cardstock and adhere it using foam tape.

Now stamp some images from HCPC-3987 Wild Poppy Accents Cling Stamp Set, HCPC-3988 Wild Poppy Bouquet Cling Stamp Set on Deluxe flower Shaping paper using archival ink-jet black and cut them using coordinating die, HCD1-7405 Wild Poppy Accents Die, HCD1-7406 Wild Poppy Bouquet Die. Color them using archival ink-leaf green, vermillion.

Stamp some flower petals from HCPC-3986 Wild Poppy Cling Stamp on Deluxe flower shaping paper-white using archival ink-vermillion and leaf green (small size). Cut them with coordinating dieHCD1-7404 Wild Poppy Die, shape them using HCFB1-5011 Wild Poppy Mold. Add stamens- HCS1-457-2 Pastel Pearl Stamens-Medium, HCS1-459-2 Rock Candy Stamens-Small. Attach HCSF1-498 EZ Stem Floral wire to Poppy flowers, make some swirls with these stem wires.

Arrange all these embellishments as pictured.

Other Products: Big Shot Plus Machine.

Wednesday, 4 May 2022

Cheerful Get Well

Dear Friends,

Today new inspiration that allows you to jump start your creativity and inspire you to create something beautiful with Heartfelt Creations Decorative Dragonfly Collections... 


Products Used:

Decorative Dragonfly Paper Collection, HCDP1-2138

Decorative Dragonfly Cling Stamp Set, HCPC-3983

Decorative Dragonfly Die, HCD1-7394

Classic Butterfly Companion Die, HCD2-7401

Decorative Circle Frames Die, HCD2-7306

Deluxe Flower Shaping Paper Pack of 50 - White, HCPP1-475

Luxe Gold Cardstock, HCGP1-488

Cheerful Note Sentiments Cling Stamp Set, HCPC-3848

Stack and Store Daubers-Pack of 30, HCDA2-450

Rajni Chawla's Vellum Flowerite - 10 Sheets, 18002

Double Dots 100pc. -3D Foam Circles, DDOTS

Designer Dries Clear Adhesive, 159723

Embossing Powder - Gold, 359760

Spellbinders Tool N' One, 359848

Ranger Archival Ink Pad - Vibrant Fuchsia, RACP524

Ranger Archival Ink Pad - Forget-Me-Not, RACP412

Instructions:

Card Size 5” x 7” (on white cardstock, final size). Take pattern paper from the HCDP1-2138 Decorative Dragonfly Paper Collection, and adhere it using designer dries clear adhesive. Cut one set of die on white cardstock from HCD2-7401 Classic Butterfly Companion Die, adhere it using foam circles.

Cut one eyelet circle die from HCD2-7306 Decorative Circle Frames Die on white cardstock, adhere it using foam circles.

Stamp some dragonfly images on vellum from HCPC-3983 Decorative Dragonfly Cling Stamp Set using versamark ink and sprinkle gold embossing powder and heat set. Cut  with coordinating die. Cut bigger dragonfly die on gold cardstock and adhere both layer together as shown.

Add Sentiment from HCPC-3848 Cheerful Note Sentiments Cling Stamp on white cardstock using archival ink-vibrant Fuchsia and forget me not.

Other Products: Big Shot Plus Machine

Wednesday, 27 April 2022

Anniversary Gate

Dear Friends,

Today's the day Heartfelt Creations the French Gate & Courtyard Dies become available to everyone!

Are you a crafter that loves making unique decorative cards, but sometimes feel limited, or uninspired? Do you feel stuck when trying to add extra beauty and decoration to the confines of a card? Don’t waste another minute feeling frustrated with limitations! Recover your joy of crafting, and the anticipation of surprise and awe in the faces of your friends and family with the new French Gate & Courtyard Elegance Dies! These dies are designed to create quick and easy 4.25”x 5.5”, 5”x7”, and 6”x 6” cards, decorative accent pieces, or embellishments on any of your favorite papercrafting projects!


Products Used:

French Gate Die, HCD1-7397

Moments in Time Paper Collection, HCDP1-2134

Decorative Circle Frames Die, HCD2-7306

Rectangular Floral Frame Cling Stamp Set, HCPC-3974

Rectangular Floral Frame Die, HCD1-7385

Deluxe Flower Shaping Paper Pack of 50 - White, HCPP1-475

Luxe Gold Cardstock, HCGP1-488

Celebrate Love Sentiments Cling Stamp Set, HCPC-3847

Wisteria Petals Cling Stamp Set, HCPC-3911

Wisteria Petals Die, HCD1-7295

Leafy Accents Cling Stamp Set, HCPC-3835

Leafy Accents Die, HCD1-7193

3D Leafy Accents Shaping Mold, HCFB1-467

Eyelet Circle & Basics Small Die, HCD1-7154

Pastel Pearl Stamens-Small, HCS1-457-1

Pastel Pearl Stamens-Medium, HCS1-457-2

Stack and Store Daubers-Pack of 30, HCDA2-450

Ranger Archival Ink Pad - Mulberry, RACP994

Ranger Archival Ink Pad - Vibrant Fuchsia, RACP524

Ranger Archival Ink Pad - Carnation Red, RACP399

Spring Bling Prills - 12 Pack, ANC850

Double Dots 100pc. -3D Foam Circles, DDOTS

Designer Dries Clear Adhesive, 159723

Spellbinders Tool N' One, 359848

Scor-Pal Measuring & Scoring Board, 173842

Rajni Chawla's Crystal Clear, PGM15015 

Instructions:

Take white cardstock size 7.125” x 9.375”, score at .5” on 7.125” side and fold it. Take another white cardstock measuring 6.625” x 9.375” and adhere it on the fold. Card base is ready. Take another layer of Luxe Gold cardstock and pattern paper from Moment in Time Collection, adhere using foam tape.

Cut three dies from HCD1-7397 French Gate Die on white cardstock and Luxe Cardstock and adhere them together and layer them as shown, using designer dries clear adhesive.

Cut one eyelet circle die from HCD2-7306 Decorative Circle Frames Die on white cardstock and adhere it using foam tape. Cut one circle die from HCD1-7154 Eyelet Circle and Basics Small Die on white cardstock and add sentiment from HCPC-3847 Celebrate Love Sentiments Cling Stamp Set using archival ink-Mulberry.

Stamp some leaves from HCPC-3835 Leafy Accents Cling Stamp Set on white cardstock using archival ink-library green and cut it with coordinating die, shape them using  HCFB1-467 3D Leafy Accents Shaping Mold. Arrange them on the right side of the eyelet circle.

Stamp some small flowers from Rectangular Floral Frame Cling Stamp Set HCPC-3974, using archival ink-vibrant fuchsia and cut them with coordinating die, color them using carnation red, shape them and add stamens.

Stamp some petals from Wisteria Petals Cling Stamp Set HCPC-3911 using archival ink-leaf green, cut them with coordinating die and color them at the centre using same ink, shape them and add prills.

Assemble the flowers together as pictured.

Other Products: Big Shot Machine, Archival Library Green ink.

Wednesday, 20 April 2022

Bordered Golden Dragonfly

Dear Friends,

Another inspiration for today with beautiful Heartfelt Creations-Decorative Dragonfly Collection. Here's the picture...


Products Used:

Decorative Dragonfly Paper Collection, HCDP1-2138

Decorative Dragonfly Cling Stamp Set, HCPC-3983

Decorative Dragonfly Die, HCD1-7394

Dragonfly Florals Cling Stamp Set, HCPC-3985

Dragonfly Florals Die, HCD1-7396

Classic Companion Border Die, HCD2-7400

Thank You Sentiments Cling Stamp Set, HCPC-3846

Decorative Circle Frames Die, HCD2-7306

Luxe Gold Cardstock, HCGP1-488

Stack and Store Daubers-Pack of 30, HCDA2-450

Double Dots 100pc. -3D Foam Circles, DDOTS

Designer Dries Clear Adhesive, 159723

Rajni Chawla's Vellum Flowerite - 10 Sheets, 18002

Embossing Powder - Gold, 359760

Spellbinders Tool N' One, 359848

Ranger Archival Ink Pad - Leaf Green, RACP436

Instructions:

Card Size 6” x 6” (on white cardstock, final size). Take pattern paper from the HCDP1-2138 Decorative Dragonfly Paper Collection, and adhere it using designer dries clear adhesive.

Cut one die from HCD2-7400 Classic Companion Border Die on white cardstock and adhere it using designer dries clear adhesive, as shown.

Cut two layers of die on white cardstock from HCD2-7306 Decorative Circles Frames Die and adhere it using foam tape. Add Sentiment from HCPC-3846 Thank You Sentiments Cling Stamp Set using archival ink- Leaf Green. Sprinkle some gold color using brush.

Stamp some flower images from HCPC-3985 Dragonfly Florals Cling Stamp set using distress ink-Seedless Preserves, Dusty Concord, Forest Moss, Peeled paint, and giving water color effect, cut  with coordinating die and adhere using foam tape and designer dries clear adhesive.

Stamp some dragonfly images on vellum from HCPC-3983 Decorative Dragonfly Cling Stamp Set and HCPC-3985 Dragonfly Florals Cling Stamp using versamark ink and sprinkle gold embossing powder and heat it. Cut with coordinating dies. Cut from same die on gold cardstock, adhere both layers togther and adhere to card front as shown.

Other Products: White cardstock, Distress Ink-Seedless Preserves, Dusty Concord, Forest Moss, Peeled paint, Big-Shot Plus Machine.

Thursday, 14 April 2022

Golden Dragonflies-Debuting Heartfelt Creations the Decorative Dragonfly Collection

Dear Friends,

Today's the day the Heartfelt Creations-Decorative Dragonfly Collection becomes available to everyone!

Add the beauty of fluttering dragonflies for crafting projects of all shapes and sizes! From focal points, to finishing touches, the decorative dragonflies are the perfect addition to every crafty stash! Introducing the New Heartfelt Creations- Decorative Dragonfly Collection! Here's my inspiration for today...


Products Used:

Decorative Dragonfly Paper Collection, HCDP1-2138

Decorative Dragonfly Cling Stamp Set, HCPC-3983

Decorative Dragonfly Die, HCD1-7394

Daydream Florals Cling Stamp Set, HCPC-3984

Daydream Florals Die, HCD1-7395

Flourish Companion Frame Die, HCD2-7399

Just For You Sentiments Cling Stamp Set, HCPC-3845

Decorative Circle Frames Die, HCD2-7306

Luxe Gold Cardstock, HCGP1-488

Stack and Store Daubers-Pack of 30, HCDA2-450

Rajni Chawla's Vellum Flowerite - 10 Sheets, 18002

Double Dots 100pc. -3D Foam Circles, DDOTS

Designer Dries Clear Adhesive, 159723

Designer Dries Clear Adhesive Refill 16 oz., DDC16

Ranger Archival Ink Pad - Garden Patina, RACP992

Embossing Powder - Gold, 359760

Spellbinders Tool N' One, 359848

Instructions:

Card size is 7” x 5” (white cardstock final size). Take pattern paper from the HCDP1-2138 Decorative Dragonfly Paper Collection, and cut it with outer die from HCD2-7399 Flourish Companion Frame Die and adhere it using foam tape. Next, cut intricate outer frame die from same set on white cardstock and adhere it using designer dries clear adhesive. From same die set cut another layer on white cardstock and adhere it using designer dries clear adhesive and foam tape as shown. Add sentiment from HCPC-3845 Just For You Sentiment using archival ink-Garden Patina.

Cut one eyelet circle HCD2-7306 Decorative Circle Frames Die on white cardstock and adhere it using foam tape. Next, sprinkle gold color using brush, as shown.

Stamp some flower images from HCPC-3984 Daydream Florals Cling Stamp set using distress ink- Seedless Preserves, Dusty Concord, Forest Moss, Peeled paint, and giving water color effect, cut it with coordinating die and adhere it using foam tape and designer dries clear adhesive.

Stamp some dragonfly images on vellum from HCPC-3983 Decorative Dragonfly Cling Stamp Set using versamark ink and sprinkle gold embossing powder and heat it. Cut it with coordinating die. Cut from same die on gold cardstock and adhere both layer together as shown.

Other Products: White cardstock, VersaMark, Distress Ink- Seedless Preserves, Dusty Concord, Forest Moss, Peeled paint, Big-Shot Plus Machine.