Thursday, 16 May 2019

Delicately Adorned

Dear friends,

Another inspiration with this beautiful collection Purr-fect Posies Collection by Heartfelt Creations.
Finely illustrated images of loveable kittens at play, and are "purr-fect" for creating furry, fun filled scenes on all of your paper crafting creations, while a "purr-fectly" charming floral cling stamp set and coordinating die, lend themselves to assembling pretty, whimsical dimensional posies "purr-fect" for accenting your summer themed paper craft creations!


Products Used
Purr-fect Posies Paper Collection, HCDP1-2102
3D Purr-fect Posies Shaping Mold, HCFB1-476
Purr-fect Posies Cling Stamp Set, HCPC-3874
Purring and Playful Cling Stamp Set, HCPC-3876
Playful Miss Kitty Cling Stamp Set, HCPC-3877
Playful Miss Kitty Die, HCD1-7241
Purring and Playful Die, HCD1-7240
Purr-fect Posies Die, HCD1-7238
Deluxe Flower Shaping Paper Pack of 50 - White, HCPP1-475
Special Birthday Sentiments Cling Stamp Set, HCPC-3843
Regal Pocket Accents Die, HCD1-7247
Regal Frame & Accents Die, HCD1-7248
Eyelet Diamond Die, HCD1-7227
Adorn It Pocket Accents Die, HCD1-7245
Petite Pocket Accents Die, HCD1-7212
Stack and Store Daubers-Pack of 30, HCDA2-450
Rock Candy Stamens-Small, HCS1-459-4
Designer Dries Clear Adhesive, 159723
Rajni Chawla's Crystal Clear, PGM15015

Other Products: White cardstock, Big-Shot Machine

For more tips on creating with the Purr-fect Posies collection, watch the tutorial at https://youtu.be/88KR6a5RRmg.

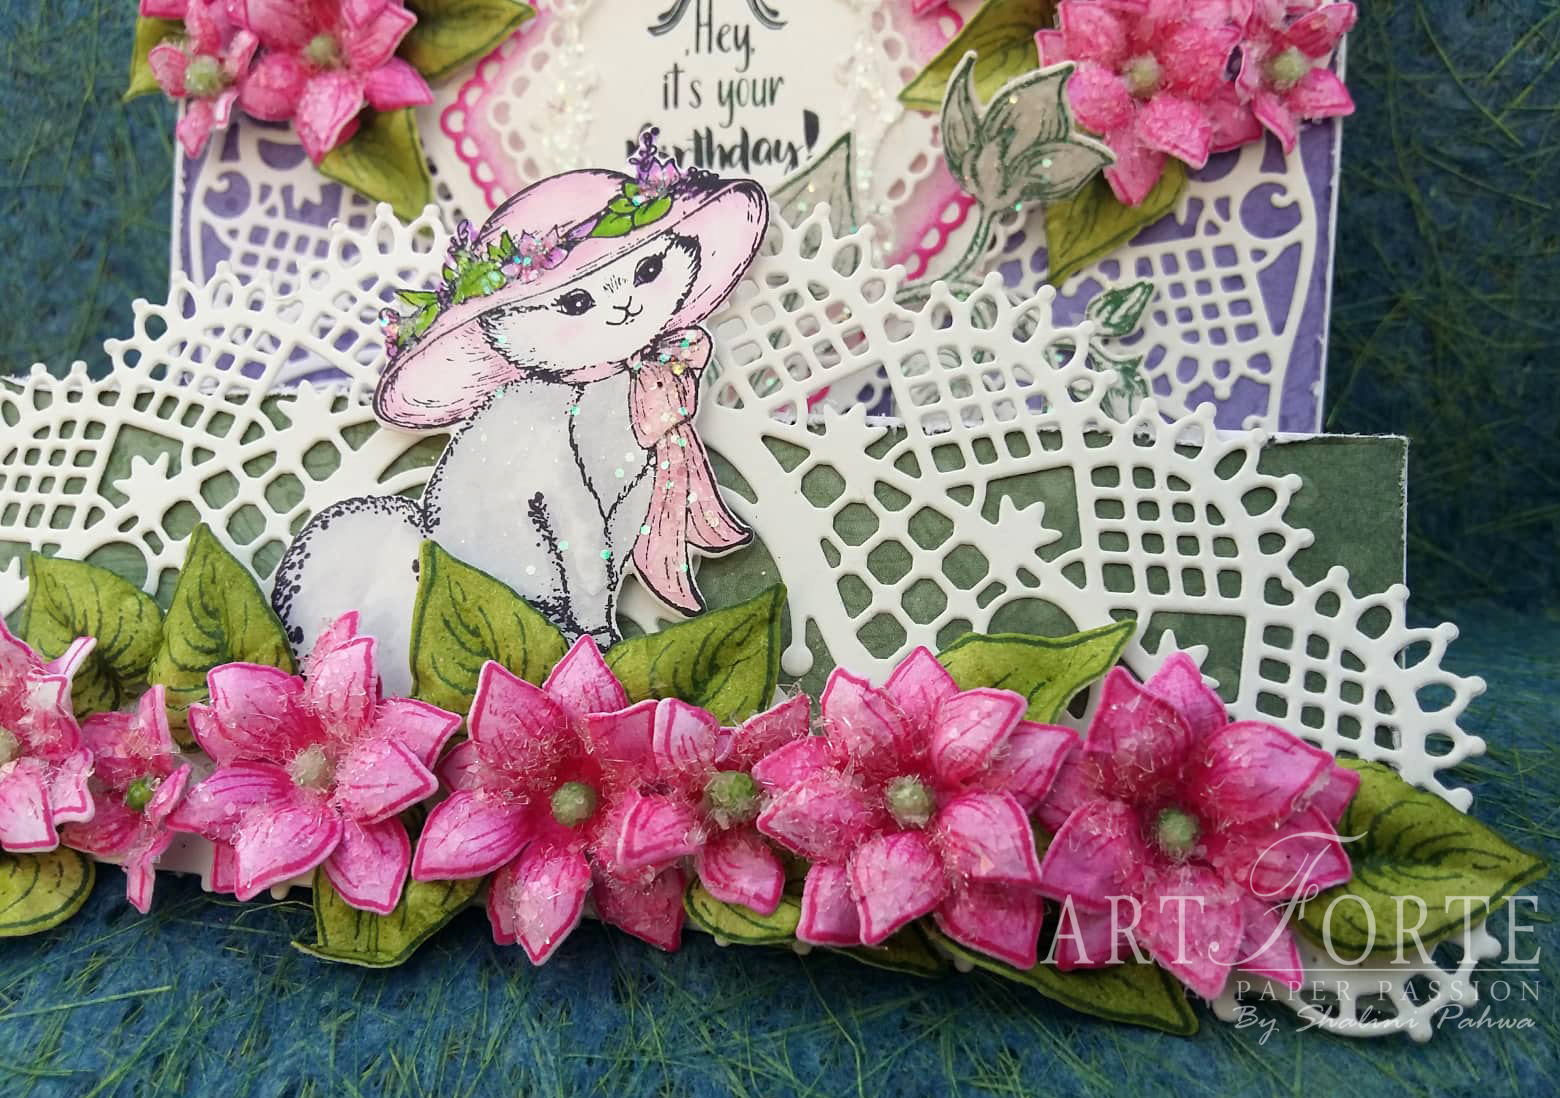
Instructions: Card size is 6" x 14" and score at 4", 8" and 10". It's a step-up card. Cut paper from the collection , tear the edges and adhere to the card base.  

Cut one die from Adorn It Pocket Accents Die from white cardstock and adhere it on the front as shown. Cut another die from Petite Pocket Accents Die on white cardstock, adhere it on the top fold and sprinkle crystal clear glitter using Designer Dries Clear Adhesive.

Cut another two dies from Regal Pocket Accents Die on white cardstock and adhere on the second fold as shown using Designer Dries Clear Adhesive.

Cut three different dies from Eyelet Diamond Die and distress the second layer of eyelet diamond die with archival ink- Vibrant Fuchsia. On the top layer add sentiment from Special Birthday Sentiments Cling Stamp Set using archival ink-Jet Black.

Cut one smallest frame die Regal Frame &Accents Die on white cardstock and cut it into half and sprinkle crystal clear glitter and adhere it on the top layer of eyelet frame die.

Stamp one image from Playful Miss Kitty Cling Stamp Set on white cardstock using archival ink-jet black and cut it with coordinating die and color it with Zig Clean Color Real Brush Markers using Color In Watercolor Brush-Fine and sprinkle crystal clear glitter. Adhere it with foam tape.

Stamp one spray image from Purring and Playful Cling Stamp Set using archival ink-library green, cut it with coordinating die, sprinkle crystal clear glitter and adhere it as ahown.

Stamp some flowers and leaves from Purr-fect Posies using archival ink- Vibrant Fuchsia and Library Green for leaves, cut them with coordinating die and color them with archival ink Vibrant Fuchsia and Leaf Green. Shape them using 3D Purr-fect Posies Shaping Mold, add stamen at the center and sprinkle crystal clear glitter using Designer Dries Clear Adhesive. Now arrange these flowers and leaves as shown.

Tuesday, 7 May 2019

Purr-fect Playdate-Debuting the Purr-fect Posies Collection by Heartfelt Creations

Dear Friends,

Today's the day the Purr-fect Posies Collection becomes available to everyone! Irresistibly charming and fun-filled antics of playful kittens bounding through the summer flower beds, or hiding behind large leafy foliage, ready to pounce on whatever comes their way, provide endless hours of entertainment and can quickly turn one's frown upside down! Whether your favorite kitty is timid or filled with sass from the tip of their nose to the tip of their tail, Heartfelt Creations invite you to celebrate your "purr-fect" fur babies with the new Purr-fect Posies Collection!
Here's my inspiration


Products Used
Purr-fect Posies Paper Collection, HCDP1-2102
3D Purr-fect Posies Shaping Mold, HCFB1-476
Purr-fect Posies Cling Stamp Set, HCPC-3874
Purr-fect Posies Die, HCD1-7238
Purr-fect Playdate Cling Stamp Set, HCPC-3875
Purr-fect Playdate Die, HCD1-7239
Deluxe Flower Shaping Paper Pack of 50 - White, HCPP1-475
Regal Pocket Accents Die, HCD1-7247
Regal Frame & Accents Die, HCD1-7248
Arrows and Banner Die, HCD1-7204
Stack and Store Daubers-Pack of 30, HCDA2-450
Rock Candy Stamens-Small, HCS1-459-4
Designer Dries Clear Adhesive, 159723
Rajni Chawla's Crystal Clear, PGM15015
Double Dots 100pc. -3D Foam Circles, DDOTS
Ranger Archival Ink Pad - Vibrant Fuchsia, RACP524
Ranger Archival Ink Pad - Leaf Green, RACP436
Ranger Archival Ink Pad - Library Green, RACP475
Zig Clean Color Real Brush Markers - 36 Pack, 478455

Other Products: White cardstock, Big-Shot Machine.

For more tips on creating with the Purr-fect Posies collection, watch the tutorial at https://youtu.be/88KR6a5RRmg.

Instructions: Base of the card size is 3.375" x 5.5" (3.375" x 11") as final size, it's a tent fold card. Cut one Regal Frame Die on white cardstock and one on pattern paper from the collection and attach this pattern paper on white cardstock. Now attach this regal frame die on the base of the card. Next, cut another regal frame die on white cardstock as shown. Cut two Regal pocket accent die on white cardstock and attach it on the base of the card on left and right side.

Stamp one image from Purr-fect Playmate Cling stamp on white cardstock using archival ink-jet black and cut it with coordinating die and color it with Zig Clean Color Real Brush Markers using Color In Watercolor Brush-Fine. Sprinkle some crystal clear glitter randomly and adhere it with foam tape to give some dimension.

Stamp some flowers and leaves from Purr-fect Posies using archival ink- Vibrant Fuchsia and Library Green for leaves and cut them with coordinating die. Color them with archival ink Vibrant Fuchsia and Leaf Green and shape them using 3D Purr-fect Posies Shaping Mold. Add stamen to the center of the flowers and sprinkle crystal clear glitter using Designer Dries Clear Adhesive. Now arrange these flowers and leaves as shown.

Cut one Arrows and Banner Die on white cardstock and add sentiment from Purr-fect Playmate Cling stamp Set using archival ink- Vibrant Fuchsia and adhere it with foam tape to give some dimension.

Wednesday, 1 May 2019

Congratulatory Gift Box

Dear Friends,

Another inspiration for Heartfelt Creations today,


Products Used
Fanci-Fold Pocket & Accents Die, HCD1-7246
Regal Pocket Accents Die, HCD1-7247
Album Tags and Accents Die, HCD1-7202
Ornamental Tags Die, HCD1-7203
Large Sweet Peony Die, HCD1-7174
Large Sweet Peony Cling Stamp Set, HCPC-3820
Oakberry Lane Blossoms Die, HCD1-7200
Oakberry Lane Blossoms Cling Stamp Set, HCPC-3842
Celebrate Love Sentiments Cling Stamp Set, HCPC-3847
3D Floral Basics Shaping Mold, HCFB1-464
3D Blossoms Shaping Mold, HCFB1-469
Deluxe Flower Shaping Kit, HCST1-401
Deluxe Flower Shaping Paper Pack of 50 - White, HCPP1-475
Designer Dries Clear Adhesive, 159723
Metal Tip for Adhesive Bottles, 352854
Rajni Chawla's Crystal Clear, PGM15015
Stack and Store Daubers-Pack of 30, HCDA2-450
Double Dots 100pc. -3D Foam Circles, DDOTS
Assorted Pearl Stamens-Medium, HCS1-459-2

Other Products: White cardstock, Big-Shot Machine, Gold cardstock, Lace-Ribbon, hole punch

For more tips on creating with the Sweet Peony collection, watch the tutorial at https://youtu.be/L9_MLkvpGPQ.

For more tips on creating with the Oakberry Lane collection, watch the tutorial at https://youtu.be/HirfUN8NEYY.

For more tips on creating with the pocket accent dies, watch the tutorial at https://youtu.be/A8sxtkGXWLQ.

Instructions: Create box with white cardstock measuring 10 x 10" and the final box size is 5 x 5". Cut two golden cardstock size 5 x 8" and score at 1" on the top as seen on the picture. Paste this golden cardstock at the base of the box. Cut two gold cardstock measuring 5 x 2.5" adhere it on the sides of the boxes as seen on the picture. Cut six Fanci-Fold Pocket & Accents Die on white cardstock and adhere them as seen on the picture. Cut two Regal Pocket Accents Die and adhere it on the top of the golden cardstock as seen on the picture. Punch a hole and add lace ribbon as seen on the picture.

Cut one Eyelet Decorative Accent Die from Albums tags and Accents Die Set and adhere it at the centre of the gold cardstock using Designer Dries Clear Adhesive, as seen on the picture. Cut two swirling ornamental tag die from Ornamental Tags Die set and add some color on the edges of the die as seen on the picture and add sentiment from Celebrate Love Sentiments Cling Stamp Set using archival ink - Vibrant Fuchsia and Plum. Adhere it with foam tape.

For Peony Flowers - Stamp Large Sweet Peony on Deluxe Flower Shaping paper using archival ink - cactus flower, stamp leaves with leaf green and cut them with coordinating dies. Color peonies with archival ink-cactus flower and for leaves use leaf green. Use shaping stylus to shape leaves. Shape peonies with -3D Floral Basics Shaping Mold and then give some shape by twisting with fingers and add stamens at the center of the flower and sprinkle some crystal clear glitter using Designer Dries Clear Adhesive. For Oakberry flowers- Stamp some Oakberry Lane Blossoms on Deluxe Flower Shaping paper using archival ink-carnation red and cut them with coordinating die. Color them with the same ink and shape them using 3D Blossoms Shaping Mold and add stamens at the center of the flower and then add crystal clear glitter. Arrange the flowers and leaves onto gift box as shown.

Wednesday, 24 April 2019

Mother's Rose Album

Dear Friends,

Today we are bringing you a fun surprise -debuting the new 8x8 Insta-Album and Elegant Pocket Dies. These just became available today for everyone!
Today my inspiration with Elegant Pocket Dies by Heartfelt Creations


Products Used
Floral Fashionista Paper Collection, HCDP1-297
Thank You Sentiments Cling Stamp Set, HCPC-3846
Adorn It Pocket Accents Die, HCD1-7245
Regal Pocket Accents Die, HCD1-7247
Regal Frame & Accents Die, HCD1-7248
Classic Rose Cling Stamp Set, HCPC-3752
Classic Rose Die, HCD1-7110
3D Rose Shaping Mold, HCFB1-462
3D Petite Florals Shaping Mold, HCFB1-471
Floral Fashionista Cling Stamp Set, HCPC-3855
Floral Fashionista Die, HCD1-7215
Designer Dries Clear Adhesive, 159723
Rajni Chawla's Crystal Clear, PGM15015
Stack and Store Daubers-Pack of 30, HCDA2-450
Double Dots 100pc. -3D Foam Circles, DDOTS
Groove Golf Tool Set, DMCT4185
Assorted Pearl Stamens-Medium, HCS1-459-2
Assorted Pearl Stamens-Small, HCS1-459-1
Ranger Archival Ink Pad - Plum, RACP499
Ranger Archival Ink Pad - Leaf Green, RACP436
Ranger Archival Ink Pad - Library Green, RACP475
Ranger Archival Ink Pad - Jet Black, RACP468


Other Products: White cardstock, Chipboard, Big-Shot Machine

For tips on creating with the Mini Album and Pocket dies, watch the tutorial at https://youtu.be/72AzbXtt2jU.

For more tips on creating with the Classic Rose collection, watch the tutorial at https://youtu.be/Z8P070kC3oo.

Instructions: To see more of this album, click here.  Create album cover with chipboard measuring 4.75 x 6.5"(2) album cover front and back) spine 3". Combine these three chipboard covering with Floral Fashionista Pattern Paper both front and back sides. For Cover, cut one base Regal Frame Die on white cardstock and one on pattern paper and attach this pattern paper on the base of regal frame die. Cut two intricate regal frame die on white cardstock and adhere it on the base of the regal frame die with foam tape to give some dimension. Cut another regal frame die as seen on the picture and stamp sentiment from Thank You sentiment cling stamp set with archival ink-jet black and adhere this die with foam tape .

Stamp few flowers from Classic Rose Cling Stamp Set with archival ink-vibrant fuchsia and leaves with library green and cut them with coordinating die and color them using archival ink-vibrant fuchsia and tea rose and leaf green for leaves and shape them using 3D Rose Shaping Mold and using Groove Golf Tool Set also. Create two roses. Sprinkle crystal clear glitter using Designer Dries Clear Adhesive.

Stamp some flowers from Floral Fashionista cling stamp set with archival ink-cactus flower and cut them with coordinating die and color them with archival ink rose madder and cactus flower and shape them with Petite Florals 3D Shaping Mold and then add stamen at the centre and sprinkle crystal clear glitter.

Cut one Adorn It Pocket Accents die on white cardstock and adhere it on spine and add sentiment from floral fashionista pattern paper as seen on picture.

Create hinges measuring 1.5 x 6.125" scoring at half inches(make three of these on white cardstock). For pages create six pockets measuring 4.5 x 6.25".(final size for pages) Attach these pages on these hinges. And create six pocket leaf using Regal pocket Accents Die on white cardstock as seen on picture.

Wednesday, 17 April 2019

Sweets and Lace

Dear Friends,

Another inspiration with Heartfelt Creations-Sugarspun Collection
Here's the picture...


Products Used
Sugarspun Paper Collection, HCDP1-2101
Sugarspun Cupcake Cling Stamp Set, HCPC-3870
Sugarspun Cupcake Die, HCD1-7234
Eyelet Lace Frames Die, HCD2-7192
Stack and Store Daubers-Pack of 30, HCDA2-450
Ranger Texture Paste Opaque, RINK44444
Hot Mama Prills, ANC821
Mauvie Gala Glitz, 13mvi
Designer Dries Clear Adhesive, 159723
Rajni Chawla's Crystal Clear, PGM15015
Double Dots 100pc. -3D Foam Circles, DDOTS
Ranger Archival Ink Pad - Vibrant Fuchsia, RACP524
Zig Clean Color Real Brush Markers - 36 Pack, 478455
Color In Watercolor Brush - Fine, 409311

Other Products: White cardstock, Big-Shot Machine.

For more tips on creating with the Sugarspun collection, watch the tutorial at https://youtu.be/kLs8-V6iBG8.

Instructions: Cut one Eyelet lace Frames die on white cardstock and adhere it on white cardstock size 4" x 6" as pictured using Designer Dries Clear Adhesive.

Create a cupcake shaped card and adhere it with foam tape. With the cupcake shaped die cut one pattern paper and distress the edges with archival ink-Vibrant Fuchsia and adhere it on the shaped card.

Now stamp one Cupcake from Sugarspun Cupcake Cling stamp set with archival ink-Vibrant Fuchsia, cut it with coordinating die and color it with Zig Clean Color Real Brush Marker on the cover of the cupcake. Decorate the icing using texture paste and sprinkle prills, crystal clear glitter and mauve gala glitz.

Add sentiment from the paper collection.

Wednesday, 10 April 2019

Sweets for the Sweet-Debuting the Sugarspun Collection by Heartfelt Creations

Dear friends,

Today's the day the Sugarspun Collection becomes available to everyone! Tantalizing treats showcased in beautifully decorated display windows draw you to the Sweet Shoppe storefront, beckoning you to step inside! Welcomed by the aroma of sweet baked goodies and sugar-laden confections, in no time at all, the mouthwatering scents of vanilla and almond have you convinced to browse and pick out an irresistible delight...after all, you deserve it! It's time to treat yourself and indulge in the newest and sweetest Sugarspun Collection! by Heartfelt Creations.
Here's my inspiration


Products Used
Sugarspun Paper Collection, HCDP1-2101
Sprinkled Confetti Cupcakes Cling Stamp Set, HCPC-3871
Sweet Shoppe Treats Cling Stamp Set, HCPC-3872
Sprinkled Confetti Cupcakes Die, HCD1-7235
Sweet Shoppe Treats Die, HCD1-7236
Eyelet Diamond Die, HCD1-7227
Lacy Diamond Die, HCD1-7228
Petite Pocket Accents Die, HCD1-7212
Special Birthday Sentiments Cling Stamp Set, HCPC-3843
Stack and Store Daubers-Pack of 30, HCDA2-450
Designer Dries Clear Adhesive, 159723
Rajni Chawla's Crystal Clear, PGM15015
Double Dots 100pc. -3D Foam Circles, DDOTS
Ranger Archival Ink Pad - Jet Black, RACP468
Ranger Archival Ink Pad - Vibrant Fuchsia, RACP524
Zig Clean Color Real Brush Markers - 36 Pack, 478455
Color In Watercolor Brush - Fine, 409311

Other Products: White cardstock, Big-Shot Machine, Sequins.

For more tips on creating with the Sugarspun collection, watch the tutorial at https://youtu.be/kLs8-V6iBG8.

Instructions: Card base final size is 6" x 6". Cut pattern paper from the collection at 5.875" x 5.875", distress the edges and adhere to card base.

Take another pattern paper from the collection measuring 5.875" x  2.125" and distress the edges and adhere it on the center of the card as shown. Cut two Petite Pocket Accents Die on white cardstock and adhere them on the top and bottom edges of the center panel.

Cut One Lacy Diamond Die on white cardstock and adhere it with foam tape. Cut one Eyelet Diamond Die on golden cardstock and adhere it with foam tape. Take another Eyelet Diamond Die which is smaller than the golden Eyelet Diamond Die and add sentiment from Special Birthday Sentiments Cling Stamp using archival ink-jet black. Adhere this sentiment with foam tape at the centre of the golden Eyelet Diamond Die as seen on the picture.

Stamp two cupcakes from Sprinkled Confetti Cupcakes Cling Stamp Set using archival ink-jet black and vibrant fuchsia and cut it with coordinating die and color them with Zig Clean Color Real Brush Markers and sprinkle some crystal clear glitter and adhere them with foam tape. Stamp two image from Sweet Shoppe Treats using archival ink-jet black and cut it with coordinating Die and color it Zig Clean Color Real Brush Markers and sprinkle crystal clear glitter and adhere them with foam tape as shown.

Add some sequins randomly.


Tuesday, 2 April 2019

Springtime Hankies

Dear Friends,

Another inspiration for Heartfelt Creations with Cherry Blossom Retreat Collection.
Made this beautiful tissue box. Here's the pic


Products Used
Deluxe Flower Shaping Paper Pack of 50 - White, HCPP1-475
Cherry Blossom Retreat Paper Collection, HCDP1-2100
3D Cherry Blossom Shaping Mold, HCFB1-474
Tweet Cherry Blossoms Cling Stamp Set, HCPC-3866
Cherry Blossom Retreat Cling Stamp Set, HCPC-3867
Wishing Well Oasis Cling Stamp Set, HCPC-3868
Tweet Cherry Blossoms Die, HCD1-7230
Cherry Blossom Retreat Die, HCD1-7231
Wishing Well Oasis Die, HCD1-7232
Decorative Pocket Accents Die, HCD1-7211
Daydreams Bridge Die, HCD1-7233
Bright Pearl Stamens-Small, HCS1-458-1
Stack and Store Daubers-Pack of 30, HCDA2-450
Designer Dries Clear Adhesive, 159723
Rajni Chawla's Crystal Clear, PGM15015
Double Dots 100pc. -3D Foam Circles, DDOTS
Ranger Archival Ink Pad - Carnation Red, RACP399
Ranger Archival Ink Pad - Leaf Green, RACP436
Ranger Archival Ink Pad - Library Green, RACP475

Other Products: White cardstock, Big-Shot Machine, Black Pigma Brush Archival Ink Pen, MDF tissue box

For more tips on creating with the Cherry Blossom Retreat collection, watch the tutorial at https://youtu.be/OaA2da5H-E0.

Instructions: Take MDF tissue box and cover it with Cherry Blossom Retreat Pattern Paper and distress the edges.

Cut two large intricate die from Daydreams Bridge on white cardstock and adhere on the top of the tissue box as pictured, and then distress with archival ink-carnation red and nuvo embellishment mousse-indian gold. Cut two Decorative Pocket Accents Die on white cardstock and adhere on the front of the tissue box as shown.

Stamp some leafy branches from Cherry Blossom Retreat with archival ink-library green, cut them with coordinating die and color them with leaf green and arrange them as pictured.

Now stamp some Tweet Cherry Blossoms flower and leaves with archival ink-carnation red and library green, cut them with coordinating die, color them with archival ink-carnation red and leaf green, and shape them with 3D mold. Assemble them as shown and add stamens (add black color at the edge of the stamens), prills and crystal clear glitter. Assemble these flowers and leaves on the top and front of the tissue box.

Next, stamp wishing well image from Wishing Well Oasis stamp set with archival ink-jet black, cut it with coordinating die and color it with Zig Clean Color Real Brush Markers. Adhere t at the left side of the tissue box and adhere a few cherry blossom flowers as pictured. Cut one Decorative Pocket Accents Die on white cardstock and adhere it using Designer Dries Clear Adhesive.

Add sentiment from the collection and adhere it with foam tape.