Showing posts with label Shalini Pahwa. Show all posts

Tuesday, 16 May 2023

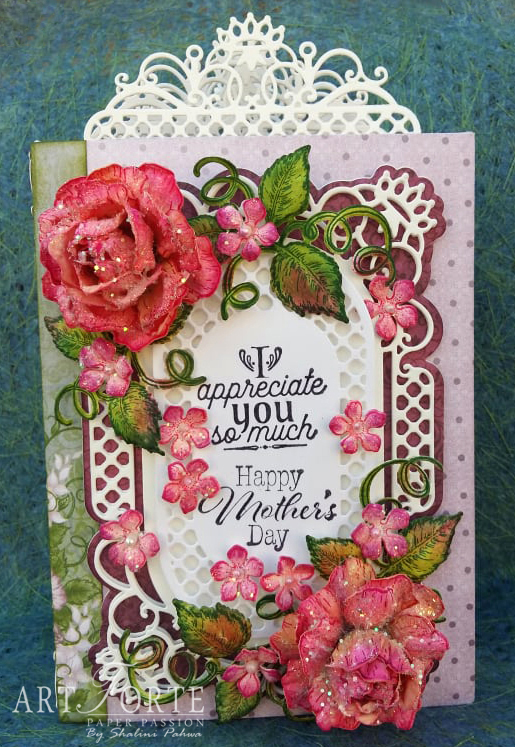
Folded Floral

Dear Friends,

Regain your confidence to create elegant cards full of elegance with the delicate stamp and die frames and sentiments… Pair these images with the delightful paper collection, a palette of pale pinks with pops of fuchsia and lush greens! Give your projects that extra dose of “wow” you’ve been wanting! Start creating elegant stamped and diecut frame cards with sentiments featuring Heartfelt Creations the Floral Sentiments Collection! Here's my inspiration for today...


Products Used:

Floral Sentiments Paper Collection, HCDP1-2151

Friend Floral Sentiment Cling Stamp Set, HCPC-31024

Friend Floral Sentiment Die, HCD1-7460

Curvy Decorative Border Die, HCD3-7442

Luxe Gold Cardstock, HCGP1-488

Deluxe Flower Shaping Paper Pack of 50 - White, HCPP1-475

Stack and Store Daubers-Pack of 30, HCDA2-450

Ranger Archival Ink Pad - Jet Black, RACP468

Ranger Archival Ink Pad - Mulberry, RACP994

Ranger Archival Ink Pad - Vibrant Fuchsia, RACP524

Rajni Chawla's Crystal Clear, PGM15015

Designer Dries Clear Adhesive, 159723

Double Dots 100pc. -3D Foam Circles, DDOTS

Spellbinders Tool N' One, 359848

Zig Clean Color Real Brush Markers - 48 Pack, 478594

Scor-Pal Measuring & Scoring Board, 173842

Scor-Tool, 368771

Instructions:

Cardstock size 7.5” x 12”. On 12” side score at 3”, 4.5”, 7.5”, 9”. Take pattern paper from HCDP1-2151 Floral Sentiments Paper Collection, cut them in strips size 2.875” x 7.375 (3strips), 1.375” x 7.375” (2 strips).

Cut two dies from HCD3 7442 Curvy Decorative Border Die on luxe gold cardstock and adhere them on left and right side as shown using designer dries clear adhesive.

Stamp image from HCPC 31024 Friend Floral Sentiment Cling Stamp set using archival ink-Jet Black on white cardstock and  with archival ink-mulberry on pattern paper from the collection and cut it with coordinating HCD1 7459 Special Floral Sentiment Die. Color it with Zig markers, as shown. Create shaker by cutting four layers of dies, add prills and cover with clear cardstock and on top of clear cardstock adhere stamped image.

Using same stamp on white cardstock using archival ink-vibrant fuchsia, cut it with coordinating die and add crystal clear glitter and adhere it with foam tape as shown. It can be displayed on table.

Other Products: Big Shot Plus Machine.

Wednesday, 19 April 2023

Gorgeous Gateway Floral

Dear Friends,

Experience the elegant beauty of the Heartfelt Creation s- Iris Garden Collection! Treat yourself to an exquisite floral paper collection filled with an iris garden, softly colored springtime hues of light lavenders, pops of purple, soft yellows, and spring greens. Here's my inspiration for today...

Products Used:

Iris Garden Paper Collection, HCDP1-2150

Iris Garden Petals Cling Stamp Set, HCPC-31020

Iris Garden Petals Die, HCD1-7456

3D Iris Shaping Mold, HCFB1-5014

Iris Garden Accents Cling Stamp Set, HCPC-31022

Iris Garden Accents Die, HCD1-7458

Deluxe Flower Shaping Kit, HCST1-401

Deluxe Flower Shaping Paper Pack of 50 - White, HCPP1-475

Slim Gateway Rectangle Die, HCD3-7446

Simple Centerpiece Die, HCD1-7367

Special Birthday Sentiments Cling Stamp Set, HCPC-3843

Stack and Store Daubers-Pack of 30, HCDA2-450

Pastel Pearl Stamens-Small, HCS1-457-1

Pastel Pearl Stamens-Medium, HCS1-457-2

Ranger Archival Ink Pad - English Ivy, RACP970

Ranger Archival Ink Pad - Leaf Green, RACP436

Ranger Archival Ink Pad - Deep Purple, RACP430

Ranger Archival Ink Pad - Sunflower, RACP005

Rajni Chawla's Crystal Clear, PGM15015

Designer Dries Clear Adhesive, 159723

Spellbinders Tool N' One, 359848

Double Dots 100pc. -3D Foam Circles, DDOTS

Instructions:

Take cardstock size 9” x 9.5” and fold it (side fold). Create card base using outer die from HCD3-7446 Slim Gateway Rectangle Die on white cardstock. Using same die, cut one piece on white cardstock and one piece on pattern paper from HCDP1-2150 Iris Garden Paper Collection, adhere them together to give some strength, as shown. Now from same die set cut intricate die on white cardstock and adhere it using foam tape.

Stamp petals from HCPC-31020 Iris Garden Petals on white cardstock using archival ink-deep purple, sunflower and for leaves using archival ink-english ivy, cut them with coordinating  HCD1-7456 Iris Garden Petals Die, color them using same ink,  shape them using HCFB1-5014 3D Iris Shaping Mold, add stamens and crystal clear glitter.

For small filler flowers stamp small iris petals using archival ink-sunflower, cut them using coordinating die, color them using same ink, shape them using 3D iris mold. Use one set of small petal and take another set of petal, cut it into half and adhere one half petal to another set and add one stamen and create a small filler flower, as shown.

Stamp images from HCPC-31022 Iris Garden Accents Cling Stamp Set on white cardstock using archival ink-deep purple, English ivy, leaf green, cut them with coordinating die HCD1-7458 Iris Garden Accents Die, color them using same ink and shape them using deluxe flower shaping tool kit. Arrange them on card front as pictured.

Cut one small die from HCD1-7367 Simple centrepiece die on white cardstock and add sentiment from  HCPC-3843 Special Birthday sentments Cling Stamp Set using archival ink-deep purple, and adhere it using foam tape.

Other Products: Big Shot Plus Machine.


Tuesday, 20 September 2022

Vibrant Hues

Dear Friends,

Maximize your creativity with the Heartfelt Creations -Hollyhock Garden Collection! Keep it simple, for those quick and easy cards, or create unique blooms on tall spikes, perfect for creating floral gardens with depth and variation in sizes.... Here's my inspiration for today...


Instructions:

Card size 5” x 7”. Take pattern paper from HCDP1-2143 Hollyhock Garden Paper Collection, tear edges, adhere it on card base using designer dries clear adhesive.

Cut one die base on pattern paper using die HCD2-7349 Palace Gateway Die, adhere it using foam tape, cut one intricate die on white cardstock, adhere it on pattern paper using foam tape.

Stamp one fence image on white cardstock using versamark ink, sprinkle embossing powder-enchanted gold and cut it with coordinating HCD1-7419 Hollyhock Fence Die. Adhere it using designer dries clear adhesive and foam tape.

Create hollyhock flowers using HCPC-3999 Hollyhock Petals & Leaves Cling Stamp on white cardstock using archival ink-vibrant fuchsia for flower petals and english ivy for leaves and small flower petals, cut them using coordinating HCD1-7417 Hollyhock Petals & Leaves Die. Color them using archival ink-vivid chartreuse, leaf green, coastal coral, vibrant fuchsia, mulberry,  shape them using HCFB1-5012 3D Hollyhock Shaping Mold, giving a touch of Encore Ultimate Metallic Ink Pad-Gold for leaves. Add stamens and prills and randomly add crystal clear glitter on edges of flowers.

Stamp some stems from HCPC-31000 Hollyhock Stem & Blooms Cling Stamp on white cardstock using archival ink- English ivy, cut them using coordinating die HCD1-7418 Hollyhock Stem & Blooms Die, color them using archival ink-leaf green, english ivy. From same stamp set make base for hollyhock flowers using archival ink- english ivy, cut them with coordinating die and color them using archival ink-leaf green.

Stamp one stem image from HCPC-31001 Hollyhock Fence Cling Stamp on white cardstock using archival ink-english ivy, cut them with coordinating die HCD1-7419 Hollyhock Fence Die, color them using archival ink-sunflower and leaf green, add randomly add crystal clear glitter. Arrange all flowers, leaves, stems as pictured.

Cut one small oval die from HCD2-7309 Eleborate Oval frames Die Die on white cardstock, add sentiment from HCPC-3847 Celebrate Love Sentiments Cling Stamp using archival ink-vibrant fuchsia, adhere it using foam tape.

Other Products: Big Shot Plus Machine. Embossing Powder-Enchanted gold.

Tuesday, 9 August 2022

Celestial Sounds

Dear Friends,

Exciting news, Heartfelt Creations - Joyous Noel Collection just launched for everyone! Whether you’re wanting to create projects with angelic images, or feature heartfelt messages with exquisite detail and design, you can create this and so much more! Here's my inspiration for today...


Products Used:

Joyous Noel Paper Collection, HCDP1-2142

Starry Noel Angel Cling Stamp Set, HCPC-3997

Starry Noel Angel Die, HCD1-7415

Noel Decorative Die, HCD1-7416

Eyelet Oval & Basics Large Die, HCD1-7157

Large Festive Poinsettia Cling Stamp Set, HCPC-3957

Large Festive Poinsettia Die, HCD1-7358

Large 3D Festive Poinsettia Shaping Mold, HCFB1-5007

Small Festive Poinsettia Cling Stamp Set, HCPC-3958

Small Festive Poinsettia Die, HCD1-7359

Small 3D Festive Poinsettia Shaping Mold, HCFB1-5008

Deluxe Flower Shaping Paper Pack of 50 - White, HCPP1-475

Luxe Gold Cardstock, HCGP1-488

Stack and Store Daubers-Pack of 30, HCDA2-450

Bright Pearl Stamens-Medium, HCS1-458-2

Pastel Bead Stamens-Medium, HCS1-457-3

Double Dots 100pc. -3D Foam Circles, DDOTS

Designer Dries Clear Adhesive, 159723

Rajni Chawla's Crystal Clear, PGM15015

Ranger Archival Ink Pad - Night Sky, RACP007

Ranger Archival Ink Pad - Periwinkle, RACP014

Ranger Archival Ink Pad - Goldenrod, RACP987

Encore Ultimate Metallic Ink Pad - Gold, TSUM10

Spellbinders Tool N' One, 359848

Instructions:

Card size 5” x 7”. Take pattern paper from the HCDP1-2142 Joyous Noel Paper Collection, tear edges and adhere it on card base using designers dries clear adhesive.

Cut two base die cuts from HCD1-7416 Noel Decorative Die on pattern paper from the collection and intricate die from HCD1-7416 Noel Decorative die on white cardstock and gold cardstock. Paste gold cardstock behind the white cardstock die little offset to give some dimension. Add crystal clear glitter. Adhere them on the card front.

Cut one Eyelet Oval on white cardstock and one die on pattern paper, adhere them together a little offset, stamp some star images from HCPC-3997 Starry Noel Angel Cling Stamp set using Encore ultimate metallic ink pad-gold on white oval. Adhere Eyelet oval die using foam tape. Stamp angel image from HCPC-3997 Starry Noel Angel Cling Stamp set using archival ink-Goldenrod and Night sky, cut it with coordinating die HCD1-7415 Starry Noel Angel Die, add crystal clear glitter, adhere it using foam tape, as  pictured.

Stamp some poinsettia flowers from HCPC-3957 Large Festive Poinsettia Cling Stamp Set, using archival ink-goldenrod, HCPC-3958 Small Festive Poinsettia Cling Stamp Set using archival ink-night sky, cut with coordinating die HCD1-7358 Large Festive Poinsettia Die and HCD1-7359 Small Festive Poinsettia Die, color them using archival ink-goldenrod and periwrinkle and shape them using HCFB1-5007 Large 3D Festive Poinsettia Shaping Mold, HCFB1-5008 Small 3D Poinsettia Mold, adhere two petals together, add stamens, and crystal clear glitter.

Stamp some leaves from HCPC-3958 Small Festive Poinsettia Cling Stamp Set using archival ink-Periwrinkle, cut with coordinating die, color them using archival ink-goldenrod. Arrange poinsettia flowers and leaves on the card front as shown.

Stamp one Noel from HCPC-3997 Starry Noel Angel Cling Stamp set using archival ink-Night Sky, cut it with coordinating die HCD1-7415 Starry Noel Angel Die, adhere it to the right of the angel..

Other Products: Big shot plus machine.

Wednesday, 20 April 2022

Bordered Golden Dragonfly

Dear Friends,

Another inspiration for today with beautiful Heartfelt Creations-Decorative Dragonfly Collection. Here's the picture...


Products Used:

Decorative Dragonfly Paper Collection, HCDP1-2138

Decorative Dragonfly Cling Stamp Set, HCPC-3983

Decorative Dragonfly Die, HCD1-7394

Dragonfly Florals Cling Stamp Set, HCPC-3985

Dragonfly Florals Die, HCD1-7396

Classic Companion Border Die, HCD2-7400

Thank You Sentiments Cling Stamp Set, HCPC-3846

Decorative Circle Frames Die, HCD2-7306

Luxe Gold Cardstock, HCGP1-488

Stack and Store Daubers-Pack of 30, HCDA2-450

Double Dots 100pc. -3D Foam Circles, DDOTS

Designer Dries Clear Adhesive, 159723

Rajni Chawla's Vellum Flowerite - 10 Sheets, 18002

Embossing Powder - Gold, 359760

Spellbinders Tool N' One, 359848

Ranger Archival Ink Pad - Leaf Green, RACP436

Instructions:

Card Size 6” x 6” (on white cardstock, final size). Take pattern paper from the HCDP1-2138 Decorative Dragonfly Paper Collection, and adhere it using designer dries clear adhesive.

Cut one die from HCD2-7400 Classic Companion Border Die on white cardstock and adhere it using designer dries clear adhesive, as shown.

Cut two layers of die on white cardstock from HCD2-7306 Decorative Circles Frames Die and adhere it using foam tape. Add Sentiment from HCPC-3846 Thank You Sentiments Cling Stamp Set using archival ink- Leaf Green. Sprinkle some gold color using brush.

Stamp some flower images from HCPC-3985 Dragonfly Florals Cling Stamp set using distress ink-Seedless Preserves, Dusty Concord, Forest Moss, Peeled paint, and giving water color effect, cut  with coordinating die and adhere using foam tape and designer dries clear adhesive.

Stamp some dragonfly images on vellum from HCPC-3983 Decorative Dragonfly Cling Stamp Set and HCPC-3985 Dragonfly Florals Cling Stamp using versamark ink and sprinkle gold embossing powder and heat it. Cut with coordinating dies. Cut from same die on gold cardstock, adhere both layers togther and adhere to card front as shown.

Other Products: White cardstock, Distress Ink-Seedless Preserves, Dusty Concord, Forest Moss, Peeled paint, Big-Shot Plus Machine.

Wednesday, 30 June 2021

Exotic-ally Colored

Dear Friends,

Add the beauty of exquisite butterflies for crafting projects of all shapes and sizes! From shaped cards, focal points or adding finishing touches, the Floral Butterflies are the perfect addition to every crafty stash! Here's my inspiration for today with Heartfelt Creations-Floral Butterflies


Products Used:

Floral Butterfly Paper Collection, HCDP1-2127

Large Floral Butterfly Cling Stamp Set, HCPC-3951

Large Floral Butterfly Die, HCD2-7352

Elegant Swirl Gateway Die, HCD2-7327

Stack and Store Daubers-Pack of 30, HCDA2-450

Designer Dries Clear Adhesive, 159723

Double Dots 100pc. -3D Foam Circles, DDOTS

Ranger Archival Ink Pad - Vibrant Fuchsia, RACP524

Ranger Archival Ink Pad - Majestic Violet, RACP494

Ranger Archival Ink Pad - Sunflower, RACP005

Rajni Chawla's Crystal Clear, PGM15015

Spellbinders Tool N' One, 359848 

Other Products: White cardstock, Big-Shot Machine, Gold Glitter.

Instructions: Make base of the card from Elegant Swirl Gateway Die HCD2-7327 on white cardstock. From the same die, cut another layer of pattern paper from the Floral butterfly paper collection. Next, from the same die set, cut intricate layer of die on white cardstock and adhere it with foam tape. Cut another layer of die on pattern paper, as seen on picture.

Cut outer layer of butterfly die on white cardstock and adhere it using Designer Dries Clear Adhesive. Stamp Large Floral Butterfly Cling Stamp- HCPC-3951 on pattern paper using archival ink- Vibrant Fuchsia and cut it with coordinating die and add gold glitter, adhere it using foam tape. Cut the upper layer of intricate butterfly on white cardstock, add crystal clear glitter and adhere it using Designer Dries Clear Adhesive.

Wednesday, 20 January 2021

Starry Night Winter Cottage

Dear Friends,

Another inspiration for Heartfelt Creations with gorgeous Countryside Cottage Collections. Here's the picture...


Products Used:

Countryside Cottage Paper Collection, HCDP1-2123

Countryside Winter 'scapes Cling Stamp Set, HCPC-3942

Countryside Winter 'scapes Die, HCD1-7336

Eyelet Circle & Basics Small Die, HCD1-7154

Starry Night Decorative Die, HCD1-7252

Rounded Window Frame Die, HCD1-7271

Stack and Store Daubers-Pack of 30, HCDA2-450

Double Dots 100pc. -3D Foam Circles, DDOTS

Ranger Archival Ink Pad - Sunflower, RACP005

Ranger Archival Ink Pad - Leaf Green, RACP436

Ranger Archival Ink Pad - Library Green, RACP475

Ranger Archival Ink Pad - Jet Black, RACP468

Ranger Archival Ink Pad - Manganese Blue, RACP454

Zig Clean Color Real Brush Markers - 48 Pack, 478594

Color In Watercolor Brush - Fine, 409311

Nuvo Crystal Drops - Autumn Red, NU683

Rajni Chawla's Crystal Clear, PGM15015

Other Products: White cardstock, Big-Shot Machine, Glue Gun.

Instructions: Card size is 6” x 6” (final size). Take pattern paper from the collection HCDP1-2123 Countryside Cottage Paper Collection and tear the edges and adhere it on card base. Take another pattern paper from the collection, cut it in triangle shape as pictured and adhere it using foam tape. Cut three border dies from Starry Night Decorative Die on white cardstock and adhere them on the left and right edges of the card base and sprinkle some crystal clear glitter. Adhere the same die (cut in half) under triangular shape paper, as seen on picture.

Cut one die from Rounded Window Frame Die Set HCD1-7271 on white cardstock and adhere it using foam tape at the center of a card. Cut one circle die on pattern paper using die from Eyelet Circle and Basics Small die HCD1-7154, distress the edges using archival ink-manganese blue.

Stamp a few images from Countryside Winter ’scapes Cling Stamp Set HCPC-3942, on white cardstock using archival ink-jet black, cutting with coordinating die-Countryside Winter ’scapes Die HCD1-7336, color them using Zig Clean Color Real Brush Markers and adhere using foam tape and add crystal clear glitter, nuvo crystal drops-Autumn Red (on berries).

Tuesday, 29 September 2020

Bright and Beautiful Zinnia

 Dear Friends,

Another inspiration with beautiful Heartfelt Creations-Summer's Garden Collection. Enjoy the peaceful tranquility of creating large life-like flowers, bursting with layers, and admire your handcrafted bouquet. Here's my inspiration for today...


Products Used:

Summer's Garden Paper Collection, HCDP1-2119

Deluxe Flower Shaping Paper Pack of 50 - White, HCPP1-475

Large 3D Zinnia Shaping Mold, HCFB1-491

Small 3D Zinnia Shaping Mold, HCFB1-492

Large Garden Zinnia Cling Stamp Set, HCPC-3923

Small Garden Zinnia Cling Stamp Set, HCPC-3924

Elegant Especially for You Cling Stamp Set, HCPC-3934

Large Garden Zinnia Die, HCD1-7314

Small Garden Zinnia Die, HCD1-7315

Elegant Especially for You Die, HCD1-7319

Elaborate Oval Frames Die, HCD2-7309

Album Tags and Accents Die, HCD1-7202

Luxe Gold Cardstock, HCGP1-488

Ranger Archival Ink Pad - Carnation Red, RACP399

Ranger Archival Ink Pad - Library Green, RACP475

Ranger Archival Ink Pad - Leaf Green, RACP436

Ranger Archival Ink Pad - Sunflower, RACP005

Ranger Archival Ink Pad - Plum, RACP499

Ranger Archival Ink Pad - Tiger Lily, RACP670

Ribbit Prills, ANC825

Go Man Go Prills, ANC818

Designer Dries Clear Adhesive, 159723

Other Products: Diamond Dust, White Cardstock, Big Shot Machine, Glue Gun.

For more ideas on creating with the Special Sentiments Stamps & Dies, watch the tutorial at https://youtu.be/-dYnAWXIH3E.

For more tips on creating with the Summer's Garden Collection watch the tutorial at https://youtu.be/kYiP8qJZ4rE.

For more ideas on creating with the 5 x 7 Decorative Frame Dies, watch the tutorial at https://youtu.be/qdBFA5VpmSo.

Instructions: Card size is 5” x 7” (final Size). Cut Base size from Elaborate Oval Frames Die HCD2-7309 on pattern paper. From the same set cut decorative layer on white cardstock. Cut One die from Album tags and accents die on white cardstock and distress the edges with archival ink-tiger lily.

Stamp one sentiment from Elegant especially For You Cling Stamp set HCPC-3934 using archival ink-Tiger Lily, carnation red and plum, and cut using coordinating Die HCD1-7319. Add Glitter.

Stamp some flowers and leaves from Large Garden Zinnia Cling HCPC-3923 and Small Garden Zinnia Cling Stamp Set HCPC-3924 on deluxe flower Shaping Paper using archival ink-carnation red and Library Green. Cut them with coordinating Dies HCD1-7314, HCD1-7315. Color using archival ink-Sunflower and leaf green. Next emboss them using Mold. After arranging layers and adhering, add some prills at the center of flower. Add Diamond Dust randomly.

Tuesday, 15 September 2020

Special Garden Floral

Dear Friends,

Explore a bright & colorful Heartfelt Creations-Summer Garden Collection full of fun summertime colors, flowers, ladybugs & butterflies! A perfect setting for your summer themed crafting projects! Stamp, die cut, and shape your own lush summer garden with layers of perfectly shaped flowers using the Garden Zinnia stamps and dies. Enjoy the peaceful tranquility of creating large life-like flowers, bursting with layers, and admire your handcrafted bouquet. Here's my inspiration for today...


Products Used:

Summer's Garden Paper Collection, HCDP1-2119

Deluxe Flower Shaping Paper Pack of 50 - White, HCPP1-475

Large 3D Zinnia Shaping Mold, HCFB1-491

Small 3D Zinnia Shaping Mold, HCFB1-492

Large Garden Zinnia Cling Stamp Set, HCPC-3923

Small Garden Zinnia Cling Stamp Set, HCPC-3924

Special Birthday Sentiments Cling Stamp Set, HCPC-3843

Large Garden Zinnia Die, HCD1-7314

Small Garden Zinnia Die, HCD1-7315

Ornate Ovals Die, HCD1-7305

Decorative Circle Frames Die, HCD2-7306

Royal Elegance Frames Die, HCD2-7307

Ticket and Tags Die, HCD1-7201

Luxe Gold Cardstock, HCGP1-488

Ranger Archival Ink Pad - Carnation Red, RACP399

Ranger Archival Ink Pad - Library Green, RACP475

Ranger Archival Ink Pad - Leaf Green, RACP436

Ranger Archival Ink Pad - Sunflower, RACP005

Ribbit Prills, ANC825

Go Man Go Prills, ANC818

Other Products: Diamond Dust, White Cardstock, Big Shot Machine, Glue Gun.

For more tips on creating with the Summer's Garden Collection watch the tutorial at https://youtu.be/kYiP8qJZ4rE.

Instructions: Card size is 6”x 6” (final Size). Cut Pattern paper from the collection, smaller than the card size, tear the edges and adhere it on the card base.

Cut One Die from Decorative Circle Frames Die HCD2-7306 on the pattern paper from the collection and with same die cut one more die on gold cardstock. Take another layer of die from Ornate Oval Die HCD1-7305 on white cardstock Take another Royal Elegance Frames Die HCD2-7307 and cut them on white cardstock and gold cardstock and assemble all these die cuts as pictured. Stamp Sentiment from Special Birthday Sentiments on the top layer using archival ink-carnation red.

Stamp some flowers and leaves from Large Garden Zinnia Cling HCPC-3923 and Small Garden Zinnia Cling Stamp Set HCPC-3924 on deluxe flower Shaping Paper using archival ink-carnation red and Library Green. Cut them with coordinating Die HCD1-7314, HCD1-7315. Color them using archival ink-Sunflower and leaf green. Next emboss them using Mold. After arranging layer add some prills at the center of flowers. Add Diamond Dust randomly

Tuesday, 18 August 2020

Christmas Night

 Dear Friends,

Maximize your Christmas Creativity with the many scenes of the Heartfelt Creations- Festive Winterscapes Collection. Whether you’re creating a cozy winter village with shops and carolers, or classic nativity scene silhouettes, you can create these and more! Capture all of your favorite winter holiday scenes and preserve them in a fun winterscape snow globe! Here's my inspiration for today...


Products Used:

Festive Winterscapes Paper Collection, HCDP1-2118

Starry Night Winterscapes Die, HCD1-7310

Majestic SwirMl Frames Die, HCD2-7308

Starry Night Winterscapes Cling Stamp Set, HCPC-3920

Stack and Store Daubers-Pack of 30, HCDA2-450

Ranger Archival Ink Pad - Jet Black, RACP468

Ranger Archival Ink Pad - Manganese Blue, RACP454

Rajni Chawla's Crystal Clear, PGM15015

Designer Dries Clear Adhesive, 159723

Spellbinders Tool N' One, 359848

Hydra Sponges, RLHS100

Scor-Pal Measuring & Scoring Board, 173842

Other Products: Hot glue, hot glue gun, scissors, paper trimmer, die cutting machine

For more tips on creating with the Festive Winterscapes Collection watch the tutorial at https://youtu.be/3K3j7I16JBI.

For more ideas on creating with the 5 x 7 Decorative Frame Dies, watch the tutorial at https://youtu.be/qdBFA5VpmSo.

Instructions: Take white cardstock size 10” x 7” and fold in half, place largest Majestic Swirl Frames Die HCD2-7308 overlapping the top fold and die cut to create a shaped card base. Take same die and cut it on pattern paper from Festive Winterscapeses Paper Collection HCDP1-2118. Take white cardstock and cut intricate Majestic Swirl Frames Die HCD2-7308. Dab some Dries Clear glue onto a sponge, apply over die, sprinkle with Rajni Chawla’s Crystal Clear and tap off. Another layer on silver cardstock, as pictured. Stamp sentiment from Starry Night Winterscapes Cling Stamp Set HCPC-3920 using Jet Black archival ink.


Stamp few images from Starry Night winterscapes Cling Stamp Set HCPC-3920 using archival ink- manganese Blue and Jet Black and cutting them using coordinating die Starry Night Winterscapes Die HCD1-7310. Layer them using foam tape. Dab some Dries Clear glue onto a sponge, apply over stamp images, sprinkle with Rajni Chawla’s Crystal Clear and tap off.

Wednesday, 24 April 2019

Mother's Rose Album

Dear Friends,

Today we are bringing you a fun surprise -debuting the new 8x8 Insta-Album and Elegant Pocket Dies. These just became available today for everyone!
Today my inspiration with Elegant Pocket Dies by Heartfelt Creations


Products Used
Floral Fashionista Paper Collection, HCDP1-297
Thank You Sentiments Cling Stamp Set, HCPC-3846
Adorn It Pocket Accents Die, HCD1-7245
Regal Pocket Accents Die, HCD1-7247
Regal Frame & Accents Die, HCD1-7248
Classic Rose Cling Stamp Set, HCPC-3752
Classic Rose Die, HCD1-7110
3D Rose Shaping Mold, HCFB1-462
3D Petite Florals Shaping Mold, HCFB1-471
Floral Fashionista Cling Stamp Set, HCPC-3855
Floral Fashionista Die, HCD1-7215
Designer Dries Clear Adhesive, 159723
Rajni Chawla's Crystal Clear, PGM15015
Stack and Store Daubers-Pack of 30, HCDA2-450
Double Dots 100pc. -3D Foam Circles, DDOTS
Groove Golf Tool Set, DMCT4185
Assorted Pearl Stamens-Medium, HCS1-459-2
Assorted Pearl Stamens-Small, HCS1-459-1
Ranger Archival Ink Pad - Plum, RACP499
Ranger Archival Ink Pad - Leaf Green, RACP436
Ranger Archival Ink Pad - Library Green, RACP475
Ranger Archival Ink Pad - Jet Black, RACP468


Other Products: White cardstock, Chipboard, Big-Shot Machine

For tips on creating with the Mini Album and Pocket dies, watch the tutorial at https://youtu.be/72AzbXtt2jU.

For more tips on creating with the Classic Rose collection, watch the tutorial at https://youtu.be/Z8P070kC3oo.

Instructions: To see more of this album, click here.  Create album cover with chipboard measuring 4.75 x 6.5"(2) album cover front and back) spine 3". Combine these three chipboard covering with Floral Fashionista Pattern Paper both front and back sides. For Cover, cut one base Regal Frame Die on white cardstock and one on pattern paper and attach this pattern paper on the base of regal frame die. Cut two intricate regal frame die on white cardstock and adhere it on the base of the regal frame die with foam tape to give some dimension. Cut another regal frame die as seen on the picture and stamp sentiment from Thank You sentiment cling stamp set with archival ink-jet black and adhere this die with foam tape .

Stamp few flowers from Classic Rose Cling Stamp Set with archival ink-vibrant fuchsia and leaves with library green and cut them with coordinating die and color them using archival ink-vibrant fuchsia and tea rose and leaf green for leaves and shape them using 3D Rose Shaping Mold and using Groove Golf Tool Set also. Create two roses. Sprinkle crystal clear glitter using Designer Dries Clear Adhesive.

Stamp some flowers from Floral Fashionista cling stamp set with archival ink-cactus flower and cut them with coordinating die and color them with archival ink rose madder and cactus flower and shape them with Petite Florals 3D Shaping Mold and then add stamen at the centre and sprinkle crystal clear glitter.

Cut one Adorn It Pocket Accents die on white cardstock and adhere it on spine and add sentiment from floral fashionista pattern paper as seen on picture.

Create hinges measuring 1.5 x 6.125" scoring at half inches(make three of these on white cardstock). For pages create six pockets measuring 4.5 x 6.25".(final size for pages) Attach these pages on these hinges. And create six pocket leaf using Regal pocket Accents Die on white cardstock as seen on picture.

Tuesday, 19 March 2019

Glistening Wonderland

Dear Friends,

Take an adventure on the path less traveled and lose yourself in an enchanting woodsy wonderland filled with magnificent wildlife, beautiful scenic expanses with Heartfelt Creations-Woodsy Wonderland Collection. Here's my inspiration


Products Used
Just For You Sentiments Cling Stamp Set, HCPC-3845
3D Blossoms Shaping Mold, HCFB1-469
Oakberry Lane Blossoms Cling Stamp Set, HCPC-3842
Oakberry Lane Blossoms Die, HCD1-7200
Woodsy Treescape Cling Stamp Set, HCPC-3766
Woodsy Wonderland Cling Stamp Set, HCPC-3767
Woodsy Critters Cling Stamp Set, HCPC-3768
Woodsy Landscape Die, HCD1-7122
Woodsy Wonderland Die, HCD1-7123
Woodsy Critters Die, HCD1-7124
Album Tags and Accents Die, HCD1-7202
Ornamental Tags Die, HCD1-7203
Stack and Store Daubers-Pack of 30, HCDA2-450
Deluxe Flower Shaping Kit, HCST1-401
Assorted Pearl Stamens-Medium, HCS1-459-2
Designer Dries Clear Adhesive, 159723
Rajni Chawla's Crystal Clear, PGM15015
Double Dots 100pc. -3D Foam Circles, DDOTS
Ranger Archival Ink Pad - Leaf Green, RACP436
Ranger Archival Ink pad-Jet Black, RACP468
Ranger Archival Ink pad-Carnation Red, RACP399
Ranger Archival Ink pad-Sunflower, RACP005

Other Products: White cardstock, Big Shot Machine.

For more tips on creating with the Woodsy Wonderland collection, watch the tutorial at https://youtu.be/TldMdgGbYkQ.

For more tips on creating with the tags & sentiments, watch the tutorial at https://youtu.be/eAfLuNkRda4.

For more tips on creating with the Oakberry Lane collection, watch the tutorial at https://youtu.be/HirfUN8NEYY.

Instructions: Cut one Album Tags and Accents Die on white cardstock to create a card base.

Stamp Woodsy Treescape, Woodsy Wonderland on white cardstock with archival ink-jet black, diecut with coordinating dies and sprinkle crystal clear glitter on them. Arrange these embellishments as shown. Now stamp Woodsy Wonder Wonderland Critters on white cardstock, cut with coordinating die and color them with Zig Clean Color Real Brush Marker using Color In Watercolor Brush.

Cut two layer die from Ornamental Tags Die on white cardstock and distress the edges of top layer and stamp the sentiment from Just For You sentiments Cling Stamp collection set with archival ink-jet black and adhere them with foam tape to give some dimension.

Stamp some blossoms and leaves from Oakberry Lane Blossoms Cling Stamp Set with archival ink- carnation red and cut with them matching die and color them with archival ink-carnation red and sunflower and shape them with 3D Blossoms Shaping Mold, add stamens at the centre of the flower, and then add some crystal clear glitter.

Stamp some leaves from Woodsy Treescape with archival ink-jet black and cut them with coordinating die and color them with archival ink-leaf green and sunflower and shape these leaves using deluxe flower shaping kit.

Now arrange these leaves and flowers as shown.

Friday, 23 November 2018

Family Vacation

Hello Friends,

Happy Black Friday....I hope your day is off to a great start and that you had a wonderful Thanksgiving Day with your family & friends. We are so EXCITED to debut Black Friday New Product Releases along with the once a year Black Friday Savings!
Here's my inspiration, hoping you all will love it,


Products Used
Double Dots 100pc. -3D Foam Circles, DDOTS
Funnel Tray, 359503
Designer Dries Clear Adhesive, 159723
Deluxe Flower Shaping Kit, HCST1-401
Stack and Store Daubers-Pack of 30, HCDA2-450
Rajni Chawla's Crystal Clear, PGM15015
Ranger Archival Ink Pad - Jet Black, RACP468
Ranger Archival Ink Pad - Paradise Teal, RACP500
Ranger Archival Ink Pad - Rose Madder, RACP638
Ranger Archival Ink Pad - Leaf Green, RACP436
Ranger Archival Ink Pad - Plum, RACP499
Buttons and Blooms Cling Stamp Set, HCPC-3849
Buttons and Blooms Die, HCD1-7205
Patchwork Daisy Border Cling Stamp Set, HCPC-3853
Patchwork Daisy Cling Stamp Set, HCPC-3852
Patchwork Daisy Paper Collection, HCDP1-296
Patchwork Daisy Border Die, HCD1-7209
Patchwork Daisy Die, HCD1-7208
12" x 12" Insta-Album - Kraft, HCIA1-470
Elegant Pocket Accents Die, HCD1-7213
Decorative Pocket Accents Die, HCD1-7211

Other Products: White cardstock, Big Shot Machine, Pink Glitter, dry grass

For more tips on creating with the Patchwork Daisy collection, watch the tutorial at https://youtu.be/v5BEpcSlmoI.

For more tips on creating with the 12 x 12 Insta-Album, watch the tutorial at https://youtu.be/d5BIbbxA5u4.

Instructions:  Album cover size 12 x 12" Insta-Album-Kraft. On the foldout cover flap take pattern paper from the Patchwork Daisy Collection, distress the edges and adhere it on the flap. Take film strip and distress edges with photos and adhere them with foam tape. Cut three borders from Decorative Pocket Accents Die on white cardstock and paste them behind the film strips as shown. Now stamp some Patchwork Daisy Border on white cardstock with archival ink-jet black and cut them with matching die and sprinkle some crystal clear glitter and arrange these elements as shown.

Now stamp some flowers and buttons from Buttons and Blooms Cling Stamp Set with archival ink-plum on white cardstock and cut them with coordinating die and color them with archival ink-sunshine, rose madder, cactus flower as shown. Then adhere two layers of petals to make one flower and adding button at the centre of the flower and pasting with foam tape and then add some crystal clear glitter on the petals.

Arrange these flowers as shown.

On the main cover, adhere pattern paper from Patchwork Daisy Collection.

Cut white-cardstock with torn edges in triangle shape and cut seven-eight die cuts from decorative pocket accents die set and adhere them with foam tape and with some dry grass.

Now stamp some flowers and buttons from Buttons and Blooms Cling Stamp Set with archival ink-plum and garden patina on white cardstock and cut them with coordinating die and color them with archival ink-sunshine, rose madder, cactus flower, garden patina as shown. Then adhere two layers of petals to make one flower and adding button at the centre of the flower and then add some crystal clear glitter on the petals. Arrange these flowers as shown.

Stamp some Patchwork Daisy Border and Patchwork Daisy on white cardstock with archival ink-jet black and cut them with matching die, add color and sprinkle crystal clear glitter and then arrange these embellishments as shown.

Add sentiments from the Patchwork Daisy Paper Collection.

Tuesday, 28 August 2018

Joys of the Season

Hi Friends,

Spread a little Christmas joy and happiness featuring these warmhearted inspirations with the new Merry and Bright Collection from Heartfelt Creations! Brimming with delicate snowflake accents, gorgeous floral clusters, charming polka dots and beautiful brocade patterns all encompassed in a non-traditional color palette of frosty blues, tantalizing teals, magnificent purples and pretty pinks.


Products Used
Double Dots 100pc. -3D Foam Circles, DDOTS
Funnel Tray, 359503
Designer Dries Clear Adhesive, 159723
Deluxe Flower Shaping Kit, HCST1-401
Stack and Store Daubers-Pack of 30, HCDA2-450
Rajni Chawla's Crystal Clear, PGM15015
Festive Holiday Die, HCD1-7146
Poinsettia & Holly Clusters Die, HCD1-7176
Poinsettia & Holly Clusters Cling Stamp Set, HCPC-3822
Pastel Pearl Stamens-Small, HCS1-457-1
Bright Pearl Stamens-Small, HCS1-458-1
3D Poinsettia Shaping Mold, HCFB1-463
Ranger Archival Ink Pad - Garden Patina, RACP992
Ranger Archival Ink Pad - Leaf Green, RACP436
Ranger Archival Ink Pad - Cactus Flower, RACP985
Frame a Card Leafy Borders Die, HCD2-7190
Noel Ornament Die, HCD1-7188
Merry and Bright Accents Cling Stamp Set, HCPC-3838
Snowy Pine Village Cling Stamp Set, HCPC-3837
Merry and Bright Paper Collection, HCDP1-293
Merry and Bright Accents Die, HCD1-7196
Snowy Pine Village Die, HCD1-7195


Other Products: White Cardstock, Glue Gun.

For more tips on creating with the Merry and Bright collection, watch the tutorial at https://youtu.be/6bgO6epBuBI.

For more tips on creating with the flower shaping molds, watch the tutorial at https://youtu.be/FSdPL7nXvQE.

Instructions: Take cardstock size 6"x12" and score at 6". Card size is 6"x6". Take pattern paper from Merry and bright Collection and tear the edges as shown. Before pasting the pattern paper adhere one partial medallion die from Frame a Card Leafy Borders.

Cut two Festive holiday die and color them with archival ink-cactus flower and adhere them as shown.

Now stamp some Poinsettia & Holly Clusters and cut them with matching die and shape them with 3D Poinsettia Shaping Mold and create some flowers, add stamens at the centre of the flowers and sprinkle some crystal clear glitter. Stamp some leaves from Snowy pine village with archival ink and cut them with matching die and color them with archival ink-fern green and shape them with deluxe flower shaping kit. Now assemble all these elements as shown.

Stamp the garland several times from merry and bright accents, cut them with matching die and color them with cactus flower and sprinkle some crystal clear glitter. Cut one Noel Ornament die on white cardstock and add them to the composition as shown.

Now add sentiment from the Merry and Bright Collection as shown.