Tuesday 29 December 2020

Delightful Dahlia

 Dear Friends,

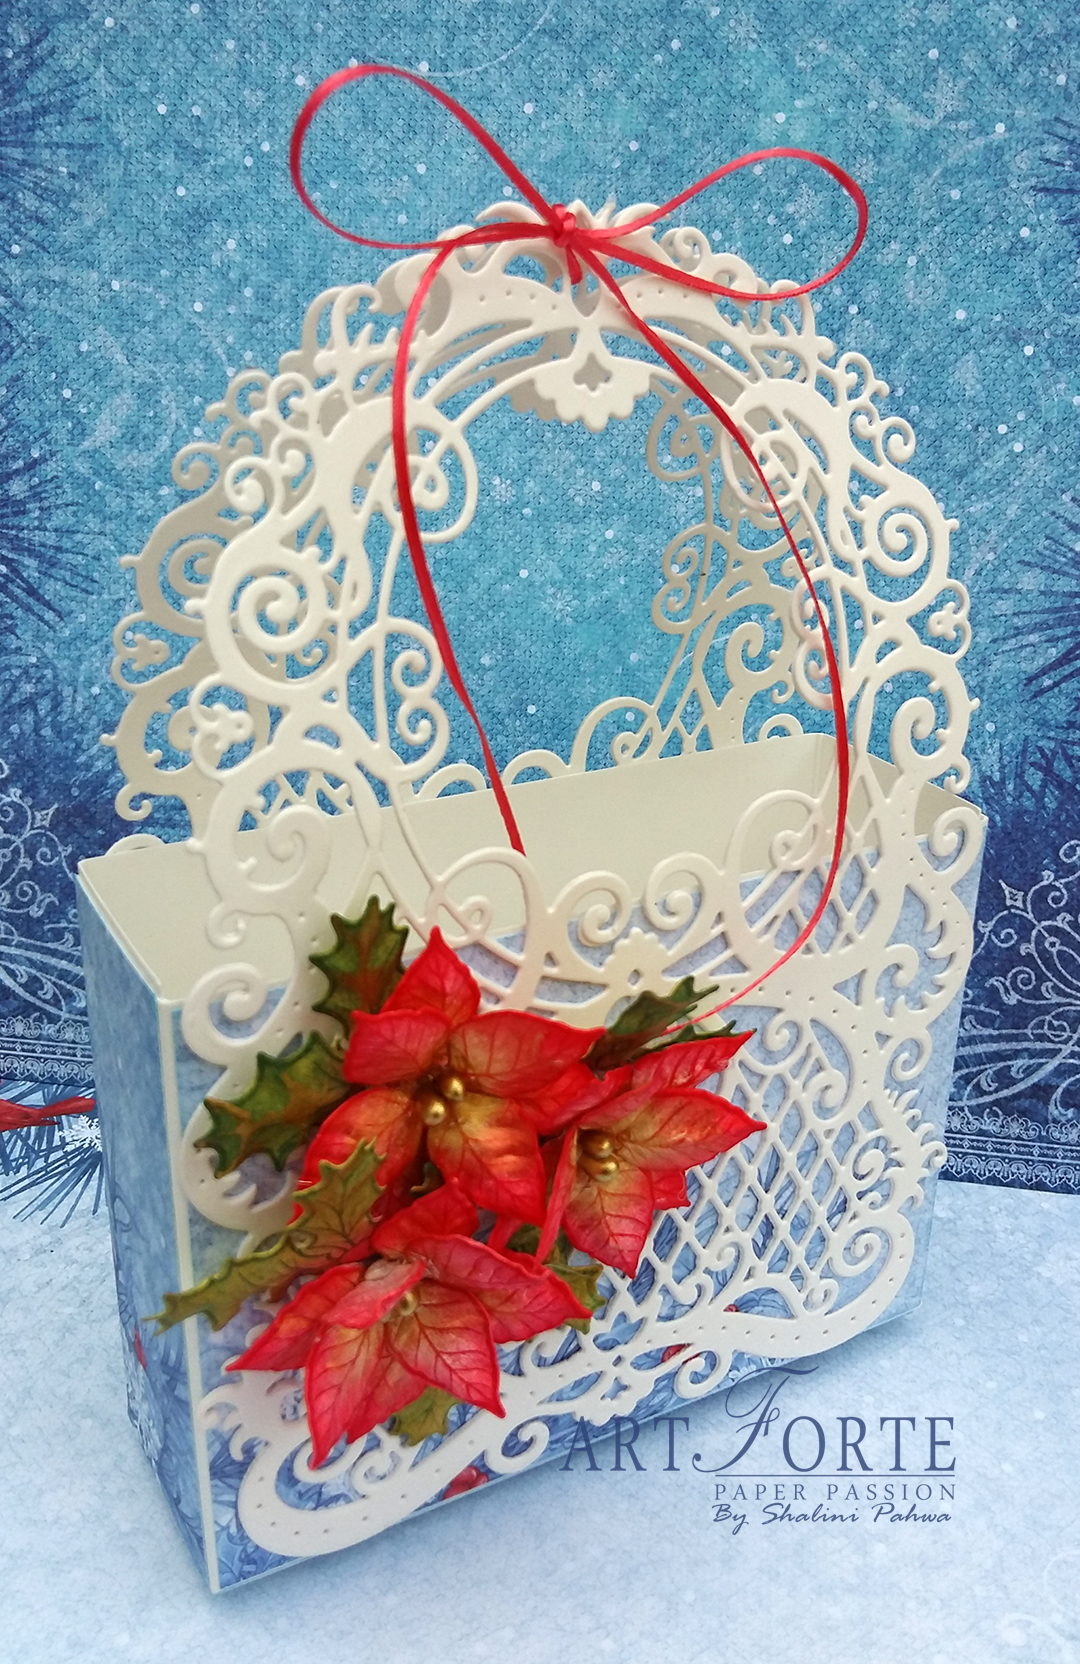
Another inspiration for today with gorgeous Heartfelt Creations Floral Shoppe Collection and Dazzling Dahlia Collection...Here's the picture...


Products Used:

Floral Shoppe Paper Collection, HCDP1-2122

Large Floral Urn Cling Stamp Set, HCPC-3931

Floral Shoppe Accents Cling Stamp Set, HCPC-3932

Floral Shoppe Fillers Cling Stamp Set, HCPC-3933

Dazzling Dahlia Cling Stamp Set, HCPC-3928

Just For You Sentiments Cling Stamp Set, HCPC-3845

Large Floral Urn Die, HCD1-7329

Floral Shoppe Accents Die, HCD1-7330

Floral Shoppe Fillers Die, HCD1-7331

Dazzling Dahlia Die, HCD1-7323

Royal Elegance Frames Die, HCD2-7307

Elaborate Oval Frames Die, HCD2-7309

Stack and Store Daubers-Pack of 30, HCDA2-450

Deluxe Flower Shaping Kit, HCST1-401

Designer Dries Clear Adhesive, 159723

Ranger Archival Ink Pad - Leaf Green, RACP436

Ranger Archival Ink Pad - Library Green, RACP475

Ranger Archival Ink Pad - Magenta Hue, RACP614

Ranger Archival Ink Pad - Sunflower, RACP005

Ranger Archival Ink Pad - Jet Black, RACP468

Crystal Ultrafine Transparent Glitter 1/2 oz., 85-glitter

Opaque Embossing Powder - White, EP100

Heat It Craft Tool, RAHT

ColorBox Pigment Ink Pad - Frost White, CB80

Rajni Chawla's Vellum Flowerite-10 Sheets

Other Products: White cardstock, Big-Shot Machine, Gold Beads, Nuvo Crystal Drops-carnation pink

For more tips on creating with the Floral Shoppe Collection watch the tutorial at https://youtu.be/unrqvzpfu1U.

For more tips on creating with the Floral Shoppe Collection watch the tutorial at https://youtu.be/unrqvzpfu1U.

For more ideas on creating with the 5 x 7 Decorative Frame Dies, watch the tutorial at https://youtu.be/qdBFA5VpmSo.

Instructions: Take white cardstock size 10” x 7” and fold in half, place largest Majestic Swirl Frames Die HCD2-7308 overlapping the top fold and die cut to create a shaped card base. From same die set, cut one frame from pattern paper and adhere it on the card base. From the same die, set cut one intricate frame on white cardstock and adhere it on the card base, as pictured using foam tape. Cut another layer on pattern paper which is smaller than the large frame die and adhere it using foam tape. Cut another layer of die from Elaborate Oval Frames Die HCD2-7309 on white cardstock and add sentiment from Just For You Sentiment Cling Stamp Set using archival ink-jet black and adhere this die using foam tape.

Stamp Dazzling Dahlia flower on vellum using Colorbox frosty white ink and sprinkle white embossing powder and then heat using Heating Tool. Cut them with coordinating die and color them using archival ink-sunflower. Create two layers of these petals, shape them and create a flower. Add stamens in the centre. Stamp some fillers flowers and leaves from Large Floral Urn Cling Stamp Set HCPC-3931, Floral Shoppe Accents Cling Stamp Set HCPC-3932, Floral Shoppe Fillers Cling Stamp Set HCPC-3933 on white cardstock and using archival ink-library green, cut them with coordinating die and color them with leaf green and magenta hue and on berries add nuvo crystal drops using color pink and add glitter while they are wet. Create arrangements as shown.

Just for You Floral

Dear Friends,

Another inspiration with beautiful Heartfelt Creations Floral Shoppe Collection  Shaped cards will be bursting with florals and beauty, demanding the attention they deserve! 


Products Used:

Floral Shoppe Paper Collection, HCDP1-2122

Large Floral Urn Cling Stamp Set, HCPC-3931

Floral Shoppe Accents Cling Stamp Set, HCPC-3932

Floral Shoppe Fillers Cling Stamp Set, HCPC-3933

Ornate Just for You Cling Stamp Set, HCPC-3936

Large Floral Urn Die, HCD1-7329

Floral Shoppe Accents Die, HCD1-7330

Floral Shoppe Fillers Die, HCD1-7331

Ornate Just for You Die, HCD1-7321

Petite Pocket Accents Die, HCD1-7212

Stack and Store Daubers-Pack of 30, HCDA2-450

Designer Dries Clear Adhesive, 159723

Double Dots 100pc. -3D Foam Circles, DDOTS

Ranger Archival Ink Pad - Leaf Green, RACP436

Ranger Archival Ink Pad - Library Green, RACP475

Ranger Archival Ink Pad - Magenta Hue, RACP614

Ranger Archival Ink Pad - Plum, RACP499

Ranger Archival Ink Pad - Carnation Red, RACP399

Other Products: White cardstock, Big-Shot Machine, Tim Holtz Clear Rock Candy-Crackle Paint.

For more tips on creating with the Floral Shoppe Collection watch the tutorial at https://youtu.be/unrqvzpfu1U.

For more ideas on creating with the Special Sentiments Stamps & Dies, watch the tutorial at https://youtu.be/-dYnAWXIH3E.

Instructions: Card size 5” x 7”. Take another white cardstock size 8.75” x 5”, adhere pattern paper from the collection and cut left and right edges using arc die from Petite Pocket Accents Die, as pictured. Now cut two intricate die from Petite Pocket Accents Die on white cardstock and adhere it on the edges of left and right die. Now again from the same die set cut another intricate border die on pattern paper from the collection and adhere it on edges of left and right die.

Stamp one large Urn from Large Floral Urn Cling Stamp Set HCPC-3931 on white cardstock using archival ink-Plum and cut it with coordinating die and then add layer of Tim Holtz Clear Rock Candy-Crackle Paint (let it dry naturally). Stamp sentiment from Ornate Just For You Cling Stamp Set HCD1-7321 on white cardstock using archival ink-carnation red and plum and cut this sentiment with coordinating die and adhere using foam tape.

Stamp some leaves, fillers and flowers from Large Floral Urn Cling Stamp Set HCPC-3931, Floral Shop Accents Cling Stamp Set HCPC-3932, Floral Shoppe Fillers Cling Stamp Set HCPC-3933 on white Cardstock using archival ink-library green, cut them with coordinating die and color them with leaf green and magenta hue. Make arrangement as shown.

Thursday 17 December 2020

Sweet Hugs

Dear Friends,

Create a floral display, full of life and beauty to cherish for years to come with a beautiful Heartfelt Creations-Floral Shoppe Collection. Here's my inspiration for today...


Products Used:

Floral Shoppe Paper Collection, HCDP1-2122

Large Floral Urn Cling Stamp Set, HCPC-3931

Floral Shoppe Accents Cling Stamp Set, HCPC-3932

Floral Shoppe Fillers Cling Stamp Set, HCPC-3933

Just For You Sentiments Cling Stamp Set, HCPC-3845

Large Floral Urn Die, HCD1-7329

Floral Shoppe Accents Die, HCD1-7330

Floral Shoppe Fillers Die, HCD1-7331

Decorative Circle Frames Die, HCD2-7306

Rounded Window Frame Die, HCD1-7271

Eyelet Circle & Basics Small Die, HCD1-7154

Stack and Store Daubers-Pack of 30, HCDA2-450

Designer Dries Clear Adhesive, 159723

Ranger Archival Ink Pad - Leaf Green, RACP436

Ranger Archival Ink Pad - Library Green, RACP475

Ranger Archival Ink Pad - Magenta Hue, RACP614

Ranger Archival Ink Pad - Sunflower, RACP005

Crystal Ultrafine Transparent Glitter 1/2 oz., 85-glitter

Other Products: White cardstock, Big-Shot Machine, Gold Beads.

For more tips on creating with the Floral Shoppe Collection watch the tutorial at https://youtu.be/unrqvzpfu1U.

For more ideas on creating with the 5 x 7 Decorative Frame Dies, watch the tutorial at https://youtu.be/qdBFA5VpmSo.

Instructions: Card size 5”x7”. Take pattern paper from the collection, tear the edges and adhere on the card base.

Cut one die from Rounded Window Frame Die HCD1-7271 on white cardstock and adhere it using foam tape. Take another small circle die, distress the edges and stamp sentiment from Just For You Sentiments Cling Stamp Set HCPC-3845 using archival ink-Magenta Hue. Cut another die from Decorative Circle Frames Die HCD2-7306 on white cardstock, cut it in half and paste it on the top and bottom using foam tape. Take Eyelet Circle & Basics Small Die HCD1-7154, cut one die from patterned paper cut in half and adhere it on the white half circle die as pictured.

Stamp some fillers flowers and leaves from Large Floral Urn Cling Stamp Set HCPC-3931, Floral Shopp Accents Cling Stamp Set HCPC-3932, Floral Shoppe Fillers Cling Stamp Set HCPC-3933 on white cardstock, using archival ink-library green, cut them with coordinating die and color them with leaf green and magenta hue inks. On berries, add nuvo crystal drops using color pink and add glitter while they are wet. Create arrangements as shown.

Tuesday 8 December 2020

Vellum Dahlia Urn-Heartfelt Creations Debuting the Floral Shoppe Collection

Dear Friends,

Today's the day the Heartfelt Creations-Floral Shoppe Collection becomes available to everyone! If you’ve been looking for a new way to create an elegant floral bouquet, look no further than the Floral Shoppe Collection! Your shaped cards will be bursting with florals and beauty, demanding the attention they deserve! Here's my inspiration for today...


Products Used:

Floral Shoppe Paper Collection, HCDP1-2122

Large Floral Urn Cling Stamp Set, HCPC-3931

Floral Shoppe Accents Cling Stamp Set, HCPC-3932

Floral Shoppe Fillers Cling Stamp Set, HCPC-3933

Large Floral Urn Die, HCD1-7329

Floral Shoppe Accents Die, HCD1-7330

Floral Shoppe Fillers Die, HCD1-7331

Dazzling Dahlia Cling Stamp Set, HCPC-3928

Swirly Accent Spray Die, HCD1-7263

Dazzling Dahlia Die, HCD1-7323

Stack and Store Daubers-Pack of 30, HCDA2-450

Assorted Pearl Stamens-Medium, HCS1-459-2

Deluxe Flower Shaping Kit, HCST1-401

Rajni Chawla's Vellum Flowerite - 10 Sheets, 18002

Designer Dries Clear Adhesive, 159723

Double Dots 100pc. -3D Foam Circles, DDOTS

Ranger Archival Ink Pad - Leaf Green, RACP436

Ranger Archival Ink Pad - Library Green, RACP475

Ranger Archival Ink Pad - Magenta Hue, RACP614

Ranger Archival Ink Pad - Sunflower, RACP005

Ranger Archival Ink Pad - Jet Black, RACP468

3-D Crystal Lacquer 4 oz, 3D1844

Opaque Embossing Powder - White, EP100

Heat It Craft Tool, RAHT

ColorBox Pigment Ink Pad - Frost White, CB80

Other Products: White cardstock, Big-Shot Machine.

For more tips on creating with the Floral Shoppe Collection watch the tutorial at https://youtu.be/unrqvzpfu1U.

For more tips on creating with the Dazzling Dahlia Collection watch the tutorial at https://youtu.be/KIIpo2C9oDs.

Instructions: Card size 6”x6”. Take pattern paper from the collection, distress the edges and adhere it on the card base.

Cut two intricate dies from Swirly Accents Spray Die HCD1-7263 on white cardstock and cut two bases of the same die on pattern paper. Adhere on card using foam tape.

Stamp Urn image from Large Floral Urn Cling Stamp Set HCPC-3931 on pattern paper using archival ink-jet black and adhere with foam tape and apply a coat of 3D Crystal Lacquer.

Stamp Dazzling Dahlia flower HCPC-3928 on vellum paper using Colorbox frosty white ink and sprinkle white embossing powder and then heat it using Heating Tool. Cut with coordinating die and color using archival ink-sunflower. Shape and create two layers of these petals to create a flower. Add stamens at the centre. Stamp some Floral Shoppe leaves and flowers using archival ink-library green and cut with coordinating die. Color using leaf green and magenta hue and shape using Deluxe Flower Shaping Kit.

Make Arrangement as shown and adhere using Designer Dries Clear Adhesive.

Tuesday 1 December 2020

Starry Night Dahlia

 Dear Friends,

Happy Wednesday! How are you spending the first days of December.....are you taking time to create something beautiful today? How about getting started on some cheery and fun cards that you will love creating?Here's my inspiration for today with Heartfelt Creations -Dazzling Dahlia Collection...


Products Used:

Dazzling Dahlia Paper Collection, HCDP1-2121

3D Dahlia Shaping Mold, HCFB1-494

Dazzling Dahlia Cling Stamp Set, HCPC-3928

Dahlia and Leaves Cling Stamp Set, HCPC-3929

For My Friend Sentiments Cling Stamp Set, HCPC-3844

Dazzling Dahlia Die, HCD1-7323

Dahlia and Leaves Die, HCD1-7324

Rounded Window Frame Die, HCD1-7271

Swirly Border Accents Die, HCD1-7262

Starry Night Decorative Die, HCD1-7252

Decorative Circle Frames Die, HCD2-7306

Stack and Store Daubers-Pack of 30, HCDA2-450

Designer Dries Clear Adhesive, 159723

Double Dots 100pc. -3D Foam Circles, DDOTS

Ranger Archival Ink Pad - Sunflower, RACP005

Ranger Archival Ink Pad - Vibrant Fuchsia, RACP524

Ranger Archival Ink Pad - Magenta Hue, RACP614

Ranger Archival Ink Pad - Rose Madder, RACP638

Ranger Archival Ink Pad - Majestic Violet, RACP494

Ranger Archival Ink Pad - Plum, RACP499

Ranger Archival Ink Pad - Leaf Green, RACP436

Ranger Archival Ink Pad - Library Green, RACP475

Hydra Sponges, RLHS100

Metal Tip for Adhesive Bottles, 352854

Spellbinders Tool N' One, 359848

Groove Golf Tool Set, DMCT4185

Other Products: Diamond Dust, White Cardstock, Big Shot Machine, Glue Gun.

For more tips on creating with the Dazzling Dahlia Collection watch the tutorial at https://youtu.be/KIIpo2C9oDs.

Instructions: Card size is 6” x 6” (final Size). Cut Pattern paper from the Dazzling Dahlia Paper Collection HCDP1-2121 smaller than the card size 5.875” x 7.875”, tear the edges and adhere it on the card base.

Stamp two dahlia images from Dazzling Dahlia HCPC-3928 on white cardstock using archival ink-Magenta Hue, cut them with coordinating Die, Dazzling Dahlia HCD1-7323 and adhere them on the top left and right bottom using foam tape as pictured.

Cut one die from Rounded Window Frame Die Set HCD1-7271 and adhere it with foam tape at the centre of the card base. Cut one small circle from Decorative Circle Frame Die set add sentiment from For My Friend Sentiment Cling Stamp Set HCPC-3844 using archival ink-Vibrant Fuchsia and plum, adhere this die using foam tape as seen picture. Cut two dies from Swirly Border Accents Die HCD1-7262 on white cardstock, add crystal clear glitter and adhere using glue gun. Cut two Starry Night Decorative Die HCD1-7252 on white cardstock and adhere it on the left and right side edges of the card base.

Stamp some dahlia flowers from Dazzling Dahlia Cling Stamp Set HCPC-3928 using archival ink-Magenta Hue and cut them with coordinating die Dazzling Dahlia Die HCD1-7323, color them using archival ink-sunflower (at the centre of the petals), rose madder, majestic violet and plum on the edges of the petals. Shape them using 3D Dahlia Shaping Mold HCFB1-494 and use groove golf tool also to give some more shape to the petals. Take two large petals and two small petals to create layers. And for the centre take one small layer and do fringing cutting and give shape to create bud and place it at the centre. Add diamond dust randomly and arrange it on the bottom left side of the card.

Stamp some leaf images from Dahlia and Leaves Cling Stamp Set HCPC-3929 using archival ink-library green, cut them with coordinating die Dahlia and Leaves HCD1-7324 and color the using archival ink-leaf green. Shape them using 3D Dahlia Shaping Mold HCFB1-494, add diamond dust and place these leaves behind the dahlia flower as pictured using glue gun.

Thursday 26 November 2020

Festive Gateway Basket

 Dear Friends,

Happy Black Friday....hoping your day is off to a great start and that you had a wonderful Thanksgiving Day with your family & friends. So EXCITED to debut Heartfelt Creations-Black Friday New Product Releases along with the once a year Black Friday Savings!

Heartfelt Creations Black Friday Savings

You can see all the details here: https://www.heartfeltcreations.us/black-friday

Save up to 20% on new products.

Doorbuster Special: Place a $100 order and choose a FREE paper pad of your choice!

If you are a Platinum member, your 20% discount will also apply. Not a Platinum member, click here for details: https://www.heartfeltcreations.us/platinum

These savings will only be valid on Black Friday, November 27th, 2020.

GET YOURS NOW

Here's my inspiration for today...


Products Used:

Lattice Swirl Gateway Die, HCD2-7328

Festive Winterscapes Paper Collection, HCDP1-2118

Christmas Poinsettia & Holly Die, HCD1-7249

Christmas Poinsettia & Holly Cling Stamp Set, HCPC-3881

3D Christmas Poinsettia Shaping Mold, HCFB1-478

Assorted Pearl Stamens-Medium, HCS1-459-2

Ranger Archival Ink Pad - Carnation Red, RACP399

Ranger Archival Ink Pad - Leaf Green, RACP436

Ranger Archival Ink Pad - Library Green, RACP475

Spellbinders Tool N' One, 359848

Scor-Pal Measuring & Scoring Board, 173842

Cosmic Brown Nuvo Mousse, NU810

Designer Dries Clear Adhesive, 159723

Other Products: White Cardstock, Big Shot Machine, Glue Gun, Ribbon.

For more ideas on creating with the Elegant Gateway Dies and Accents, watch the tutorial at https://youtu.be/H6fZTiYUH_w.

For more tips on creating with the Candlelit Christmas collection, watch the tutorial at https://youtu.be/PJeFD_d3AiM.

Instructions: Take two white cardstock size 5” x 7.75”. Score at 1.5” and on the longer side score at 1.5”, 6.25”. Cut tabs by cutting up to the horizontal scored line on the long edge. Apply glue to both short edge and long edge. Overlap the flaps on both long edges. Fold the score edges and basket is ready. Now adhere pattern paper from Festive Winterscapes Paper Collection HCDP – 2118 on all four sides. Cut two Lattice Swirl Gateway Die HCD2-7328 on white cardstock and adhere on the basket using Designer Dries Clear Adhesive. Add ribbon on the top attaching both the dies creating handle.

Stamp some poinsettia flowers and leaves on white cardstock using Christmas Poinsettia & Holly Cling Stamp Set HCPC-3881 using carnation red, leaf green inks and cut them with coordinating die. Color them with same ink, add Cosmic Brown Nuvo Mousse NU810 and shape them using 3D Christmas Poinsettia Shaping Mold. Add gold stamens at the centre. Arrange the composition as pictured.

Tuesday 17 November 2020

Gorgeous Grateful Blooms

Dear Friends,

Create an elegant arrangement of stunning flowers and get lost in our own handmade paper garden with Heartfelt Creations-Dazzling Dahlia Collection. Here's my inspiration for today...


Products Used:

Dazzling Dahlia Paper Collection, HCDP1-2121

3D Dahlia Shaping Mold, HCFB1-494

Dazzling Dahlia Cling Stamp Set, HCPC-3928

Dahlia and Leaves Cling Stamp Set, HCPC-3929

For My Friend Sentiments Cling Stamp Set, HCPC-3844

Dazzling Dahlia Die, HCD1-7323

Dahlia and Leaves Die, HCD1-7324

Elaborate Oval Frames Die, HCD2-7309

Intricate Swirl Frames Die, HCD2-7191

Stack and Store Daubers-Pack of 30, HCDA2-450

Designer Dries Clear Adhesive, 159723

Double Dots 100pc. -3D Foam Circles, DDOTS

Ranger Archival Ink Pad - Sunflower, RACP005

Ranger Archival Ink Pad - Vibrant Fuchsia, RACP524

Ranger Archival Ink Pad - Magenta Hue, RACP614

Ranger Archival Ink Pad - Rose Madder, RACP638

Ranger Archival Ink Pad - Majestic Violet, RACP494

Ranger Archival Ink Pad - Plum, RACP499

Ranger Archival Ink Pad - Leaf Green, RACP436

Ranger Archival Ink Pad - Library Green, RACP475

Hydra Sponges, RLHS100

Metal Tip for Adhesive Bottles, 352854

Spellbinders Tool N' One, 359848

Groove Golf Tool Set, DMCT4185

Other Products: Diamond Dust, White Cardstock, Big Shot Machine, Glue Gun.

For more tips on creating with the Dazzling Dahlia Collection watch the tutorial at https://youtu.be/KIIpo2C9oDs.

Instructions: Card size is 5”x7” (final Size). Cut Pattern paper from the Dazzling Dahlia Paper Collection HCDP1-2121, smaller than the card size 5.875” x 7.875” and adhere it on the card base.

Cut one frame die from Intricate Swirl Frames Die HCD2-7191 on white card-stock adhere it with foam tape on the card base. Take another pattern paper from the collection, distress the edges and adhere it on top of the intricate frame die using designer dries clear adhesive. Cut another frame die from Elaborate Oval Frames Die HCD2-7309 on white card-stock and on pattern paper also and adhere both dies and cut them in half and adhere them using foam tape, as pictured.

From the same die set cut small frame die on white card-stock and add sentiment from For my Friend Sentiments Cling Stamp Set HCPC-3844 using archival ink-Vibrant Fuchsia and Plum and adhere this die using foam tape.

Stamp some dahlia flowers from Dazzling Dahlia Cling Stamp Set HCPC-3928 using archival ink-Magenta Hue and cut them with coordinating die Dazzling Dahlia Die HCD1-7323, color them using archival ink-sunflower (at the center of the petals), rose madder, majestic violet and plum on the edges of the petals, and shape them using 3D Dahlia Shaping Mold HCFB1-494. Use groove golf tool also to give some more shape to the petals. Take two large petals and two small petals to create layers. And for the centre take one small layer and do fringing cutting and give shape to create bud and place it at the centre. Make two flower sets. Add diamond dust randomly and adhere the flowers on the top left and bottom right side of the card.

Stamp some leaf images from Dahlia and Leaves Cling Stamp Set HCPC-3929 using archival ink-library green, cut them with coordinating die Dahlia and Leaves HCD1-7324 and color using archival ink-leaf green. Shape them using 3D Dahlia Shaping Mold HCFB1-494, add diamond dust and place these leaves behind the dahlia flower using glue gun.

Tuesday 10 November 2020

Thoughtful Dahlia

 Dear Friends,

An elegant arrangement of stunning flowers and get lost in our own handmade paper garden with Heartfelt Creations- Dazzling Dahlia Collection. Prepare to impress your friends, family, with the new Dazzling Dahlia Collection! Here my inspiration for today...


Products Used:

Dazzling Dahlia Paper Collection, HCDP1-2121

3D Dahlia Shaping Mold, HCFB1-494

Dazzling Dahlia Cling Stamp Set, HCPC-3928

Dahlia and Leaves Cling Stamp Set, HCPC-3929

Just For You Sentiments Cling Stamp Set, HCPC-3845

Dazzling Dahlia Die, HCD1-7323

Dahlia and Leaves Die, HCD1-7324

Royal Elegance Frames Die, HCD2-7307

Stack and Store Daubers-Pack of 30, HCDA2-450

Designer Dries Clear Adhesive, 159723

Double Dots 100pc. -3D Foam Circles, DDOTS

Ranger Archival Ink Pad - Sunflower, RACP005

Ranger Archival Ink Pad - Magenta Hue, RACP614

Ranger Archival Ink Pad - Rose Madder, RACP638

Ranger Archival Ink Pad - Majestic Violet, RACP494

Ranger Archival Ink Pad - Plum, RACP499

Ranger Archival Ink Pad - Leaf Green, RACP436

Ranger Archival Ink Pad - Library Green, RACP475

Ranger Archival Ink Pad - Vibrant Fuchsia, RACP524

Hydra Sponges, RLHS100

Metal Tip for Adhesive Bottles, 352854

Spellbinders Tool N' One, 359848

Groove Golf Tool Set, DMCT4185

Other Products: Diamond Dust, White Cardstock, Big Shot Machine, Glue Gun.

For more tips on creating with the Dazzling Dahlia Collection watch the tutorial at https://youtu.be/KIIpo2C9oDs.

For more ideas on creating with the 5 x 7 Decorative Frame Dies, watch the tutorial at https://youtu.be/qdBFA5VpmSo.

Instructions: Card size is 5”x7” (final Size). Cut Pattern paper from the Dazzling Dahlia Paper Collection HCDP1-2121, smaller than the card size 5.875” x 7.875”, tear the edges and adhere it on the card base.

Cut one die from Royal Elegance Frames Die HCD2-7307 on white cardstock and adhere it with foam on the cards base. From the same die set cut another die on the pattern paper from the collection and adhere it on the top of the frame die using foam tape, cut another small frame die from the same set and add sentiment from Just For You Sentiments Cling Stamp Set HCPC-3845 using archival ink-Vibrant Fuchsia, and adhere it with foam tape to create some dimension.

Stamp image from Dahlia and Leaves Cling Stamp Set HCPC-3929 on white cardstock using archival ink-Magenta Hue and cut them with coordinating die Dahlia and Leaves HCD1-7324 and add diamond dust using Designer Dries Clear Adhesive and adhere them using foam tape.

Stamp some dahlia flowers layers from Dazzling Dahlia Cling Stamp Set HCPC-3928 using archival ink-Magenta Hue and cut them with coordinating die Dazzling Dahlia Die HCD1-7323, color them using archival ink-sunflower (at the centre of the petals), rose madder, majestic violet and plum on the edges of the petals, and shape them using 3D Dahlia Shaping Mold HCFB1-494 and use groove golf tool also to give some more shape to the petals. Take two large petals and two small petals to create layers. And for the centre take one small layer and do fringing cutting and give shape to create bud and place it at the centre. Add diamond dust randomly. Arrange it on the left bottom side of the card as pictured.

Stamp one leaf image from Dahlia and Leaves Cling Stamp Set HCPC-3929 using archival ink-library green, cut with coordinating die Dahlia and Leaves HCD1-7324 and color using archival ink-leaf green. Shape them using 3D Dahlia Shaping Mold HCFB1-494, add diamond dust and place this leaf behind the dahlia flower using Designer Dries Clear Adhesive.

Wednesday 4 November 2020

Christmas Elegance

Dear Friends,

Join me and be insipred to get a jump start on your Christmas project today! Quick holiday card to accent your poinsettias with Heartfelt Creations-Snowy Pines Paper Collection and Christmas Poinsettia & Holly Die. Here's my inspiration for today...


 Products Used:

Snowy Pines Paper Collection, HCDP1-2117

Festive Pine Cones Die, HCD1-7302

Christmas Poinsettia & Holly Die, HCD1-7249

Courtyard Elegance Die, HCD1-7283

Decorative Circle Frames Die, HCD2-7306

Festive Pine Cones Cling Stamp Set, HCPC-3917

Christmas Poinsettia & Holly Cling Stamp Set, HCPC-3881

Candy Cane Cottage Cling Stamp Set, HCPC-3884

3D Christmas Poinsettia Shaping Mold, HCFB1-478

Stack and Store Daubers-Pack of 30, HCDA2-450

Assorted Pearl Stamens-Medium, HCS1-459-2

Ranger Archival Ink Pad - Carnation Red, RACP399

Ranger Archival Ink Pad - Leaf Green, RACP436

Ranger Archival Ink Pad - Library Green, RACP475

Ranger Archival Ink Pad - Plum, RACP499

Rajni Chawla's Crystal Clear, PGM15015

Designer Dries Clear Adhesive, 159723

Spellbinders Tool N' One, 359848

Hydra Sponges, RLHS100

Scor-Pal Measuring & Scoring Board, 173842

Cosmic Brown Nuvo Mousse, NU810

Other Products: White Cardstock, Big Shot Machine, Glue Gun.

For more tips on creating with the Snowy Pines Collection watch the tutorial at https://youtu.be/nVtKVcgg530.

For more ideas on creating with the Decorative Royale Square & Circle Dies, watch the tutorial at https://youtu.be/tqmtn_TiVVw.

For more tips on creating with the Candlelit Christmas collection, watch the tutorial at https://youtu.be/PJeFD_d3AiM.

Instructions: Take white card-stock size 12” x 6” and fold in half, final size is 6”x 6”. Take pattern paper from the Snowy Pines Paper Collection size 5.875” x 5.875”, tear the edges and adhere it on the card base. Cut one die from Courtyard Elegance Die HCD1-7283 on white cardstock and adhere it at the centre of the card using foam tape. Cut one circle die from the same set on white cardstock and adhere it at the centre of the frame die using foam tape. Next cut one small circle die from Decorative Circle Frames Die HCD1-7306 on white cardstock and add sentiment from Candy Cane Cottage Cling Stamp Set HCPC-3884 using archival ink-Plum, and adhere it using foam tape as shown.

Stamp one large pine image from Festive Pine Cones Cling Stamp Set HCPC-3917 on white cardstock using archival ink-Jet black, cut it with coordinating die and adhere it on the right side. Stamp some poinsettia flowers and leaves on white cardstock using Christmas Poinsettia & Holly Cling Stamp Set HCPC-3881 using carnation red, leaf green, cut them with coordinating die, color them with same ink, add Cosmic Brown Nuvo Mousse NU810 and shape them using 3D Christmas Poinsettia Shaping Mold. Add gold stamens at the centre. Dab some Dries Clear glue onto a sponge, apply over flowers, sprinkle with Rajni Chawla’s Crystal Clear and tap off.

Arrange the composition as pictured.

Tuesday 27 October 2020

Summer Garden Birthday

Dear Friends,

Another beautiful inspiration with Heartfelt Creations-Summer Garden Collection. Create large and lifelike florals, for those times when a little blossom just won’t do. Here's the picture...


Products Used:

Summer's Garden Paper Collection, HCDP1-2119

Deluxe Flower Shaping Paper Pack of 50 - White, HCPP1-475

Large 3D Zinnia Shaping Mold, HCFB1-491

Small 3D Zinnia Shaping Mold, HCFB1-492

Large Garden Zinnia Cling Stamp Set, HCPC-3923

Small Garden Zinnia Cling Stamp Set, HCPC-3924

Special Birthday Sentiments Cling Stamp Set, HCPC-3843

Large Garden Zinnia Die, HCD1-7314

Small Garden Zinnia Die, HCD1-7315

Petite Pocket Accents Die, HCD1-7212

Eyelet Rectangle & Basics Die, HCD2-7189

Assorted Pearl Stamens-Medium, HCS1-459-2

Ranger Archival Ink Pad - Carnation Red, RACP399

Ranger Archival Ink Pad - Leaf Green, RACP436

Ranger Archival Ink Pad - Sunflower, RACP005

Ranger Archival Ink Pad - Plum, RACP499

Ranger Archival Ink Pad - Tiger Lily, RACP670

Ribbit Prills, ANC825

Go Man Go Prills, ANC818

Designer Dries Clear Adhesive, 159723

Other Products: Diamond Dust, White Cardstock, Big Shot Machine, Glue Gun.

For more tips on creating with the Summer's Garden Collection watch the tutorial at https://youtu.be/-dYnAWXIH3E.

Instructions: Card size is 5”x 6”. (final Size). Take pattern paper from the collection, tear the edges and adhere it on the card base using Designers Dries Clear Adhesive.

Cut one Petite Pocket Accents Die on white cardstock and adhere with foam tape as shown. With the same die cut another diecut on pattern paper from the collection and adhere it on the top edges of the card. Cut one die from Intricate Swirl Frames Die HCD2-7189 on white cardstock and add sentiment from Special Birthday Sentiments Cling Stamp Set using archival ink-Carnation Red and Plum. Now adhere this diecut with sentiment on the centre top of the card using foam tape.

Stamp some flowers using the Large Garden Zinnia Cling Stamp Set HCPC-3923 and Small Garden Zinnia Cling Stamp Set HCPC-3924 on deluxe flower Shaping Paper using archival ink-carnation red and leaf green. Cut them with coordinating Dies HCD1-7314, HCD1-7315. Color them using archival ink-Sunflower and leaf green. Next emboss them using Mold. After arranging layer, add some prills and stamens at the center of the flowers. Add Diamond Dust randomly.

Tuesday 20 October 2020

Bright Golden Wishes

Dear Friends,

How is your Wednesday going? Are you experiencing beautiful crisp fall weather? The beauty of the flowers and projects you will be inspired to create today are pretty flowers that last through all seasons with Heartfelt Creation-Home on the Farm Collection. Here's my inspiration for today...


Products Used:

Home on the Farm Paper Collection, HCDP1-2120

Home on the Farm Cling Stamp Set, HCPC-3925

Happy Meadows Cling Stamp Set, HCPC-3926

Barnyard Accents Cling Stamp Set, HCPC-3927

Home on the Farm Die, HCD1-7316

Happy Meadows Die, HCD1-7317

Barnyard Accents Die, HCD1-7318

Eyelet Circle & Basics Small Die, HCD1-7154

Eyelet Royale Die, HCD1-7282

Ornamental Tags Die, HCD1-7203

Designer Dries Clear Adhesive, 159723

Double Dots 100pc. -3D Foam Circles, DDOTS

Ranger Archival Ink Pad - Jet Black, RACP468

Redland Elements 1 oz., 26redland

Zig Clean Color Real Brush Markers - 48 Pack, 478594

Other Products: White cardstock, Big Shot Machine.

For more tips on creating with the Home on the Farm Collection watch the tutorial at https://youtu.be/zJQQ7iljUw8.

Instructions: Card size 6” x 6” (final size). Take pattern paper from the collection, tear the edges and adhere it on the card base. Take another white cardstock which is shorter than the pattern paper and layer it with pattern paper again.

Cut two dies from Eyelet Royale Die on white cardstock and adhere it on the top and bottom of the card base. Now cut one Eyelet Circle Die on white cardstock and adhere it with foam tape in the center.

Stamp some sunflower images, grass bushes and Fence image from the Barnyard Accents Cling Stamp Set HCPC-3927 on the white cardstock using archival ink-jet black and cut them with coordinating die HCD1-7318. Color the using Zig Markers. For sunflower add few Redland elements at the centre of a sunflower and add diamond dust randomly. Stamp one drum image from Home On the farm Cling Stamp Set HCPC-3925 on white cardstock using archival ink-jet black, and cut it with coordinating Die HCD1-7316. Color them using Zig Markers. Stamp a few chicken images from Happy Meadows Cling Stamp Set HCPC-3926 on white cardstock using archival ink-jet black, and cut them with coordinating die HCD1-7317. Color them with Zig Markers and adhere with Designers Dies Clear Adhesive. Now arrange all the elements as pictured.

Cut one set of die from Ornaments Tags Die and adhere it to the top right edge side.

Tuesday 13 October 2020

Harvest Happenings

 Dear Friends,

Today's the day Heartfelt Creations- Home on the Farm Collection becomes available to everyone. Mosey through a delightful paper collection full of bright harvest colors, days on the farm, big red barns, livestock and more! The Home on the Farm Collection is designed to bring your farm creations to life! Here's my inspiration for today...


Products Used:

Home on the Farm Paper Collection, HCDP1-2120

Home on the Farm Cling Stamp Set, HCPC-3925

Happy Meadows Cling Stamp Set, HCPC-3926

Barnyard Accents Cling Stamp Set, HCPC-3927

Just For You Sentiments Cling Stamp Set, HCPC-3845

Home on the Farm Die, HCD1-7316

Happy Meadows Die, HCD1-7317

Barnyard Accents Die, HCD1-7318

Rounded Window Frame Die, HCD1-7271

Ornamental Tags Die, HCD1-7203

Designer Dries Clear Adhesive, 159723

Double Dots 100pc. -3D Foam Circles, DDOTS

Ranger Archival Ink Pad - Jet Black, RACP468

Ranger Archival Ink Pad - Library Green, RACP475

Redland Elements 1 oz., 26redland

Zig Clean Color Real Brush Markers - 48 Pack, 478594

Other Products: White cardstock, Big Shot Machine.

For more tips on creating with the Home on the Farm Collection watch the tutorial at https://youtu.be/zJQQ7iljUw8.

Instructions: Take a cardstock size 4.125” x 11”. On the 11” side score at .5”, 2”, 4”, 5.5”. Take another cardstock size 3”x 5.5” and on the 5.5” side score at .5”, 2”. Cover all the sides with pattern paper from the collection.

On the front panel paste one die cut from Rounded Window Frame Die on white cardstock.

Stamp One barn image from Home On the Farm Cling Stamp Set HCPC-3925 using archival ink-Jet Black, cut it with coordinating die HCD1-7316 and color it with Zig Markers. Stamp some flower images, grass bushes and fence image from the Barnyard Accents Cling Stamp Set HCPC-3927 on the white cardstock using archival ink-jet black, and cut them with coordinating die HCD1-7318. Color using Zig Markers. For sunflower add a few Redland elements at the centre of a sunflower and add diamond dust randomly. Stamp horse and cow images from Happy Meadows Cling Stamp Set HCPC-3926 on white cardstock using archival ink-jet black, and cut them with coordinating die HCD1-7317. Color them with Zig Markers and adhere them with Foam tape. Now arrange all the elements on the front panel as pictured.

Cut one die set from Ornamental Tags Die on white cardstock and pattern paper for the inner die and add sentiment from Just For You Sentiments using archival ink-Library Green.

Tuesday 6 October 2020

Joyful Heart Zinnia

Dear Friends,

Another inspiration today with Heartfelt Creations-Summer's Garden Collection. Here's the picture...


Products Used:

Summer's Garden Paper Collection, HCDP1-2119

Deluxe Flower Shaping Paper Pack of 50 - White, HCPP1-475

Large 3D Zinnia Shaping Mold, HCFB1-491

Small 3D Zinnia Shaping Mold, HCFB1-492

Large Garden Zinnia Cling Stamp Set, HCPC-3923

Small Garden Zinnia Cling Stamp Set, HCPC-3924

Cheerful Note Sentiments Cling Stamp Set, HCPC-3848

Large Garden Zinnia Die, HCD1-7314

Small Garden Zinnia Die, HCD1-7315

Ornate Ovals Die, HCD1-7305

Royal Elegance Frames Die, HCD2-7307

Heart of Joy Decorative Die, HCD1-7256

Assorted Pearl Stamens-Medium, HCS1-459-2

Luxe Gold Cardstock, HCGP1-488

Ranger Archival Ink Pad - Carnation Red, RACP399

Ranger Archival Ink Pad - Leaf Green, RACP436

Ranger Archival Ink Pad - Sunflower, RACP005

Ranger Archival Ink Pad - Plum, RACP499

Ranger Archival Ink Pad - Tiger Lily, RACP670

Go Man Go Prills, ANC818

Ribbit Prills, ANC825

Designer Dries Clear Adhesive, 159723

Double Dots 100pc. -3D Foam Circles, DDOTS

Other Products: Diamond Dust, White Cardstock, Big Shot Machine, Glue Gun.

For more tips on creating with the Summer's Garden Collection watch the tutorial at https://youtu.be/kYiP8qJZ4rE.

Instructions: Card size is 5” x7” (final Size). Take pattern paper from the collection, tear the edges and adhere it on the card base using Designers Dries Clear Adhesive.

Cut two Heart of Joy Decorative Die HCD1-7256 from white cardstock and adhere them using Designers Dries Clear adhesive as pictured. Cut Ornate oval Die HCD1-7305 from white cardstock and Luxe Gold cardstock and adhere them using 3D Foam. Cut Royal Elegance Frames Die HCD2-7307 from white cardstock, add sentiment from Cheerful Notes Sentiments Cling Stamp Set HCPC-3848 using archival ink-Carnation Red, then adhere it using foam.

Stamp some flowers and leaves from Large Garden Zinnia Cling HCPC-3923 and Small Garden Zinnia Cling Stamp Set HCPC-3924 on deluxe flower Shaping Paper using archival ink-carnation red and library green (for leaves). Cut them with coordinating Dies HCD1-7314, HCD1-7315. Color them using archival ink-Sunflower and leaf green. Next, emboss them using Mold. After arranging layer add some prills at the center of a flowers. Add Diamond Dust randomly. Arrange flowers and leaves as pictured.

Tuesday 29 September 2020

Bright and Beautiful Zinnia

 Dear Friends,

Another inspiration with beautiful Heartfelt Creations-Summer's Garden Collection. Enjoy the peaceful tranquility of creating large life-like flowers, bursting with layers, and admire your handcrafted bouquet. Here's my inspiration for today...


Products Used:

Summer's Garden Paper Collection, HCDP1-2119

Deluxe Flower Shaping Paper Pack of 50 - White, HCPP1-475

Large 3D Zinnia Shaping Mold, HCFB1-491

Small 3D Zinnia Shaping Mold, HCFB1-492

Large Garden Zinnia Cling Stamp Set, HCPC-3923

Small Garden Zinnia Cling Stamp Set, HCPC-3924

Elegant Especially for You Cling Stamp Set, HCPC-3934

Large Garden Zinnia Die, HCD1-7314

Small Garden Zinnia Die, HCD1-7315

Elegant Especially for You Die, HCD1-7319

Elaborate Oval Frames Die, HCD2-7309

Album Tags and Accents Die, HCD1-7202

Luxe Gold Cardstock, HCGP1-488

Ranger Archival Ink Pad - Carnation Red, RACP399

Ranger Archival Ink Pad - Library Green, RACP475

Ranger Archival Ink Pad - Leaf Green, RACP436

Ranger Archival Ink Pad - Sunflower, RACP005

Ranger Archival Ink Pad - Plum, RACP499

Ranger Archival Ink Pad - Tiger Lily, RACP670

Ribbit Prills, ANC825

Go Man Go Prills, ANC818

Designer Dries Clear Adhesive, 159723

Other Products: Diamond Dust, White Cardstock, Big Shot Machine, Glue Gun.

For more ideas on creating with the Special Sentiments Stamps & Dies, watch the tutorial at https://youtu.be/-dYnAWXIH3E.

For more tips on creating with the Summer's Garden Collection watch the tutorial at https://youtu.be/kYiP8qJZ4rE.

For more ideas on creating with the 5 x 7 Decorative Frame Dies, watch the tutorial at https://youtu.be/qdBFA5VpmSo.

Instructions: Card size is 5” x 7” (final Size). Cut Base size from Elaborate Oval Frames Die HCD2-7309 on pattern paper. From the same set cut decorative layer on white cardstock. Cut One die from Album tags and accents die on white cardstock and distress the edges with archival ink-tiger lily.

Stamp one sentiment from Elegant especially For You Cling Stamp set HCPC-3934 using archival ink-Tiger Lily, carnation red and plum, and cut using coordinating Die HCD1-7319. Add Glitter.

Stamp some flowers and leaves from Large Garden Zinnia Cling HCPC-3923 and Small Garden Zinnia Cling Stamp Set HCPC-3924 on deluxe flower Shaping Paper using archival ink-carnation red and Library Green. Cut them with coordinating Dies HCD1-7314, HCD1-7315. Color using archival ink-Sunflower and leaf green. Next emboss them using Mold. After arranging layers and adhering, add some prills at the center of flower. Add Diamond Dust randomly.

Tuesday 22 September 2020

Regal Happy Birthday-Heartfelt Creations Debuting the Special Sentiments

Dear Friends,

When you need to add extra elegance and sentiments, but don’t need the extra stress. No matter the occasion, birthdays, special days & anniversaries, or just Thinking of You, the Special Sentiments Collection makes it simple to add that extra decorative touch, without adding frustration! Regain your confidence in creating cards and projects with beautiful sentiments that are sure to impress everyone who lays eyes on your creations! Simplify the crafting process, and add elegant decor the quick and EZ way! Introducing… the NEW Heartfelt Creations Special Sentiments Collection! Here's my inspiration for today with this amazing collection...


Products Used:

Small Garden Zinnia Die, HCD1-7315

Large Garden Zinnia Die, HCD1-7314

Elaborate Birthday Cling Stamp Set, HCPC-3937

Elaborate Birthday Die, HCD1-7322

Summer's Garden Paper Collection, HCDP1-2119

Deluxe Flower Shaping Paper Pack of 50 - White, HCPP1-475

Large 3D Zinnia Shaping Mold, HCFB1-491

Small 3D Zinnia Shaping Mold, HCFB1-492

Large Garden Zinnia Cling Stamp Set, HCPC-3923

Small Garden Zinnia Cling Stamp Set, HCPC-3924

Regal Pocket Accents Die, HCD1-7247

Luxe Gold Cardstock, HCGP1-488

Ranger Archival Ink Pad - Carnation Red, RACP399

Ranger Archival Ink Pad - Library Green, RACP475

Ranger Archival Ink Pad - Leaf Green, RACP436

Ranger Archival Ink Pad - Sunflower, RACP005

Ranger Archival Ink Pad - Plum, RACP499

Ribbit Prills, ANC825

Go Man Go Prills, ANC818

Designer Dries Clear Adhesive, 159723

Other Products: Diamond Dust, White Cardstock, Big Shot Machine, Glue Gun.

For more ideas on creating with the Special Sentiments Stamps & Dies, watch the tutorial at https://youtu.be/-dYnAWXIH3E.

For more tips on creating with the Summer's Garden Collection watch the tutorial at https://youtu.be/kYiP8qJZ4rE.

Instructions: Card size is 5” x 7”. (final Size). Cut Pattern paper from the collection, smaller than the card size, torn the edges and adhere it on the card base.

Cut two dies from Regal Pocket Accents Die HCD1-7247 on Gold cardstock and adhere them on the top left edges and right bottom edges as pictured, using designer dries Clear adhesive. Cut another die Elaborate Birthday Die HCD1-7322, on white cardstock. Stamp sentiment from Elaborate Birthday Cling Stamp Set HCPC-3937 using archival ink carnation red and plum, and cut them using coordinating die HCD2-7322. Add Glitter.

Stamp some flowers and leaves from Large Garden Zinnia Cling HCPC-3923 and Small Garden Zinnia Cling Stamp Set HCPC-3924 on deluxe flower Shaping Paper using archival ink-carnation red and Library Green. Cut them with coordinating Die HCD1-7314, HCD1-7315. Color tem using archival ink-Sunflower and leaf green. Next emboss them using Mold. After arranging layer add some prills at the center of a flowers. Add Diamond Dust randomly.

Tuesday 15 September 2020

Special Garden Floral

Dear Friends,

Explore a bright & colorful Heartfelt Creations-Summer Garden Collection full of fun summertime colors, flowers, ladybugs & butterflies! A perfect setting for your summer themed crafting projects! Stamp, die cut, and shape your own lush summer garden with layers of perfectly shaped flowers using the Garden Zinnia stamps and dies. Enjoy the peaceful tranquility of creating large life-like flowers, bursting with layers, and admire your handcrafted bouquet. Here's my inspiration for today...


Products Used:

Summer's Garden Paper Collection, HCDP1-2119

Deluxe Flower Shaping Paper Pack of 50 - White, HCPP1-475

Large 3D Zinnia Shaping Mold, HCFB1-491

Small 3D Zinnia Shaping Mold, HCFB1-492

Large Garden Zinnia Cling Stamp Set, HCPC-3923

Small Garden Zinnia Cling Stamp Set, HCPC-3924

Special Birthday Sentiments Cling Stamp Set, HCPC-3843

Large Garden Zinnia Die, HCD1-7314

Small Garden Zinnia Die, HCD1-7315

Ornate Ovals Die, HCD1-7305

Decorative Circle Frames Die, HCD2-7306

Royal Elegance Frames Die, HCD2-7307

Ticket and Tags Die, HCD1-7201

Luxe Gold Cardstock, HCGP1-488

Ranger Archival Ink Pad - Carnation Red, RACP399

Ranger Archival Ink Pad - Library Green, RACP475

Ranger Archival Ink Pad - Leaf Green, RACP436

Ranger Archival Ink Pad - Sunflower, RACP005

Ribbit Prills, ANC825

Go Man Go Prills, ANC818

Other Products: Diamond Dust, White Cardstock, Big Shot Machine, Glue Gun.

For more tips on creating with the Summer's Garden Collection watch the tutorial at https://youtu.be/kYiP8qJZ4rE.

Instructions: Card size is 6”x 6” (final Size). Cut Pattern paper from the collection, smaller than the card size, tear the edges and adhere it on the card base.

Cut One Die from Decorative Circle Frames Die HCD2-7306 on the pattern paper from the collection and with same die cut one more die on gold cardstock. Take another layer of die from Ornate Oval Die HCD1-7305 on white cardstock Take another Royal Elegance Frames Die HCD2-7307 and cut them on white cardstock and gold cardstock and assemble all these die cuts as pictured. Stamp Sentiment from Special Birthday Sentiments on the top layer using archival ink-carnation red.

Stamp some flowers and leaves from Large Garden Zinnia Cling HCPC-3923 and Small Garden Zinnia Cling Stamp Set HCPC-3924 on deluxe flower Shaping Paper using archival ink-carnation red and Library Green. Cut them with coordinating Die HCD1-7314, HCD1-7315. Color them using archival ink-Sunflower and leaf green. Next emboss them using Mold. After arranging layer add some prills at the center of flowers. Add Diamond Dust randomly