Wednesday 27 September 2017

Simple Pleasures Shaker Album

Hello Dear Friends,
It's Heartfelt Creations inspiration day, today i'm sharing another fun shaker mini album from Beary Fun Retreat Collection. Here's the pix


Products Used
Metal Tip for Adhesive Bottles, 352854
Redland Elements, 26redland
Luggage and Tags Die, HCD1-745
Classic Sunflower Cling Stamp Set, HCPC-3626
Classic Sunflower Die, HCD1-753
Deluxe Flower Shaping Kit, HCST1-401
Go Man Go Prills, ANC818
Festive Holiday Die, HCD1-7146
Window Box Fillers Die, HCD1-7149
Window Box Fillers Cling Stamp Set, HCPC-3795
Happy Time Treehouse Die, HCD1-7152
Sunflower Accents Die, HCD1-7153
Beary Fun Retreat Paper Collection, HCDP1-282
Happy Time Treehouse Cling Stamp Set, HCPC-3798
Sunflower Accents Cling Stamp Set, HCPC-3799

Other Products: White cardstock, Archival ink- Buttercup, Plum, Glossy accent, Distress ink-Peeled Paint, Mustard Seed, Spice Marmalade, golden beads, clear glass beads, acrylic paint

For more tips on creating with this collection watch the tutorial at here.

Watch this video on how to shape the Sunflowers here

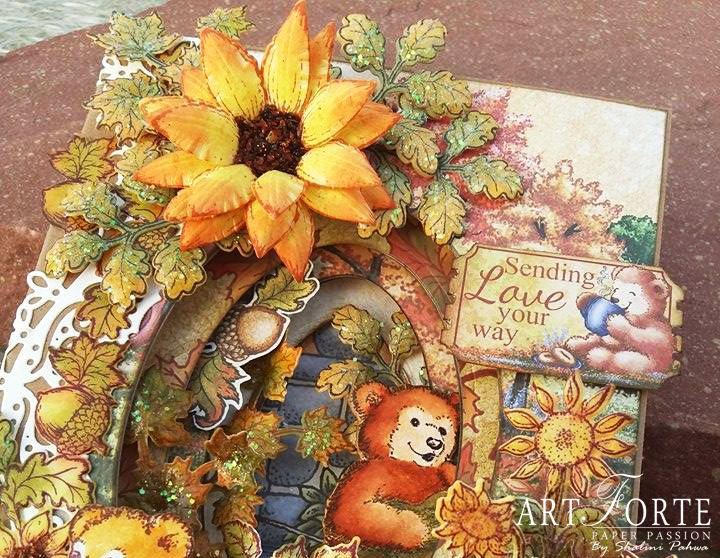
Instructions: Let’s start creating this shaker mini album with 5 pages for inside. Take a thick cardstock for pages and cut them. Final size of the pages are 5” circle and decorate them with designer paper. Shaker embellishment is a 3D Chipboard decorated with a designer paper with sequins and prills, leaves sunflower accents cling stamp set with coordinating die, and the chipboard is painted with acrylic colours.

Create flowers using the Classic Sunflower stamp set using Buttercup Archival ink on white cardstock and diecut with coordinating dies. Color them with buttercup and shape them with Deluxe Flower shaping kit. Use three layers for creating flowers and at the centre use dries clear glue and Redland Elements earth textures.

Stamp various Sunflower Accents on the white cardstock with black Archival ink and die cut them with the coordinating die. Color them with Distress ink-Peeled Paint, Mustard Seed, Spiced Marmalade. Add Glossy Accents and sprinkle golden beads and clear glass beads. Stamp flowers from window box fillers stamp set with black Archival ink and and die cut them with coordinating die. Add just a little color in the centre using Mustard seed ink and add Go Man Go prills at the centre with dries clear glue.

Take another white cardstock and stamp Happy Time Treehouse Cling Set with black and Plum Archival ink and colour them with Zig Clean Color Real Brush and cut them with coordinating dies, and add it to the top of the chipboard as shown on the pix. Decorate the inside pages according to your own choice.

Die cut one Sentiment from the designer paper using the Luggage and Tags dies and paste it as shown on the picture.

Die cut two beautiful die from Festive Holiday and paste it at the base of the chipboard and add one ring at the top of the album.

I hope you all will love this shaker album.

Have A Nice Day!!!

Tuesday 19 September 2017

Fall Beary Basket

Hello Dear Friends,
Come along with us and join in our fall festivities as we go on one  fun filled retreat with the Beary Fun Retreat Collection by Heartfelt Creations!


Products Used
Double Dots 100pc. -3D Foam Circles, DDOTS
Designer Dries Clear Adhesive, 159723
Metal Tip for Adhesive Bottles, 352854
Redland Elements, 26redland
Luggage and Tags Die, HCD1-745
Classic Sunflower Cling Stamp Set, HCPC-3626
Classic Sunflower Die, HCD1-753
Deluxe Flower Shaping Kit, HCST1-401
Decorative Medallion Die, HCD1-7144
Window Box Fillers Die, HCD1-7149
Window Box Elements Die, HCD1-7150
Sunflower Accents Die, HCD1-7153
Beary Fun Retreat Paper Collection, HCDP1-282
Sunflower Accents Cling Stamp Set, HCPC-3799

Other Products: White cardstock, Archival ink- Buttercup, Bright Tangelo, Orange Blossom, Plum, Glossy accent, Distress ink-Peeled Paint, Mustard Seed, Spiced Marmalade, Golden beads, jute

For more tips on creating with this collection watch the tutorial at https://youtu.be/DpUPW0oxiJ4.

You can watch a video on making sunflowers here

Instructions: To make this basket, first create a base box measuring cardstock 8” x 8” and score 1.25” on all four sides. Now fold the sides and base box will be ready. Before pasting the sides, first cut and adhere the patterned paper on the sides, both inside and outside, with dries clear glue.

Now die cut 4 Decorative Medallion Die with pattern paper using the outline die. Die cut eight Decorative Medallions from white cardstock and adhere a white medallion on each side of the medallion outline pieces. Now paste them as seen on the picture (four for outside and four for inside of the basket).

Die cut eight Window Box Elements from white cardstock.

Take cardstock size 1.25” x 13.5” and then paste pattern paper on both the side, and then paste four window box elements die as seen on the picture (two on top of the handle and two under the handle). And at the centre of the handle paste two leaves die from Sunflower Accents die with one sentiment from the pattern paper. Adhere one Window Box Elements on each side of basket as shown.

Create flowers using the Classic Sunflower stamp set using Orange Blossom Archival ink on white cardstock and diecut with coordinating dies. Color them with buttercup and use Bright Tangelo on the edges and shape them with Deluxe Flower shaping kit. Use three layers for creating flowers and at the centre use black beads with Redland Elements earth textures.

Stamp various Sunflower Accents on the white cardstock with black Archival ink and die cut them with the coordinating die. Color them with Distress ink-Peeled Paint, Mustard Seed, Spiced Marmalade. Add Glossy Accents and sprinkle golden beads. Stamp two flowers from window box fillers stamp set with black Archival ink and and die cut them with coordinating die.

Add one tag on the side of the handle die cut from designer paper using the Luggage and Tags die, adding jute if desired and also add sentiment.

Fussy cut stamp squares from designer paper. Arrange all the elements as shown adhering with dries clear glue and 3D foam. Finally your beautiful basket is ready to gift someone special.

Have A Nice Day!!!

Tuesday 12 September 2017

Beary Fun Layered Card

Hello Dear Friends,
Today's the day! Long days filled with sunshine begin to fade and the crisp evening breezes begin to call for cozy wool knit sweaters as the fall season slowly ushers out the lazy days of summer! Along with the falling leaves and a last surge of floral blossoms, autumn brings with it a more relaxed and reflective way of life and a reminder that winter will soon be around the corner. Come along with us and join in our fall festivities as we go on one final fun filled retreat with the Beary Fun Retreat Collection


Products Used
Double Dots 100pc. -3D Foam Circles, DDOTS
Designer Dries Clear Adhesive, 159723
Metal Tip for Adhesive Bottles, 352854
Redland Elements, 26redland
Deluxe Flower Shaping Kit, HCST1-401
Delicate Border Basics Die, HCD1-7118
Beary Fun Retreat Die, HCD1-7151
Happy Time Treehouse Die, HCD1-7152
Sunflower Accents Die, HCD1-7153
Beary Fun Retreat Paper Collection, HCDP1-282
Beary Fun Retreat Cling Stamp Set, HCPC-3797
Happy Time Treehouse Cling Stamp Set, HCPC-3798
Sunflower Accents Cling Stamp Set, HCPC-3799
Eyelet Oval & Basics Large Die, HCD1-7157

Other Products: Watercolor paper, White cardstock, archival ink- Buttercup, Bright Tangelo, Orange Blossom,plum, Glossy Accent, Zig Clean Color Real Brush

Watch this video here for tips on how to create scenes from the Beary Retreat Collection.

Learn how to shape the Classic Sunflowers here

Instructions: Construct 5” x 7” Layered Oval Card (Kraft), and cut the Beary Paper Collection for each side of the pages of the album. With a pencil mark the oval that needs to be cut on each paper and choose the coordinating die from the Eyelet Oval and Basics Large Dies and die cut. Sponge edges with coordinating inks and adhere to pages.

Create flowers using the Classic Sunflower Stamp Set using orange blossom archival ink on white cardstock and diecut with coordinating dies. Color them with buttercup and use bright Tangelo on the edges and shape them with Deluxe Flower shaping kit. Use three layers for creating flowers and at the centre use black beads with Redland Elements earth textures.

Stamp Beary Fun Retreat Set on the watercolor paper and die cut them with the coordinating die. Color them with Zig Clean Color Real Brush. Stamp Sunflower Accents on the white cardstock with black and plum archival ink and cut them with the coordinating die and color them with Distress Ink-Peeled Paint, Spiced Marmalade, and sprinkle Crystal Clear with Glossy Accents.

Cute mailbox stamp is from Happy Time Treehouse set and die cut with coordinating die. Color it with Zig Real Brush.

Die cut one Delicate Border Basics from white cardstock and paste it on the left side of the card.

Arrange all the elements as shown on the picture and add the sentiment fussy cut from the paper collection. Now embellish all the pages as you desire.

I hope you all will love this creations and collection.
Do Visit Heartfelt Creations Store to Buy this Lovely Collection.

Have A Nice Day!!!

Home Decor-Garden Notes Alstroemeria Fan

Hi Friends

Today, on this lovely day, I present to you an ode to all my dear friends – cherishing the moments that we have spent together. Although being as a home-décor challenge theme, this lovely piece of paper-art using Alstroemeria flowers is symbolic to friendship and trials and tribulations associated with friends. As friendship often has ups and downs, so do the leaves of this lovely flower. But as the bright hues and the twisted leaves of this flower indicate, even during such daunting moments in a relationship, one shouldn’t lose hope and pursue the trails of life with a smile. The Alstromeria flower also encourages us to follow our dreams and achieve our aspirations, both in a material and spiritual sense. I am dedicating this lovely creation to all my past and present friends with a hope to be blessed with their support and company through the challenges of life.
Here's the pix


I hope you all will love my creation.
Would love to hear your words.

Products Used:
GN Dahlia(used Leaves die)

For our Challenge today Elizabeth Craft Designs are giving away a $20 Gift Card to use on the Elizabeth Craft Designs website to 3 winners. 
To enter, simply leave a comment on the Elizabeth Craft Designs blog post and answer this question: What Home Decor items do you like to create to use in your home?

We will select 3 lucky winners in a random drawing.

The winners will be announced on Friday, September 15th, on the Elizabeth Craft Designs blog.

All the Best!!!
Have A Nice Day!!!

Wednesday 6 September 2017

Winter Borders and Florals

Hello Dear Friends,
It's Heartfelt Creations Day today. Here's another inspiration from Winter's Eve collection.
Here's the pix,


Products Used
Designer Dries Clear Adhesive, 159723
Metal Tip for Adhesive Bottles, 352854
Decorative Oval Die, HCD1-762
Large Sparkling Poinsettia Cling Stamp Set, HCPC-3679
Large Sparkling Poinsettia Die, HCD1-765
Scor-Pal Measuring & Scoring Board, 173842
Eyelet Oval Die, HCD1-776
Delicate Border Basics Die, HCD1-7118
Rajni Chawla's Crystal Clear, PGM15015
Decorative Medallion Die, HCD1-7144
Winter's Eve Paper Collection, HCDP1-281
Window Box Fillers Die, HCD1-7149
Window Box Fillers Cling Stamp Set, HCPC-3795

Other Products: White cardstock, archival-rose madder, plum, diamond dust, beads-golden.

For tips on how to create a layered card and shadow boxes  check out this video here

Instructions: Take a cardstock size 6”x12” and fold it to half(side  fold).Final size is 6”x6”. Now take a pattern paper from Winter’s Eve Collection which is smaller 1/8th and distress the edges and paste. Paste two Delicate Border Basics die at the top and bottom with foam tape.
Add Two tags, fussy cut them from the paper collection attaching the decorative medallion die on the sides as seen on the pix.
Now add another layer of Eyelet Oval Die at the centre with foam tape to give the dimension.

Stamp the Large Sparkling Poinsettia cling stamp set flower with Rose Madder ink onto white cardstock and die cut with the coordinating die. Color with archival inks, Rose Madder and Plum. Shape using the Deluxe Flower Shaping Kit and create one poinsettia flower. Sprinkle with diamond dust, and at the centre add golden beads. Now stamp the Window Box Filler with Archival Ink Plum. Diecut with coordinating die. Color with Archival Inks Buttercup and Plum, sprinkle with Crystal Clear Powder using Glossy Accent. After making all these elements, arrange as shown and adhere.
Now add a sentiment from the pattern paper and fussy cut it and paste it as shown.