Dear Friends,
Happy Black Friday....we hope your day is off to a great start and that you had a wonderful Thanksgiving Day with your family & friends. We are so EXCITED to debut Heartfelt Creations Black Friday New Product Releases along with the once a year Black Friday Savings! More more details, check
https://www.heartfeltcreations.us/blog/black-friday-savings-and-elegant-inspiration
Here's my inspiration for today
Products Used:
Designer Dries Clear Adhesive, 159723
Rajni Chawla's Vellum Flowerite - 10 Sheets, 18002
ColorBox Pigment Ink Pad - Frost White, CB80
Double Dots 100pc. -3D Foam Circles, DDOTS
Opaque Embossing Powder - White, EP100
6" x 6" Shutter Fold Card - White, HCCB1-480
Eyelet Circle & Basics Small Die, HCD1-7154
Wild Aster Die, HCD1-7257
Rounded Window Frame Die, HCD1-7271
Rounded Lattice Window Die, HCD1-7274
Stack and Store Daubers-Pack of 30, HCDA2-450
Wild Aster Paper Collection, HCDP1-2106
Wild Aster Cling Stamp Set, HCPC-3887
Deluxe Flower Shaping Kit, HCST1-401
Rajni Chawla's Crystal Clear, PGM15015
Ranger Archival Ink Pad - Majestic Violet, RACP494
Heat It Craft Tool, RAHT
Other Products: White cardstock, Big Shot Machine, Distress Oxides-Wilted Violet, Peeled Paint.
For more tips on creating with the Window Scene cards & dies, watch the tutorial at
https://youtu.be/LnM95GR92ao.
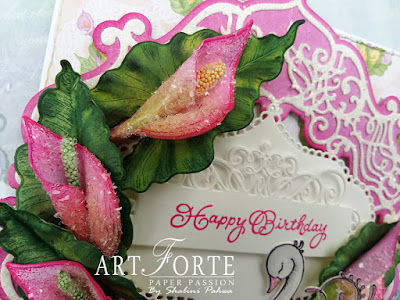
Instructions: Click here to view more photos of this project. Premade Card base used - 6” x 6” Shutter Fold Card-White. Take pattern paper from the collection and cut it according to the shape of the card by tracing it on the pattern paper with pencil. Cut it with scissor, tear the edges and adhere it on the card base both inside and outside.
Cut two dies from Rounded Lattice Window Die on white cardstock add crystal clear glitter and adhere it using Designer Dries Clear Adhesive. Cut one die from Rounded Window Frame Die on white cardstock, distress the edges using archival ink-majestic violet. Add crystal clear glitter. Cut one small basic circle die from Eyelet Circle & Basics Small Die Set, Add Sentiment from Special Birthday Sentiments Cling Stamp Set using archival ink-majestic violet.
Stamp flowers and leaves from wild aster cling stamp set on Rajni Chawla’s Vellum Flowerite using ColorBox Pigment Ink Pad-Frost White, sprinkle white embossing powder, heat and then cut them with coordinating die. Color them with Distress Oxides - Wilted Violet, Peeled Paint (for leaves), shape them using Deluxe Flower Shaping Kit. After layering the flowers add prills at the centre. Arrange flowers and leaves as shown.
Inside of the card, add cutting die from Rounded Window Frame Die Set on white cardstock, adhere it using Designer Dries Clear Adhesive and add sentiment from Special Birthday Sentiments Cling Stamp Set using archival ink-majestic violet.
Another inspiration for today...
Christmas Doily
Products Used:
Designer Dries Clear Adhesive, 159723
Double Dots 100pc. -3D Foam Circles, DDOTS
6" x 6" Swing Fold Card - White, HCCB1-482
Eyelet Circle & Basics Small Die, HCD1-7154
Ornamental Tags Die, HCD1-7203
Christmas Poinsettia & Holly Die, HCD1-7249
Rounded Window Frame Die, HCD1-7271
Stack and Store Daubers-Pack of 30, HCDA2-450
Candlelit Christmas Paper Collection, HCDP1-2104
3D Christmas Poinsettia Shaping Mold, HCFB1-478
Luxe Gold Cardstock, HCGP1-488
Christmas Poinsettia & Holly Cling Stamp Set, HCPC-3881
Assorted Pearl Stamens-Medium, HCS1-459-2
Indian Gold Nuvo Mousse, NU802
Rajni Chawla's Crystal Clear, PGM15015
Ranger Archival Ink Pad - Carnation Red, RACP399
Ranger Archival Ink Pad - Leaf Green, RACP436
Other Products: White cardstock, Big Shot Machine.
For more tips on creating with the Window Scene cards & dies, watch the tutorial at
https://youtu.be/LnM95GR92ao.
For more tips on creating with the Candlelit Christmas collection, watch the tutorial at
https://youtu.be/PJeFD_d3AiM.
Instructions: Click here to view more photos of this project. Premade Card base used - 6” x 6” Swing Fold Card-White. Take pattern paper from the collection and cut it according to the shape of the card by tracing it on the pattern paper with pencil and cut it with scissor, tear the edges and adhere on the card base both inside and outside.
For the front round: Cut base round on Luxe Gold Cardstock and adhere it using Designer Dries Clear Adhesive.
Cut one die from Rounded Window Frame Die Set on white cardstock and adhere it with foam tape. Cut another die from the same die set on Luxe Gold Cardstock and adhere it with foam tape. Cut another die on white cardstock and adhere it with foam tape. And the last die again on white cardstock and cut it with small circle die from Eyelet Circle & Basics Small Die, add crystal clear glitter. Add sentiment from the collection using die from Ornamental Tags Die Set. Adhere it using foam tape, as shown.
Stamp some poinsettia flowers and leaves on white cardstock using carnation red and leaf green inks, cut them with coordinating die and color them with same ink and add Indian Gold Nuvo Mouse. Shape them using 3D Christmas Poinsettia Shaping Mold. Add stamens at the centre and add crystal clear glitter on it. Arrange all these flowers and leaves as shown.


